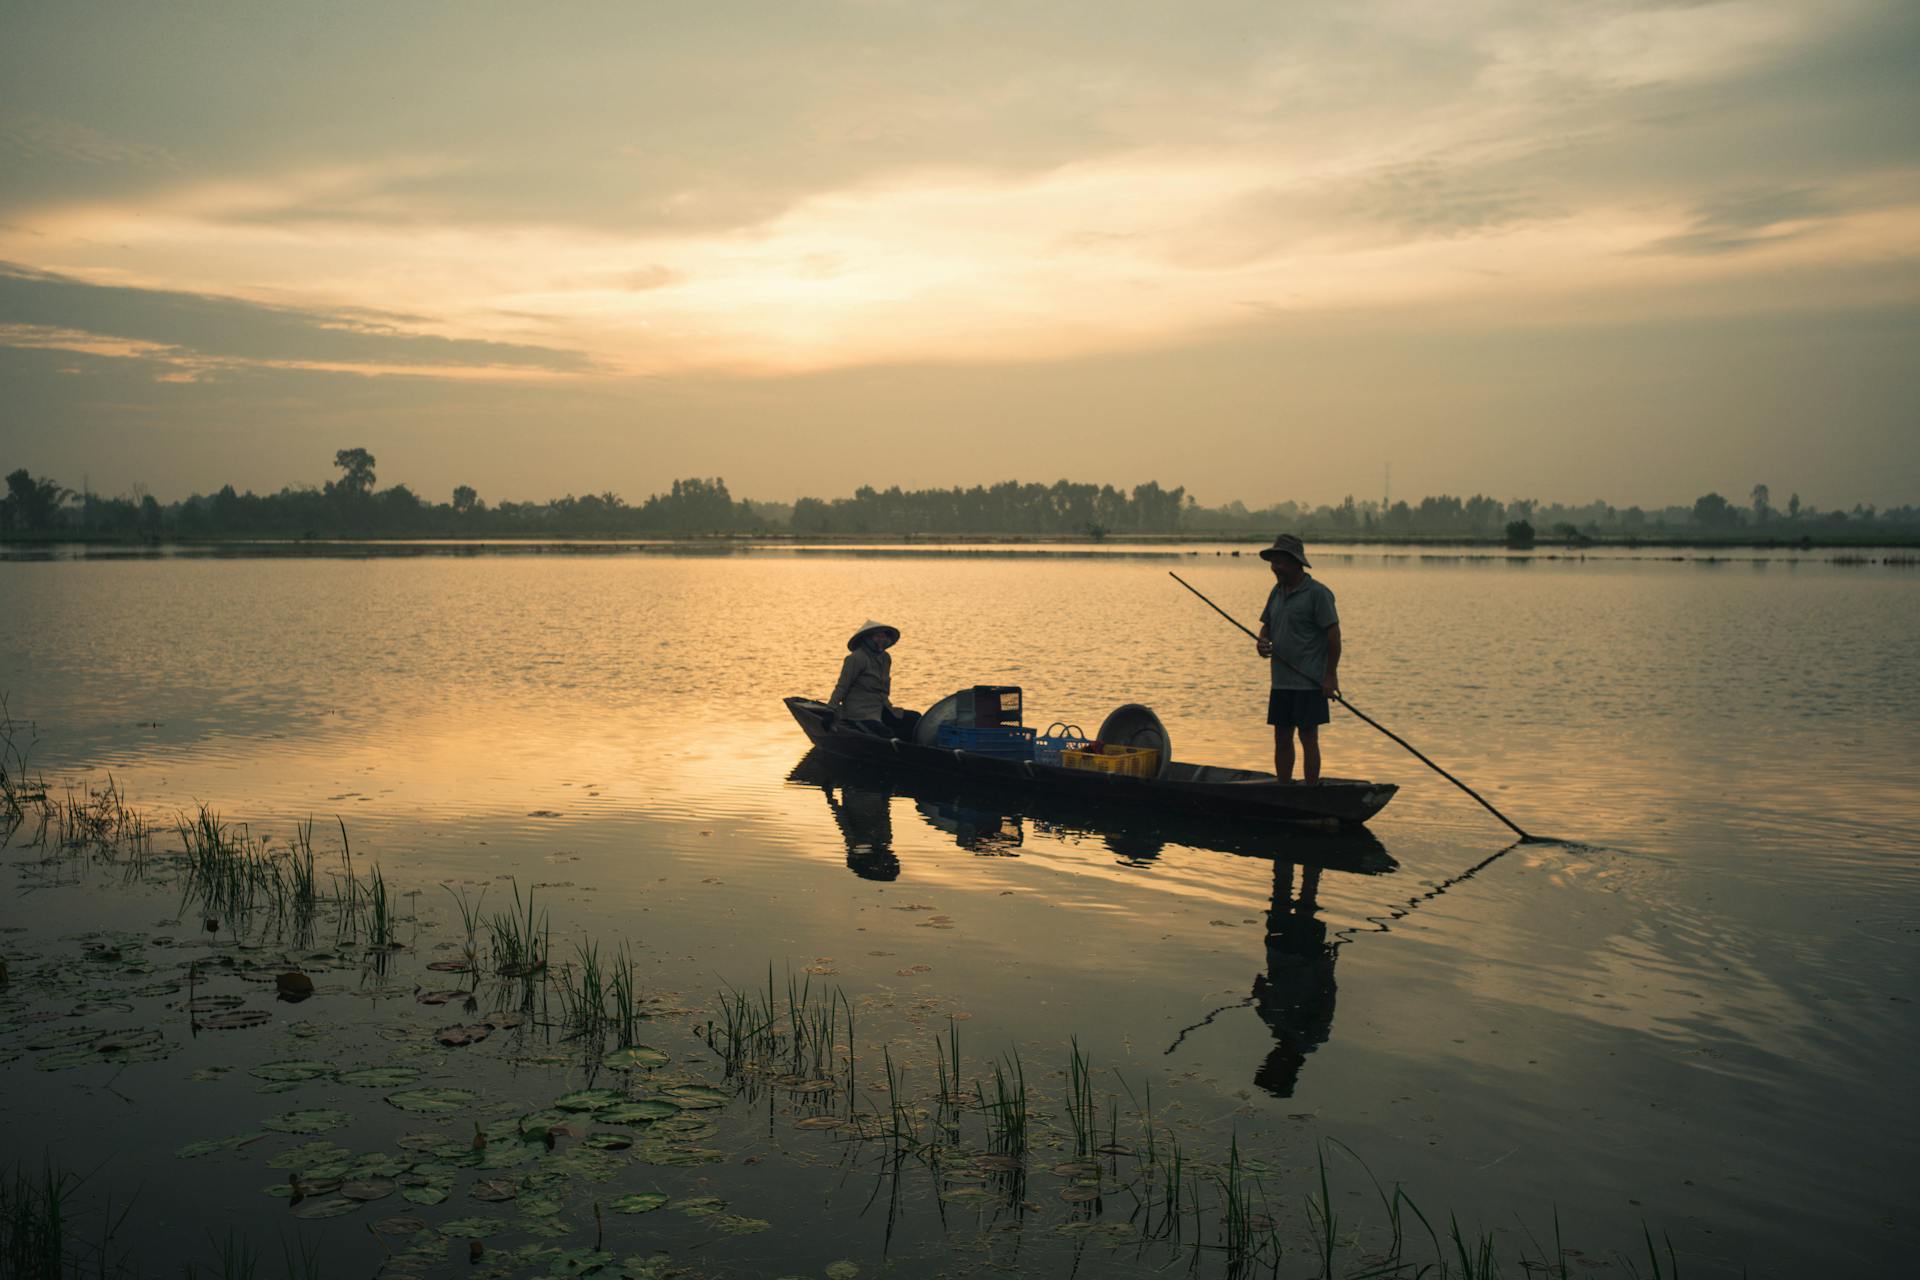
Live bait does the attracting for you. A nightcrawler wriggles on its own. A minnow swims. That natural movement, scent, and appearance draws strikes from fish that might ignore an artificial lure — especially when fish are sluggish or just not actively feeding. For a new angler, that means more bites, faster learning, and the confidence that comes from actually landing fish.
If you haven’t covered general fishing basics yet, our beginner fishing guide is a good starting point. This article walks you through choosing bait, hooking it without killing it, rigging up, reading bites, keeping bait alive, and staying within the rules.
Why Live Bait Is the Best Starting Point for New Anglers
What Is Live Bait and How Does It Differ from Lures
Live bait means any organism that’s alive when you put it on your hook — minnows (small fish), nightcrawlers (large earthworms), crayfish, leeches, mealworms, and others. The term “natural bait” sometimes includes dead or cut bait, but this article focuses on bait that stays alive until a fish takes it.
Artificial lures — spinnerbaits, plastic worms, topwater frogs — imitate prey but require you to create movement through retrieves and rod action. With live bait, the bait moves itself. You present it, and the fish does the rest.
Why Beginners Catch More Fish with Live Bait
There are a few practical reasons live bait tends to be more forgiving:
- Natural presentation. A hooked nightcrawler wriggles. A minnow swims. You don’t need to master a retrieve pattern before your bait looks convincing.
- Scent and vibration. Live bait releases scent trails and creates water vibrations that attract bottom feeders and predators alike — advantages artificial lures can’t match.
- Broader species appeal. The same nightcrawler rig can catch bass, catfish, trout, panfish, and more on the same trip.
- Lower skill threshold. Learn basic rigging, cast your line, and let the bait work. That faster reward loop — more bites, more landed fish — is what keeps beginners coming back.
That doesn’t mean artificial lures aren’t worth learning. Once you’re comfortable with the basics, soft plastic imitation baits and other lures are a natural next step. Many anglers use both, switching to lures when fish are actively chasing and to live bait when fish are sluggish or cautious.
Choosing the Right Live Bait for Your Target Species
Picking the right bait comes down to matching what your target fish eats naturally. Here are the five most common live baits for freshwater fishing and what they do best.
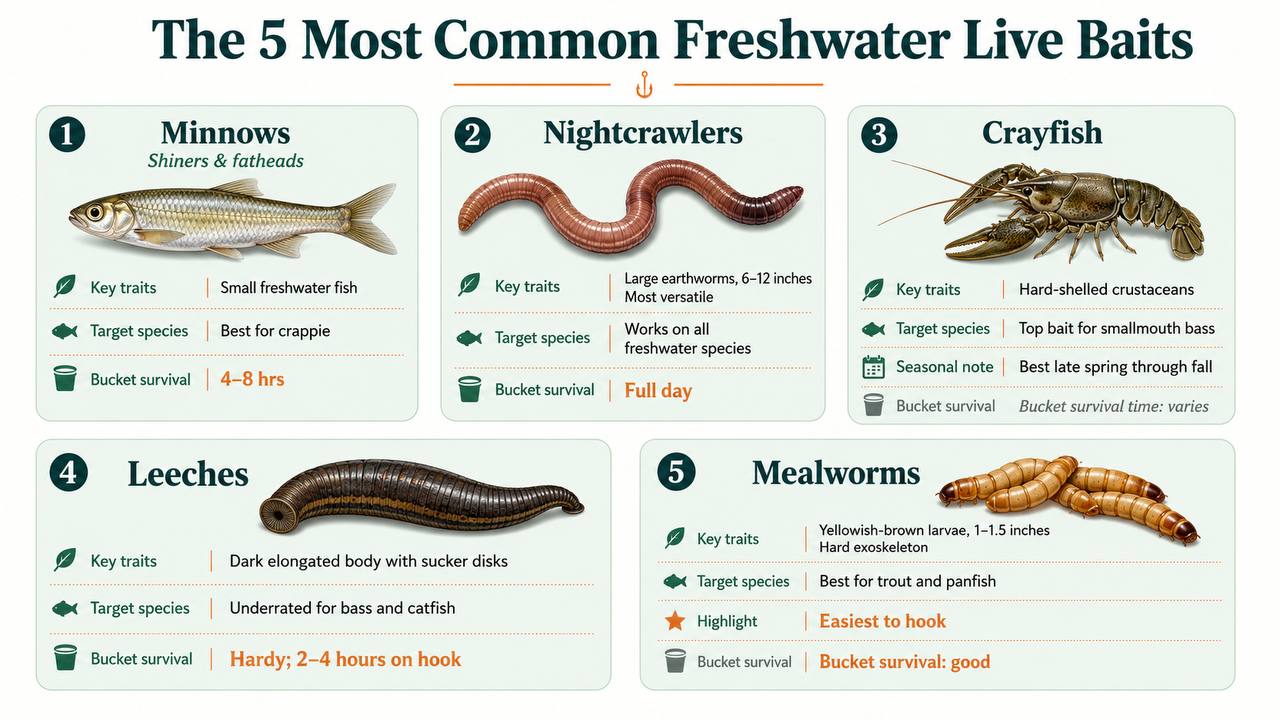
Minnows (Shiners and Fathead Minnows)
Minnows are small freshwater fish that come in several types. The two most commonly available at bait shops are golden shiners (slender, silvery) and fathead minnows (stockier, more golden-bronze). Fatheads are notably hardier and tend to survive longer in a bait bucket — a practical advantage for beginners.
Minnows are widely considered the premier live bait for crappie, and they also work well for bass, walleye, trout, and larger catfish. Matching minnow size to your target fish matters:
- Small minnows (1.5–2.5 inches): panfish like bluegill and crappie
- Medium minnows (3–5 inches): bass and walleye
- Large minnows (5+ inches): catfish and other big predators
These are general guidelines — adjust based on the size of fish in the water you’re targeting.
Nightcrawlers and Red Wigglers
Nightcrawlers are large earthworms, typically 6–12 inches long with a reddish-brown segmented body. They’re widely regarded as one of the most versatile live baits for freshwater fishing. Nearly all common freshwater gamefish — bass, catfish, trout, crappie, panfish, walleye, and perch — will eat a nightcrawler. They work whole for larger species and in segments for panfish and trout, and they release a strong scent trail that draws fish from a distance.
Red wigglers are a smaller, more portable alternative. They have a reddish body with light banding and work best for panfish and trout, especially when fishing light tackle or from the bank.
Crayfish
Crayfish are crustaceans with a hard shell, two large claws, and a segmented tail. They’re a major food source for smallmouth bass in many waterways and also attract largemouth bass, walleye, and panfish. They work best near rocky structure and creek beds, and are most effective during warmer months (late spring through early fall). Live crayfish produce better results than dead ones because their natural movement — including claw-waving — triggers strikes.
Leeches
Leeches are often underrated but highly effective for bass, catfish, walleye, and trout. They’re dark, elongated, with a larger sucker disk at the tail end and a narrower head. They’re notably hardy and can stay alive on the hook for extended periods — commonly 2–4 hours depending on conditions. They work in both clear and murky water and can sometimes be collected locally from muddy shorelines (where permitted).
Mealworms
Mealworms are yellowish-brown larvae, approximately 1–1.5 inches long, with a hard exoskeleton that keeps them on the hook well. They’re best for trout, panfish, and small bass. Particularly effective in cooler water and more compact than nightcrawlers, making them easy to transport.
How to Hook Live Bait Without Killing It
Hooking live bait properly is the difference between a bait that swims and wriggles for an hour, and a dead lump on the bottom. Use the right hook and pierce the bait where it minimizes damage.
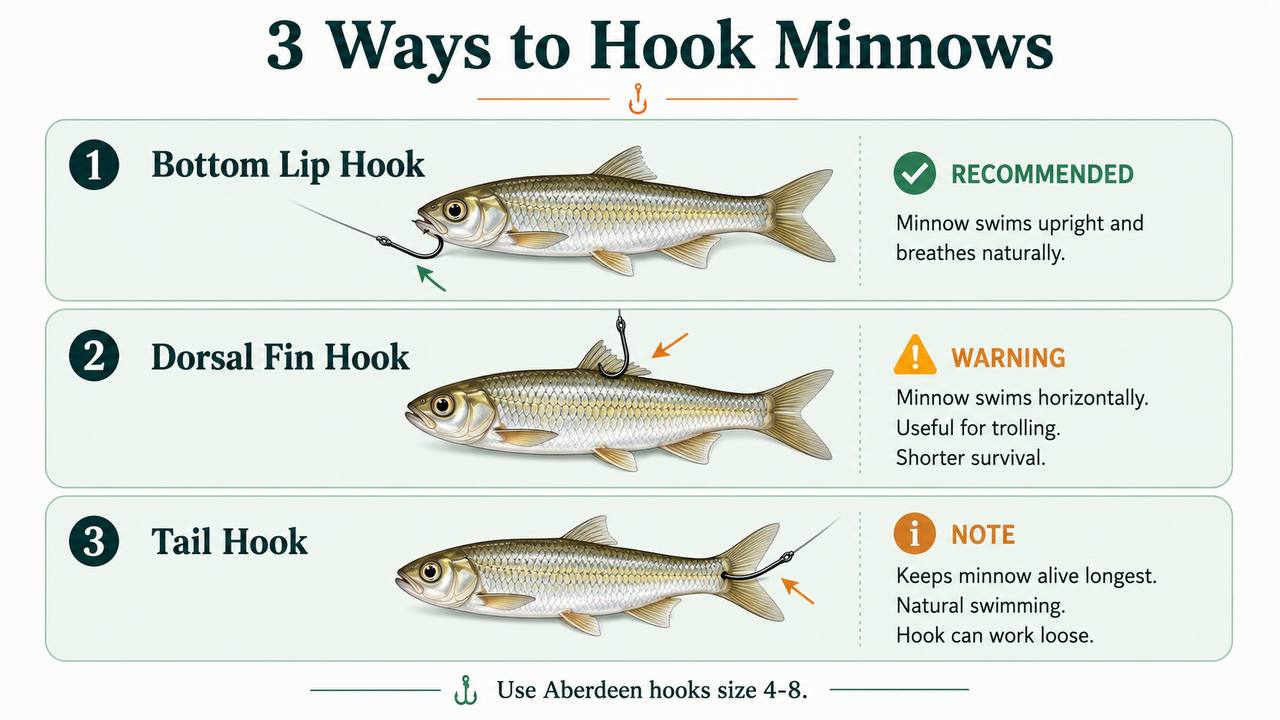
Hooking a Minnow (Lip, Back, and Tail Methods)
Through the lips (bottom lip): The most common method, especially for bobber fishing and casting. The hook enters the bottom lip, letting the minnow swim upright. Best starting method for beginners.
Through the dorsal fin (back): Insert the hook just behind the dorsal fin. Makes the minnow swim horizontally — useful when trolling or fishing deeper. A back-hooked minnow typically doesn’t survive as long.
Through the tail: Keeps the minnow alive longest and produces natural swimming action. Works well for stationary bobber presentations. The downside: the hook can work loose if the minnow wriggles enough.
Some anglers hook minnows through the eyeball socket, but this is debated — some say it produces good action, others argue it kills the bait too quickly. Beginners should stick with lip or tail methods.
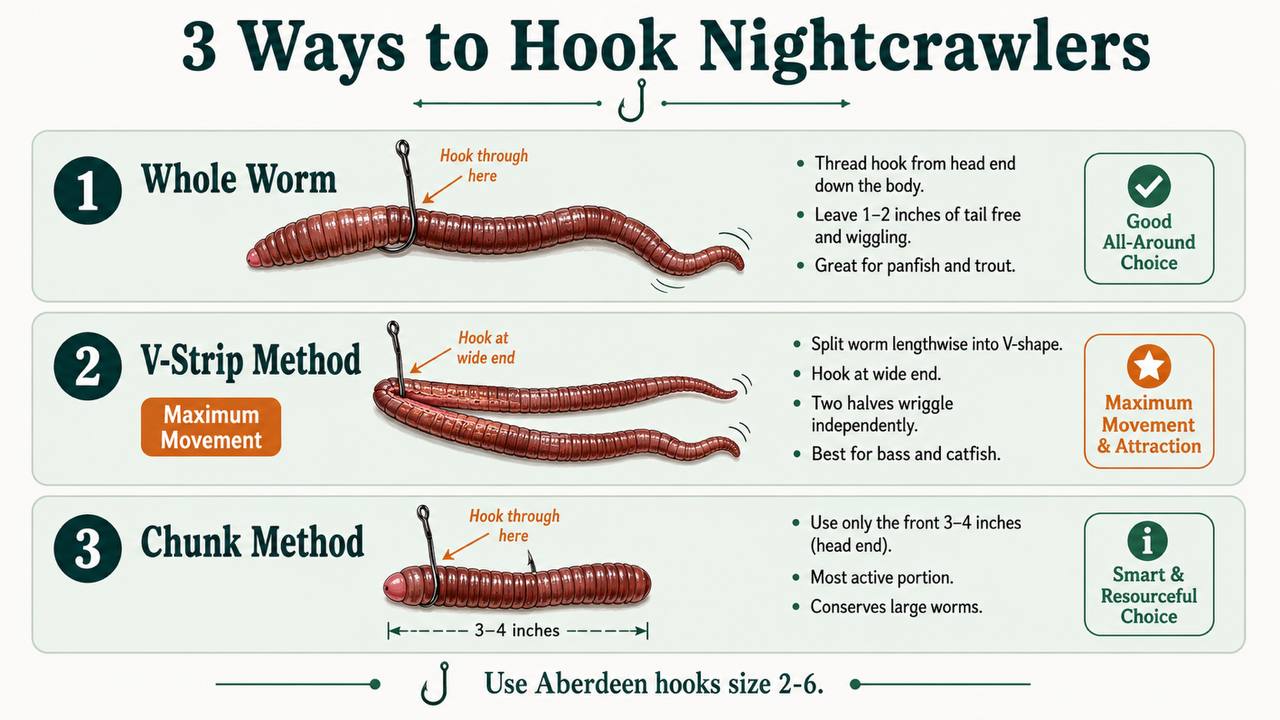
Hooking a Nightcrawler (Whole, V-Strip, and Chunk Methods)
Whole worm on a split-shot rig: Thread the worm head to tail, leaving 1–2 inches of tail free at the end. The wriggling tail is a powerful attractant. Great for panfish, trout, and general fishing.
The V-strip method: Split the worm lengthwise down its back into a V-shape. Hook through the skin at the wide end so the two halves wriggle independently. Maximum movement and scent — especially good for bass and catfish.
Chunk method: Use only the front 3–4 inches (the head end). Most active portion, stays on the hook well. Practical for conserving a large nightcrawler across multiple casts.
No single “right” way — different methods suit different species and conditions.
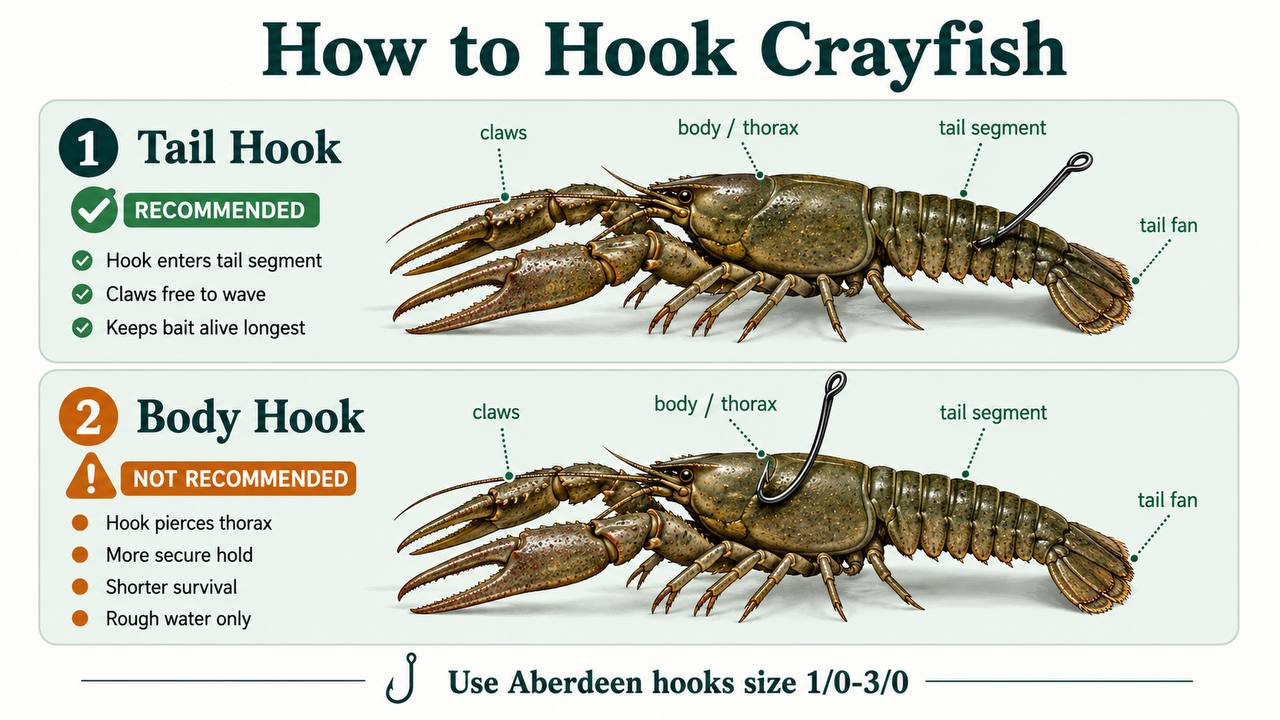
Hooking a Crayfish (Tail Method)
The standard approach is through the tail. The hook enters the tail segment and exits the underside near the tail — keeps the crayfish alive longest with claws free to wave.
Hooking through the body (thorax) is more secure but causes more damage, shortening survival. Some anglers use this in rough water or heavy current.
A note on claw removal: Some anglers remove claws before hooking to prevent handling injury. It’s a debated practice — some say it doesn’t affect bait viability, others argue it stresses the bait. Ultimately a personal choice.
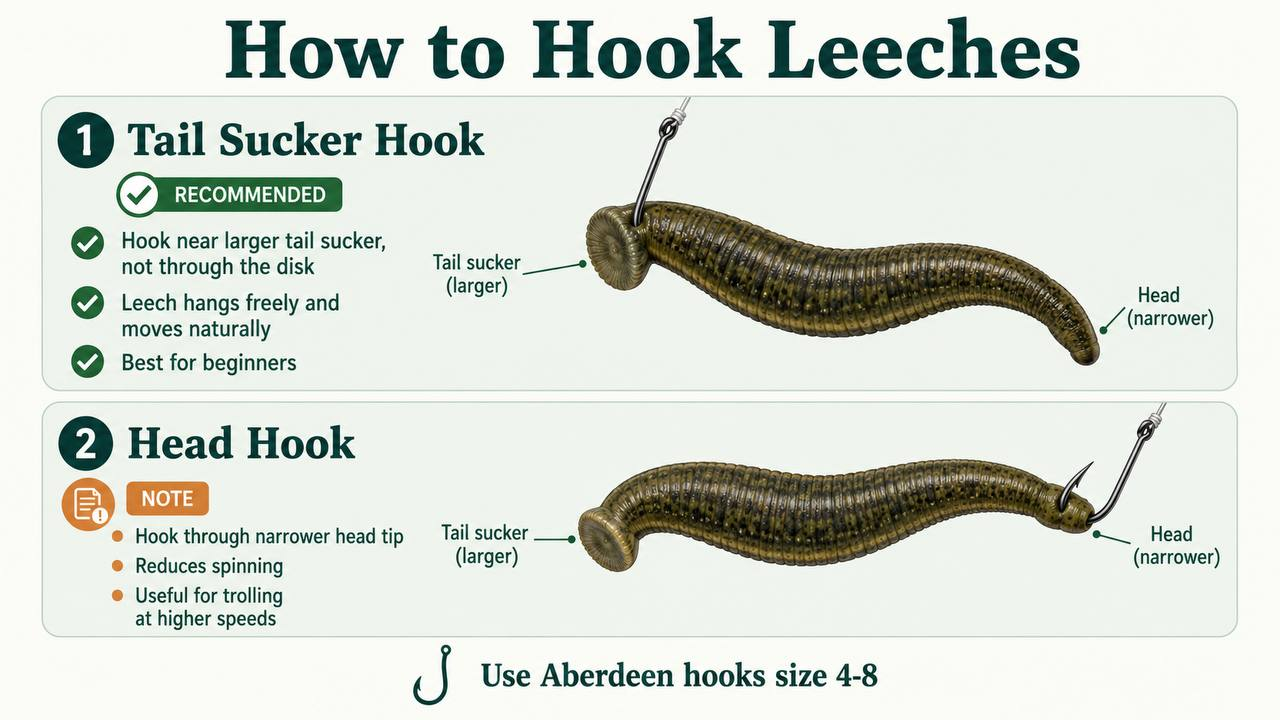
Hooking a Leech (Tail Sucker Method)
Hook a leech near the larger tail sucker disk, but not through the disk itself (it could latch onto your finger). The leech hangs freely and moves naturally. Best method for beginners.
Hooking through the head (narrower tip) is sometimes preferred when trolling at higher speeds, since it reduces the chance of the leech spinning in the water. For bobber fishing, the tail-sucker method works fine.
Hooking a Mealworm
Mealworms have a hard exoskeleton that makes them easy to hook — they hold well and don’t slip off.
Thread through the body: Insert the hook through a middle segment. Simple and reliable.
Head hooking: Hook through the head, leaving the tail free. Creates more visible movement under a bobber — useful for finicky panfish.
Multiple mealworms: Thread 2–3 small mealworms for a “cluster.” Works well for trout or panfish when a single mealworm isn’t getting bites.

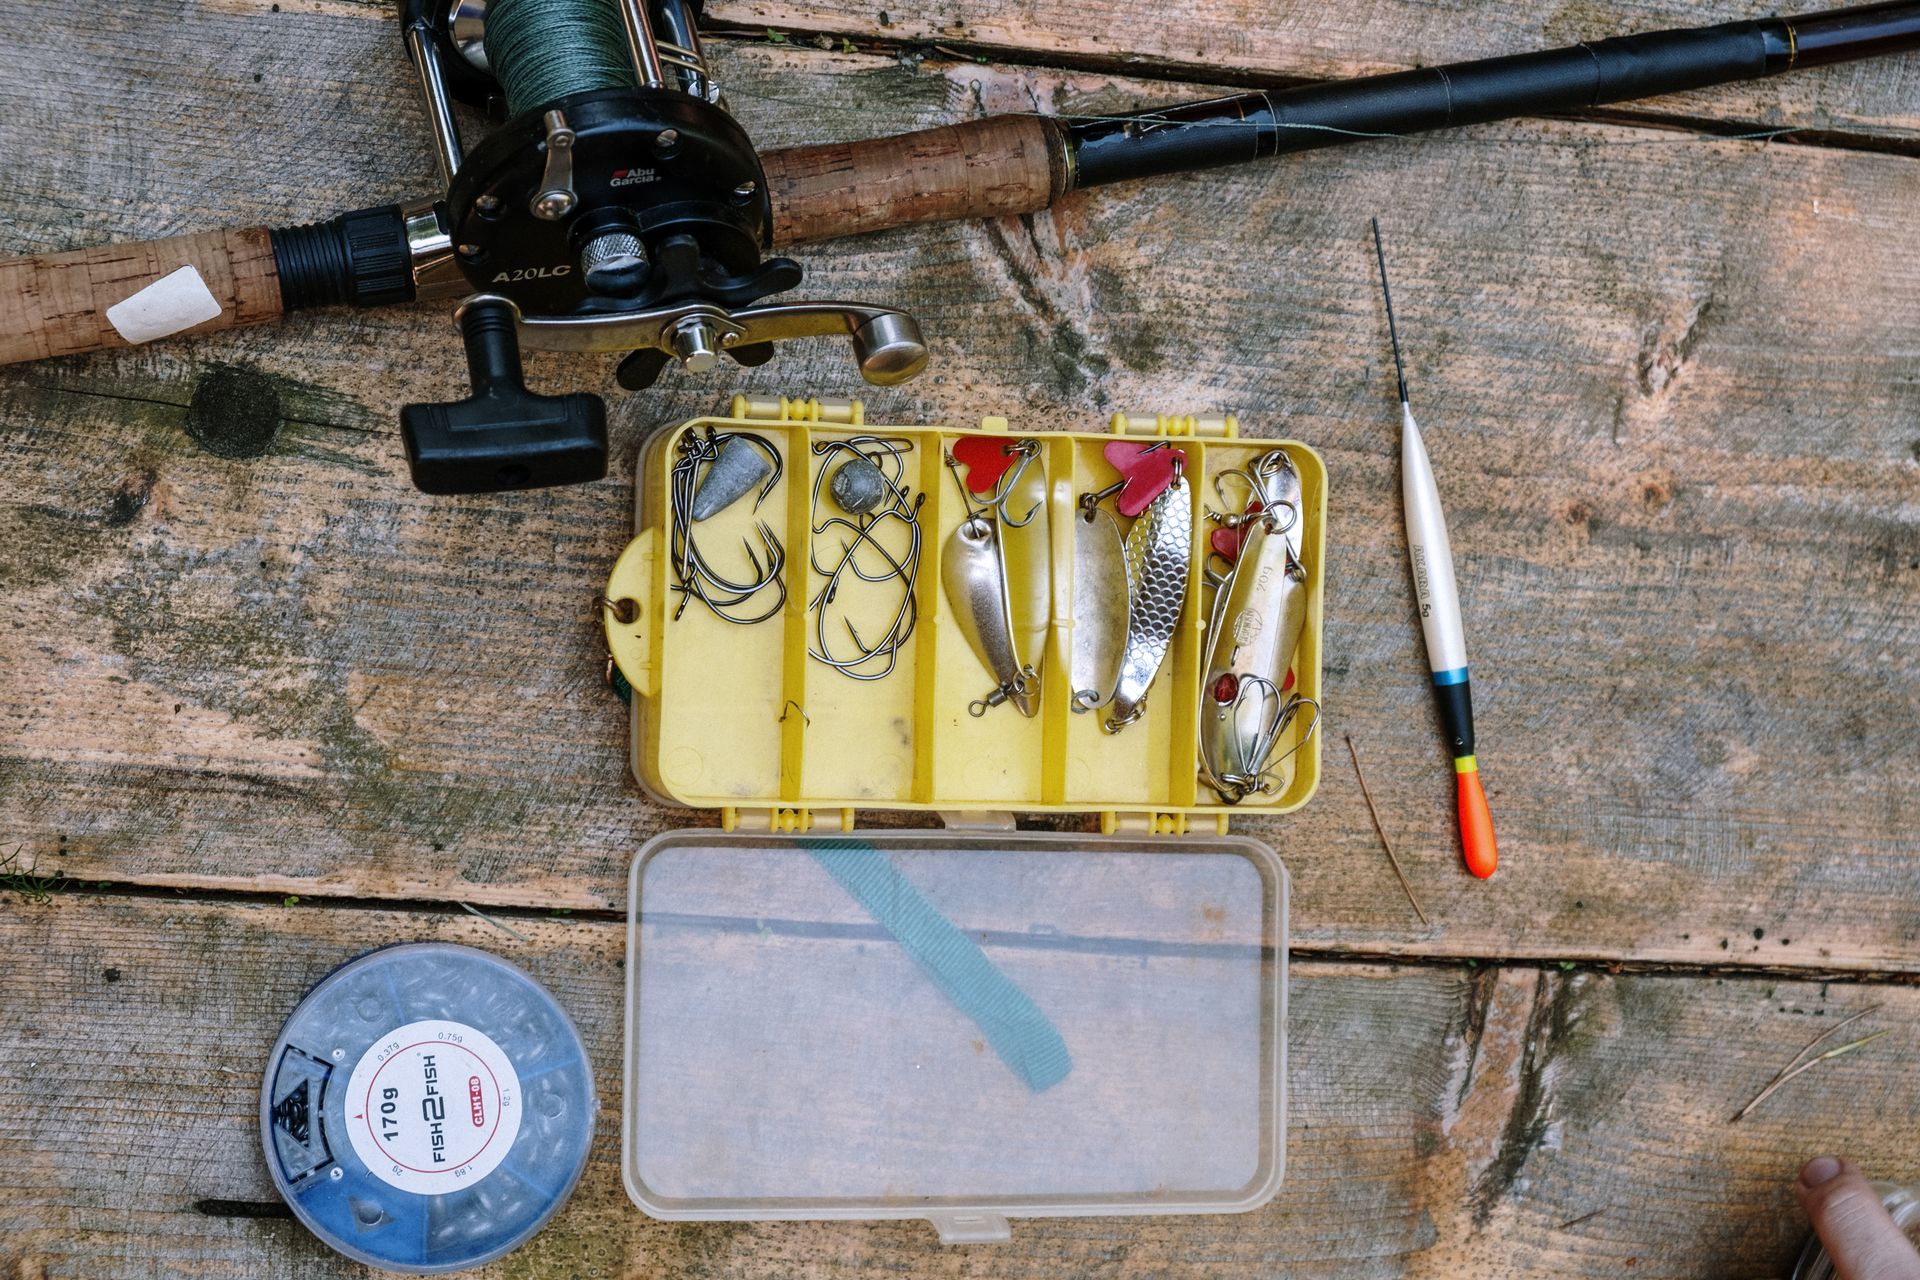
Choosing the Right Hook: Size, Type, and Aberdeen Hooks
Hook selection matters more than most beginners realize. The wrong hook can kill your bait before you even cast.
Aberdeen hooks are the standard choice for live bait. Light wire causes less tissue damage, no barb or a very fine barb minimizes damage on insertion, and a long shank gives you more to grip when threading. Together, these features keep bait alive and swimming longer. They’re also preferred for catch-and-release fisheries because they cause less injury to fish.
Recommended hook sizes by bait type:
| Bait Type | Aberdeen Hook Size |
|---|---|
| Minnows | 4–8 |
| Nightcrawlers | 2–6 |
| Mealworms | 8–12 |
| Leeches | 4–8 |
| Crayfish | 1/0–3/0 |
Other hook types worth knowing: Octopus hooks are similar to Aberdeens but with a slight bend in the shank, and bait holder hooks have small barbs along the shank that grip worms firmly — useful in rough water or current.
Handle hooks carefully, and use needle-nose pliers for removal from fish. It’s safer and easier than using your bare hands.
Three Essential Live Bait Rigs for Beginners
You don’t need a complicated setup to catch fish with live bait. Three rigs cover most freshwater situations.
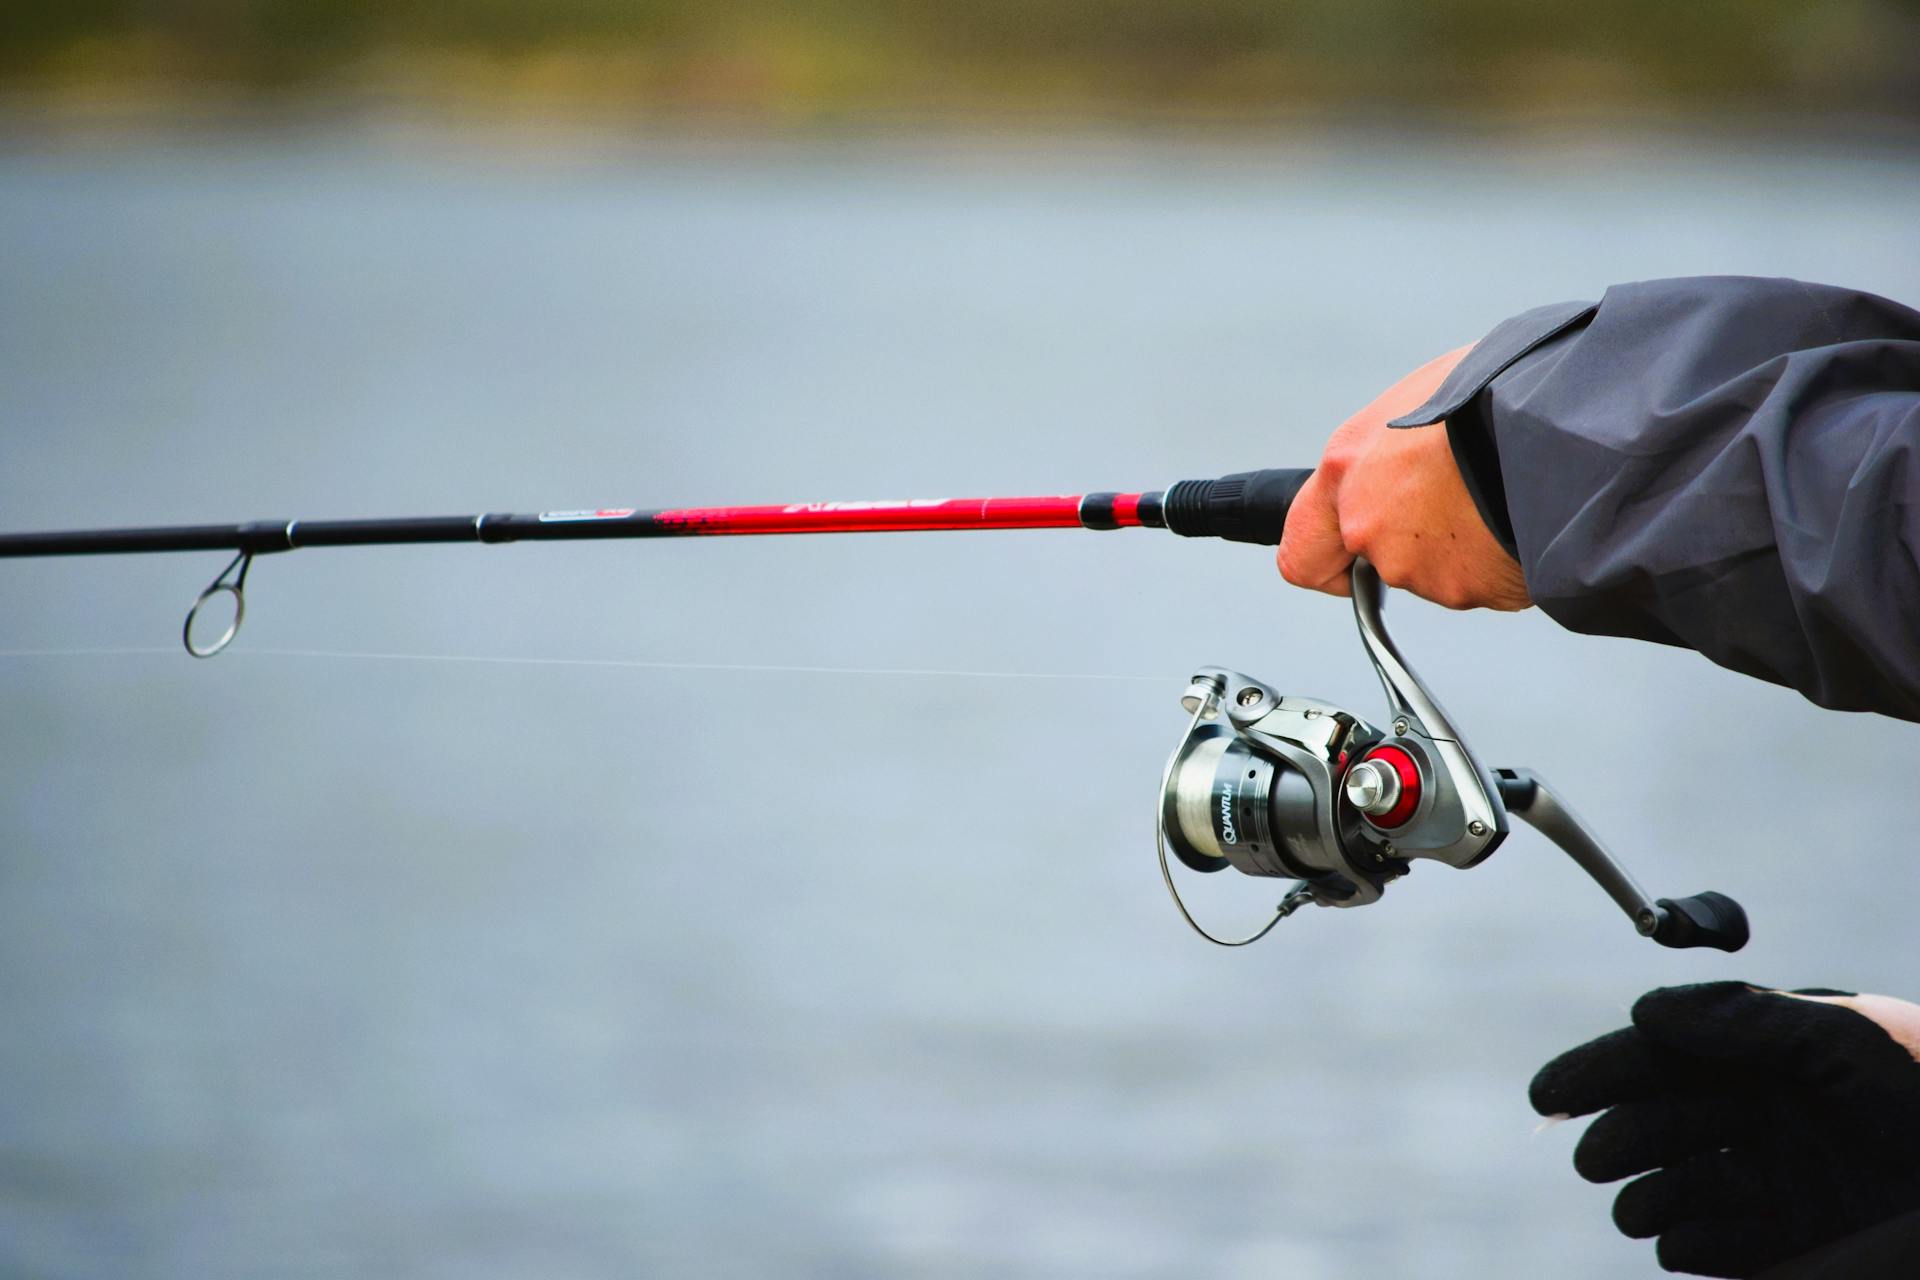
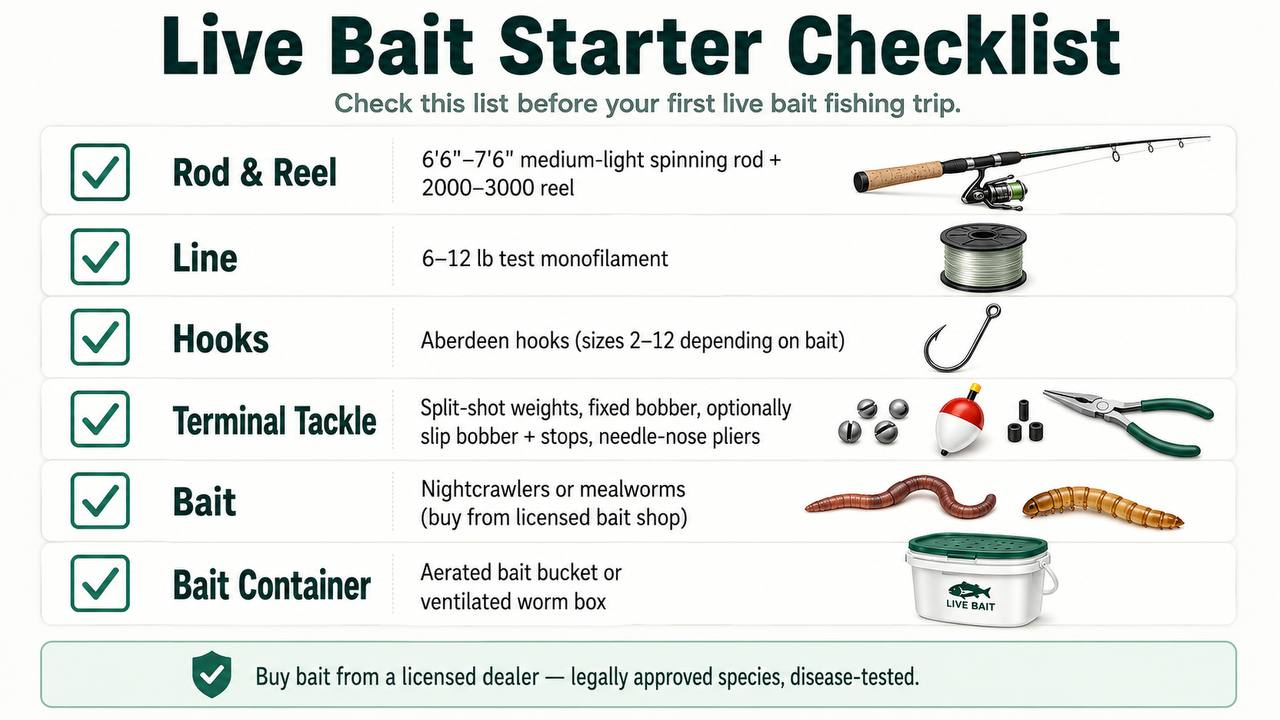
A quick note on gear before we get into the rigs: a 6’6″–7’6″ medium-light spinning rod paired with a 2000–3000 size reel handles the light lines and subtle bites of live bait fishing while still having enough backbone for moderate-sized fish. For line, 6–12 lb test monofilament works well for most beginner applications — it has enough stretch to absorb sudden runs and is visible in the water, which helps with bite detection. If you want to dig into line choices, our guide on choosing fishing line covers the tradeoffs.
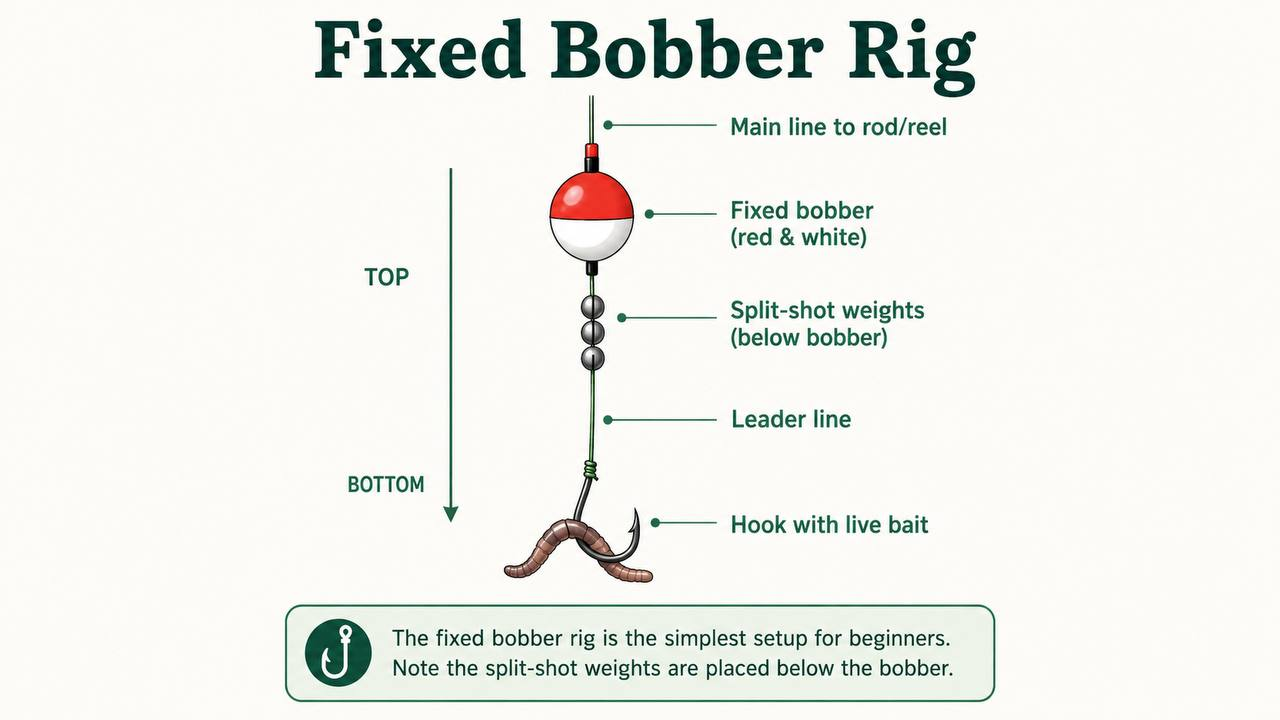
Fixed Bobber Rig (Simplest for Beginners)
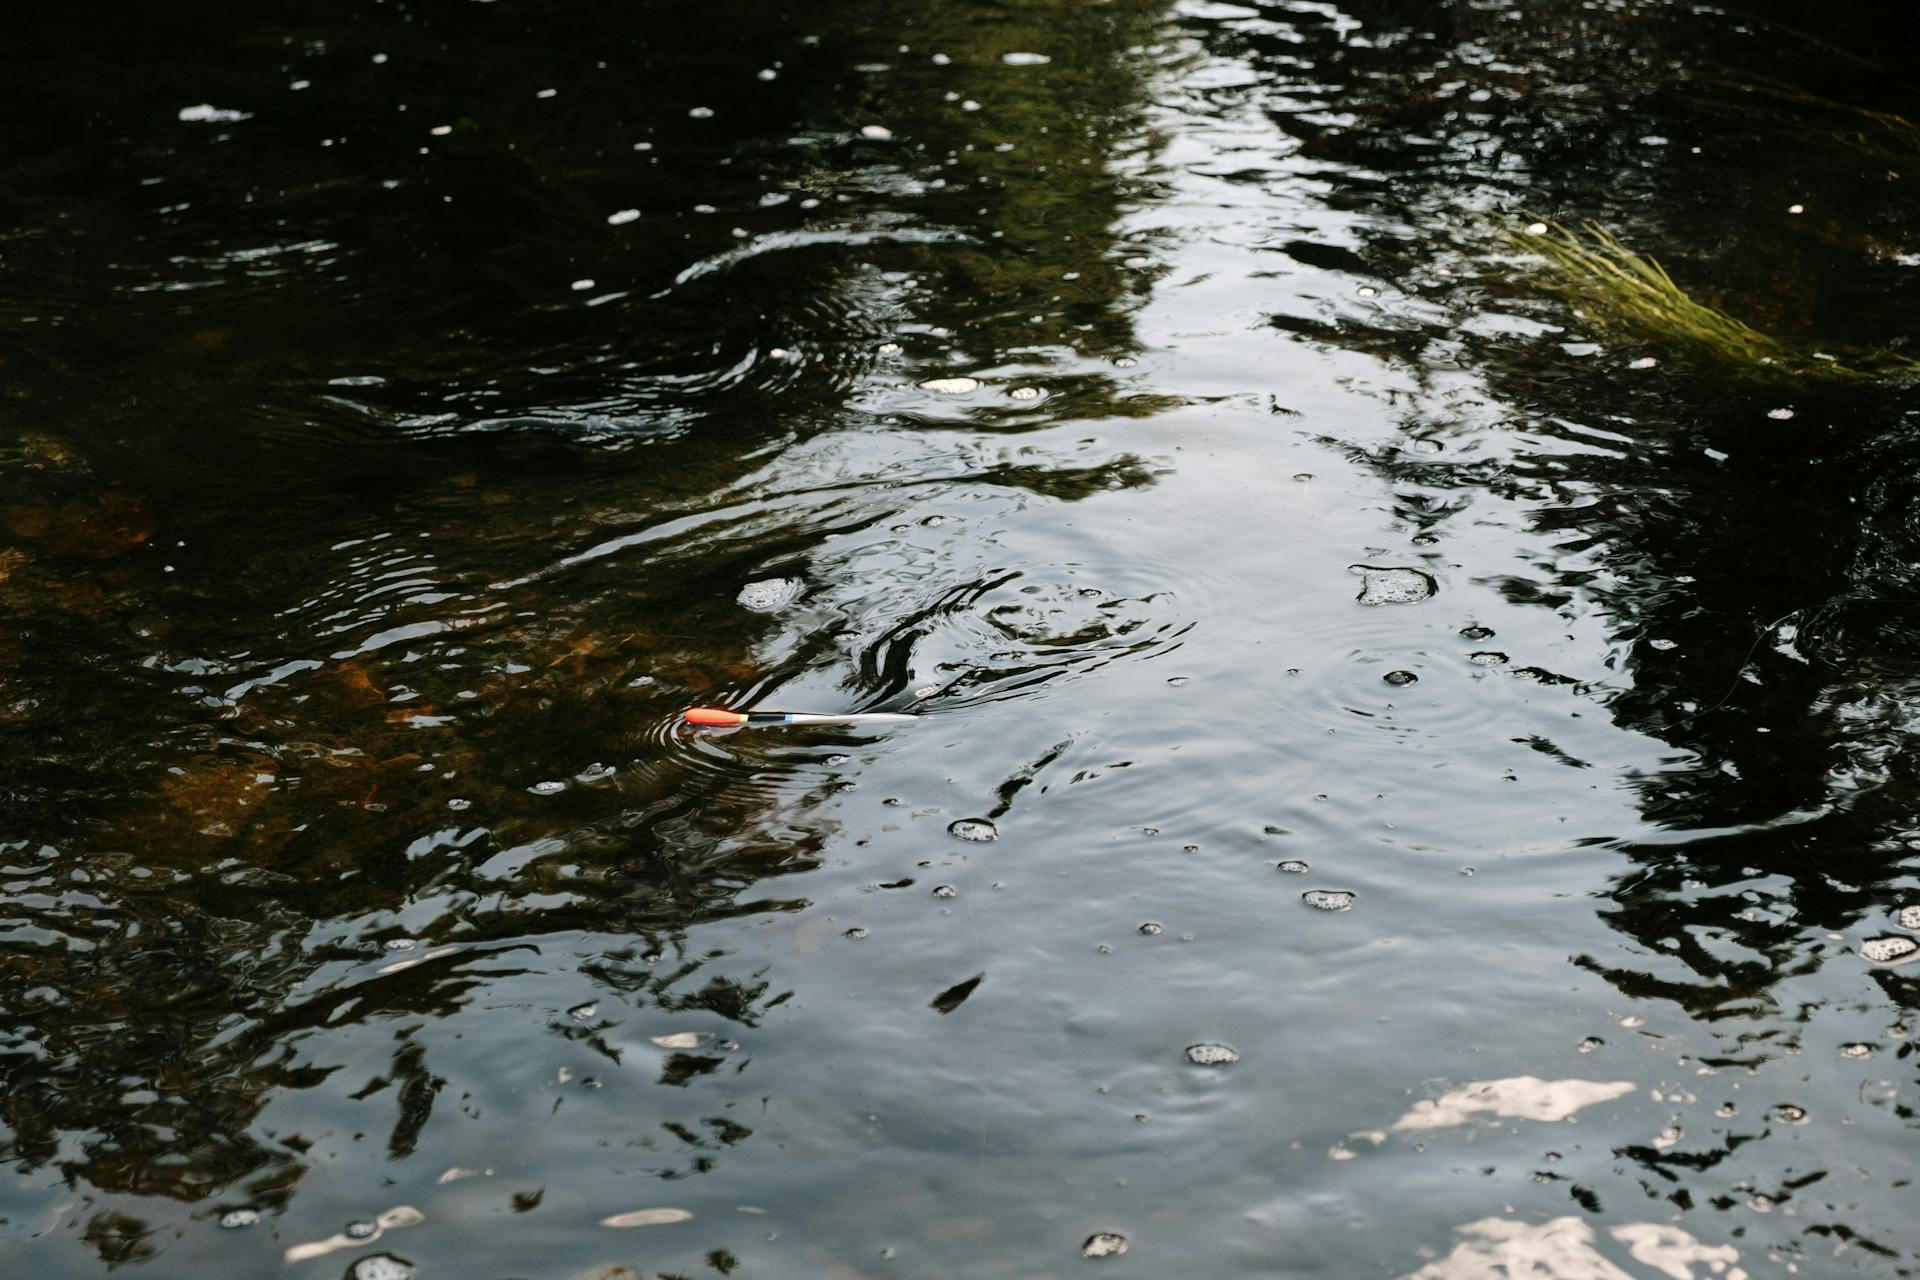
The fixed bobber rig is the easiest setup to learn. A bobber is a small floating device attached above your hook that indicates bite activity by moving, tilting, or sinking.
Components (from the hook upward):
- Hook with live bait
- Leader line (fluorocarbon or monofilament)
- Split-shot weight(s) — small, round lead weights pinched onto the line for depth control
- Fixed bobber (the classic red-and-white type)
- Main line to your reel
How to set it up: Thread your main line through the bobber and secure it with a clip or by tying it. Pinch split-shot weights onto the line below the bobber, closer to the hook. The bobber’s position on the line determines your fishing depth — slide it to match where fish are holding.
When to use it: Shallow water (1–5 feet), panfish, trout, and any situation where you want a clear visual bite indicator.
Limitation: Casting distance is limited because the bobber catches wind. For depths beyond about 7 feet, a slip bobber is a better choice.
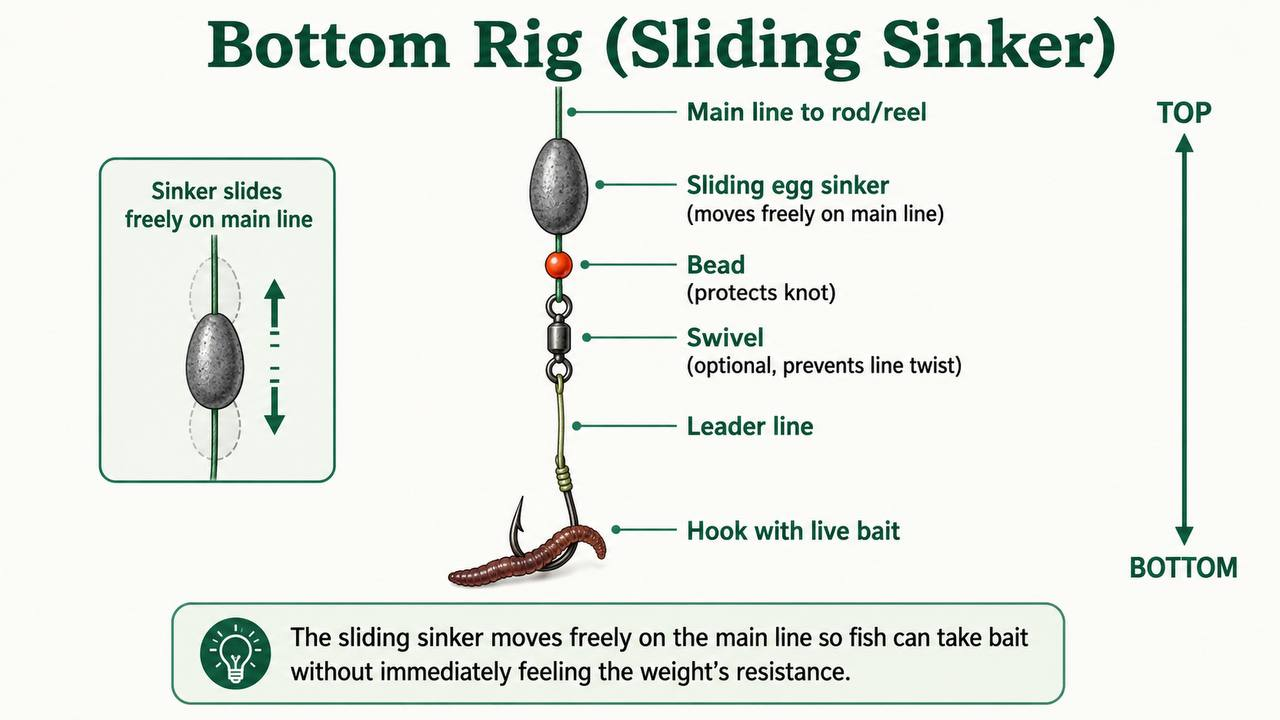
Bottom Rig with Sliding Sinker
Bottom rigging (sometimes called a “Fishdinder rig” in some regions) places your bait on or just above the bottom. The fish finds the bait rather than you actively presenting it.
Components (from the hook upward):
- Hook with live bait
- Leader (12–24 inches of fluorocarbon or monofilament)
- Optional swivel (helps prevent line twist)
- Bead (protects the knot and masks noise)
- Sliding egg sinker (an egg-shaped weight that slides freely on the main line)
- Main line to your reel
How to set it up: Tie your leader to the main line (with or without a swivel). Thread a bead onto the main line above the leader knot. Thread the sliding egg sinker onto the main line above the bead. The sinker should move freely — it should not be locked in position.
Why the sliding sinker matters: Because the sinker slides freely, a fish can take the bait and swim without immediately feeling the weight’s resistance. This increases hook-up rates, especially with cautious species.
When to use it: Catfish, bass holding near the bottom, walleye, and any species feeding near structure.
Weight selection: 1/4–1/2 oz for typical lake fishing; 1/2–1 oz or heavier for river current or deep water.
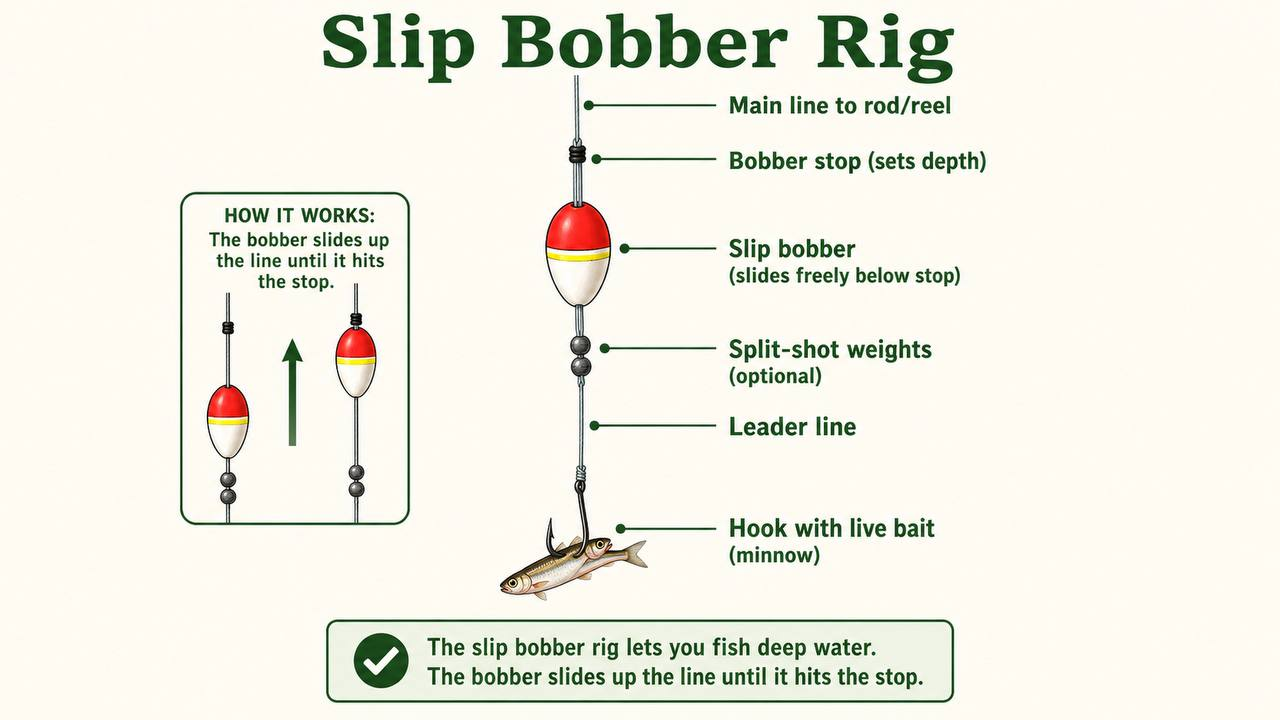
Slip Bobber Rig for Deep Water
A slip bobber (or slip float) slides freely on the fishing line until it hits a depth marker called a “bobber stop.” This lets you fish much deeper water — 10–30+ feet — while maintaining good casting distance, since the bobber slides through the rod eyelet during the cast.
Components (from the hook upward):
- Hook with live bait
- Leader line
- Split-shot weights (optional — often minimal or none needed)
- Slip bobber (has a hollow center that the line passes through)
- Bobber stop (a small rubber bead positioned on the line above the bobber, toward the reel)
- Main line to your reel
How to set it up: Place a bobber stop on your main line and slide it to your desired depth. Thread the slip bobber onto the line below the stop. When you cast, the bobber slides through the rod guides freely. Once in the water, it floats up the line until it hits the stop, locking into position at your set depth.
When to use it: Deep-water crappie fishing, bass near deep structure, walleye, and any situation where fish are holding well below the surface.
Key advantage over fixed bobber: Adjust depth on the fly by simply sliding the bobber stop — no re-tying required.
How to Tell When a Fish Is Biting Live Bait
Understanding what triggers a fish to bite helps, but knowing how to detect a bite is what matters on the water. Live bait bites are typically subtler than lure strikes, because fish often nibble, taste, and reposition live bait before committing.
Reading Bobber Bites
Here are the key indicators to watch for:
- Bobber tilting or bobbing up and down: The fish is investigating. Don’t set the hook yet.
- Bobber slowly sinking: The fish has the bait and is tasting. Hold firm and wait.
- Bobber darts sideways: The fish has taken the bait and is swimming with it. Set the hook.
- Bobber completely disappears underwater: The fish has committed fully. Set the hook now.
- Bobber twitching or vibrating: Nibbling. Wait for a more definitive movement.
Reading Rod-Tip and Line Bites (Freelining)
Freelining means fishing without a bobber — you feel for bites through line tension and rod-tip movement:
- Sudden tug or jerk on the line
- Line becoming suddenly heavy or “thick” — often described as a “wet sponge feel,” especially when bottom fishing for walleye
- Rod tip bending or vibrating
- Line swimming sideways when you try to move it
- Line moving with the current but stopping suddenly — a fish has stopped the drift
For more on hook-setting technique, check out our guide on setting the hook.
Live Bait Bites vs. Lure Strikes
The biggest difference is patience. With a lure, a strike is usually aggressive and immediate. With live bait, a fish may investigate for several seconds, let go, re-take it, then finally commit. Setting the hook too early is one of the most common mistakes beginners make with live bait.
How Long to Wait Before Setting the Hook
As a general starting point, wait 2–3 seconds after you see a definitive take (bobber going completely under, line going taut and holding) before setting the hook. But this isn’t a universal rule — catfish often swallow bait slowly and may need more time, while crappie strikes can be nearly instant. Species and conditions matter. The principle is to wait for a confident, committed take rather than reacting to every bobber movement.
When you do set the hook, use a smooth, firm upward sweep of the rod — not a violent jerk, which can tear the hook free or break light line.
A quick note on distinguishing real bites from debris: weeds, logs, and underwater obstacles pull at a steady rate that matches the current. A fish bite is typically erratic, sharper, and may pause or reverse direction.
How to Keep Your Live Bait Alive on the Water
Dead or lethargic bait catches far fewer fish. Proper bait care matters.
Keeping Minnows Alive
Minnows are the most finicky live bait:
- Use an aerated bait bucket with a battery-powered aerator if you fish with minnows regularly.
- Keep the water clean, cool, and oxygenated. Change it if it gets cloudy.
- Don’t overcrowd. A good rule of thumb: approximately 12 minnows per gallon for standard-sized baitfish.
- Keep the bucket in the shade — direct sunlight heats the water and kills minnows quickly.
- Adding non-iodized salt (approximately 1 teaspoon per gallon) can help reduce stress. Pickling or canning salt or aquarium salt both work — the key is non-iodized.
- Acclimate minnows to the fishing water temperature before hooking them. A sudden temperature change can shock and kill bait.
Storing Nightcrawlers and Leeches
- Nightcrawlers: Store in damp (not wet) bedding — moist newspaper, damp soil, or commercial worm bedding. Keep them in a ventilated container in a cool, dark place. Worms breathe through their skin, so they need air. They can survive for several days with proper care. Never store them in direct sun or sealed containers.
- Leeches: Store in damp moss, soil, or a commercial leech keeper. They need moisture but not standing water. Can last days to weeks with proper care.
Mealworm and Crayfish Care
- Mealworms: Need dry conditions. Store in the original container with ventilation holes at room temperature. They can last several weeks.
- Crayfish: Store in a ventilated container with damp (not submerged) material. Remove any dead crayfish promptly.
One practical tip: carry about 50% more bait than you think you’ll need. Live bait dies, gets eaten, or falls off hooks.
When and Where Live Bait Fishing Works Best
Best Seasons for Live Bait Fishing
Spring and fall are typically the peak seasons in most temperate freshwater environments. During spring, fish feed heavily as they build energy for spawning, and water temperatures in the 45–60°F range are ideal. Crappie on minnows is a classic spring tactic. Fall brings another feeding surge — larger baits like whole nightcrawlers and medium minnows work well as fish target calorie-rich meals.
Timing can vary by geography. In southern climates, seasonal patterns shift compared to northern ones, so observing local conditions and reading the water to find fish helps.
Summer live bait fishing works best early morning and late evening. During midday heat, fish move deeper, and live bait fished deep with a slip bobber or bottom rig can still be productive. Winter live bait works but requires deeper presentations, slower techniques, and smaller bait (mealworms, small worm segments).
Best Times of Day
Dawn and dusk are consistently the most productive times year-round. Overcast days extend the productive window. Night fishing with live bait — particularly for catfish on nightcrawlers — is very effective.
Water Conditions That Favor Live Bait
- Stained or murky water: Live bait’s scent and vibration advantages are maximized when visibility is low.
- Clear water: Still works well, but fish may be more cautious — lighter line and fluorocarbon leaders help.
- Post-front clear-ups and slow periods: When fish hold near structure, live bait sitting quietly at the right depth is often the ticket.
- Water temperatures from roughly 40–80°F: In this broad range, live bait works across most of the continental US. Below 50°F favors smaller bait and slower presentations; 65–80°F supports larger, more active bait.
Live bait has limits, though. Fast, high-current river sections can sweep bait away or pin it against structure. When fish are actively chasing prey in clear, sunny water, a well-retrieved lure may outproduce live bait. And if you need to cover water quickly, live bait is inherently slower.
Common Beginner Mistakes with Live Bait
Here are the most frequent ones and how to avoid them:
- Setting the hook too early. The number-one live bait mistake. The bobber moves, you jerk, and the fish was only investigating. Wait for the definitive take — bobber going completely under, or line going taut and holding.
- Using a hook that is too large. A heavy hook on a small minnow causes massive damage and kills the bait instantly. Match hook size to bait size — see the chart above.
- Not adjusting depth. Fish hold at different depths depending on time of day, weather, water temperature, and season. Leaving your bobber at one depth all day means missing fish holding higher or lower. Adjust throughout the trip.
- Not replacing dead or lethargic bait. A dead minnow floating lifelessly or a worm that has stopped wriggling catches far fewer fish. If your bait stops moving, replace it.
- Fishing with too much line tension. Tight line transmits resistance that fish feel through the bait, causing them to drop it. Live bait presentations need a relaxed, slightly slack line — taut enough to feel a bite, but not so tight that the fish senses the weight.
- Using the wrong hook type. Heavy, thick-wire hooks on small bait cause too much damage. Light-wire hooks (Aberdeen style) are essential for keeping bait alive.
- Ignoring legal requirements. Transporting live baitfish across water bodies without checking regulations, using prohibited species, or releasing unused bait can result in fines and ecological harm. Check your local regulations before every trip.
- Fighting a big fish on a light bobber rig. Bobber rigs are designed for presentation, not for fighting large fish. A big bass on a light bobber setup can easily pull the bobber under and break the line. Consider switching to a bottom rig or heavier setup when targeting larger species.
Live Bait Legal Considerations Every Beginner Should Know
Live bait fishing comes with regulatory responsibilities that new anglers often overlook. Getting this wrong can result in fines, and more importantly, it can harm local ecosystems.
Always check your state’s current fishing regulations before using live bait. Regulations regarding baitfish species, transport between water bodies, and bait collection methods vary widely and change frequently.
Transporting Live Bait Between Water Bodies
Transporting live baitfish — and sometimes even the water from your bait bucket — between different bodies of water is frequently illegal. Many states prohibit this practice to prevent the spread of diseases and invasive species. The Lacey Act regulates the import of certain injurious wildlife species into the United States and enforces state wildlife laws, but the primary regulatory concern for most anglers is at the state level. Individual states maintain their own restrictions on transporting live baitfish, and these restrictions can differ even between water bodies within the same state.
Bait Species Restrictions
State-level bait restrictions vary widely. Some states permit only certain baitfish species, while others restrict bait collection to the same drainage area where the fish will be used. Most states prohibit using game fish (bass, trout, etc.) as live bait. Goldfish are illegal as bait in many states — even though they’re sometimes available, using them as bait can carry legal risk.
Some states require that unused live bait be destroyed rather than released, to prevent introducing non-native species into local waterways. When in doubt, purchase bait from a licensed bait dealer — they sell legally approved species, and the bait is typically disease-tested.
Cast Net Rules and Bait Collection
Many states regulate or prohibit cast nets for bait collection. Bank anglers tempted to collect their own bait should check local cast net regulations first. In some areas, hand-dip nets are the only legal method for collecting baitfish from the water you’re fishing.
Getting Started: Your First Live Bait Fishing Trip
You don’t need a lot of gear to start. Here’s a practical checklist:
Rod and reel: 6’6″–7’6″ medium-light spinning rod paired with a 2000–3000 size reel.
Line: 6–12 lb test monofilament. Six to 8 lb for panfish and trout, 10–12 lb for bass.
Hooks: Aberdeen hooks in the sizes listed above (4–8 for minnows, 2–6 for nightcrawlers, 8–12 for mealworms).
Terminal tackle: Split-shot weights in a range of sizes, a fixed bobber (red-and-white), optionally a slip bobber with bobber stops for deeper water. Needle-nose pliers for hook removal.
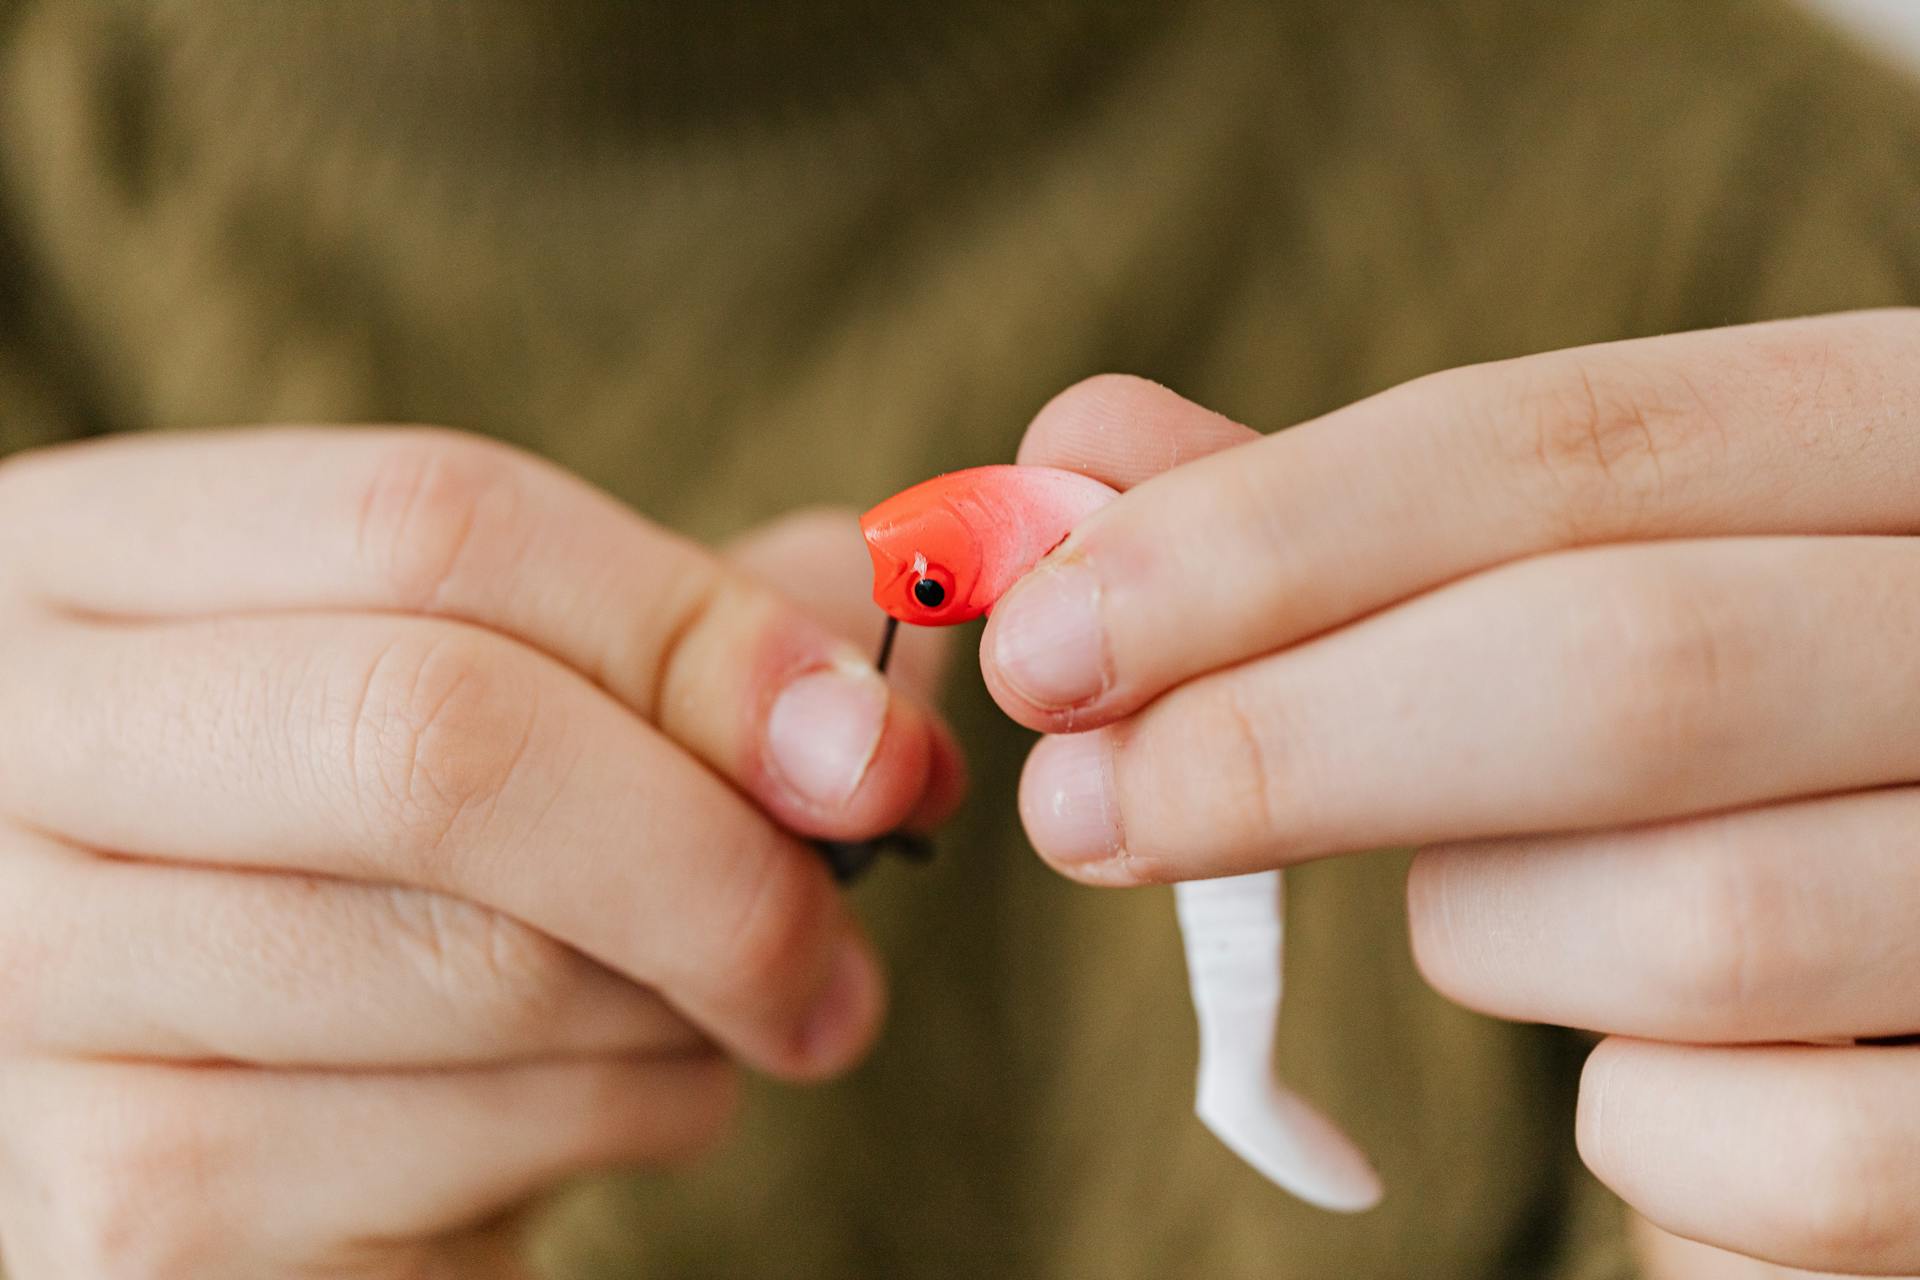
Bait: Start with nightcrawlers or mealworms if you’re completely new. They’re the easiest to hook, the most forgiving, and work on the widest variety of species. Buy from a licensed bait shop.
Bait bucket or keeper: An aerated bait bucket for minnows, or a ventilated worm box for nightcrawlers.
Head to a calm lake or slow-moving river, set up a simple fixed bobber rig, and give it a try. If you’re fishing from the shore, our bank fishing guide has additional tips for finding productive spots. For a broader starter checklist, check out building your first tackle box.
Live bait fishing rewards patience more than anything else. Cast your line, let the bait do its job, and wait for the fish to commit. That first bite with live bait is what gets a lot of people hooked on fishing for good — and with the right bait, the right rig, and a little patience, it won’t take long.
Frequently Asked Questions
What is the best live bait for beginner anglers?
Nightcrawlers and mealworms. Nightcrawlers work on nearly every freshwater species, and mealworms are easy to hook and transport. Both are more forgiving than minnows, which take more skill to hook without killing.
How do you hook a minnow so it stays alive?
Bottom-lip method: insert the hook through the bottom lip so the minnow swims upright and breathes naturally. Use a size 4–8 Aberdeen hook. Work quickly and keep the minnow in water until the hook is set. The tail-hooking method keeps the minnow alive even longer but suits stationary bobber presentations better.
What size hook should I use for live bait?
Match hook size to bait size. Aberdeen hooks: 4–8 for minnows, 2–6 for nightcrawlers, 8–12 for mealworms, 4–8 for leeches, 1/0–3/0 for crayfish. Too large kills the bait; too small lets it slip off.
How do I know if my bobber is showing a real bite?
Tilting or bobbing up and down means investigating — wait. Slowly sinking means the fish has the bait — hold firm. Darting sideways or going completely underwater means committed — set the hook. Debris pulls steadily with the current; a fish bite is sharper and may pause or reverse.
Can I use a slip bobber and a fixed bobber on the same trip?
Yes. Start with a fixed bobber in shallow water and switch to a slip bobber when fish move deeper. The adjustable bobber stop makes changing depth easy without re-tying.
How long does live bait stay alive in a bait bucket?
Minnows in an aerated, cool bucket typically last a full day (aim for about 12 per gallon). Nightcrawlers in damp bedding last several days. Leeches last days to weeks with proper moisture. Mealworms last weeks at room temperature in a ventilated container.
Do I need a fishing license to use live bait?
In most states, you need a valid fishing license regardless of bait type. Check with your state wildlife agency for specific rules.
What’s the difference between Aberdeen hooks and regular hooks?
Aberdeen hooks have light wire (less tissue damage), no barb or a very fine barb (easier insertion), and a long shank (more to grip). Regular hooks have heavier wire and stronger barbs that can kill live bait quickly.
Is live bait better than artificial lures for catching bass?
For beginners, yes — live bait doesn’t require retrieve technique. But when bass are actively chasing prey, a well-retrieved lure can outproduce live bait. Many experienced bass anglers use both.
Can I take live bait from one lake and use it at another?
This is frequently illegal. Many states prohibit transporting live baitfish between bodies of water to prevent disease spread and invasive species. Always check local regulations. When in doubt, buy bait at your destination.