What You Need to Know Before You Start
Fishing is not a talent you are born with. It is a skill you build through practice, patience, and a few basic pieces of gear. If you have never held a rod, that is fine — this guide walks you through everything from choosing your first setup to tying your first knot and making your first cast.
Fishing Is a Skill You Build Over Time
Every experienced angler started exactly where you are now. They made a few trips, learned from what worked and what did not, and gradually built confidence. You do not need years of experience to catch your first fish. You need the right gear for the job, a clear idea of what you are targeting, and a willingness to try.
The questions that usually come up first are: What rod do I buy? How do I tie a knot? Where do I even stand? We will go through each of those in order so you can walk to the water with something solid to work with.
What This Beginner Fishing Guide Covers
Here is the order we will go through:
- Choosing your first fishing rod and reel
- Picking the right fishing line
- Essential tackle to buy beyond the rod and reel
- How to tie an improved clinch knot
- How to cast with a spinning reel
- The five easiest fish to target as a beginner
- Where to go for your first fishing trip
- The best seasons and times to fish
- How to handle and release fish properly
- Whether you need a fishing license
- Common beginner mistakes to avoid
- A practical pre-trip checklist
A Quick Note on Realistic Expectations
It is completely normal to not catch any fish on your first trip. It is also normal to only catch one or two. Fishing involves variables you cannot control — water conditions, weather, fish behavior, and the simple fact that fish are living creatures, not machines that respond to every lure. The goal of your first few trips is to build comfort with your gear, learn how to tie a knot under pressure, and understand what a bite feels like. Fish will come as your skills develop.
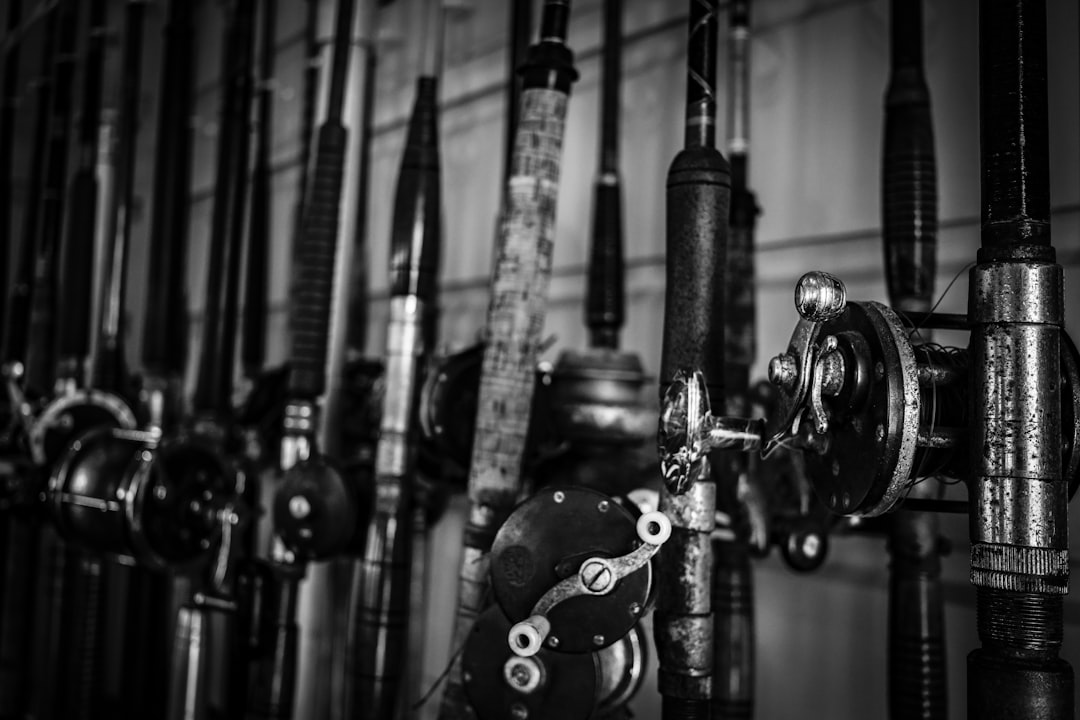
Choosing Your First Fishing Rod and Reel
Your rod and reel are the most important purchase you will make. Getting this right matters more than anything else, because a good beginner combo will serve you for years.
Rod Length, Power, and Action Explained
Three specs determine whether a rod is right for you: length, power, and action.
Rod length refers to the physical length of the rod blank measured from the reel seat to the tip. For general beginner fishing from the bank of a pond, lake, or slow-moving river, a rod between 6’6″ and 7′ offers the best combination of casting distance and control. Longer rods cast farther but are harder to maneuver in tight spaces. Shorter rods are easier to handle but sacrifice some distance.
Power describes the weight range the rod is designed to handle. “Medium” power rods are built for fish roughly in the 1-5 lb range, which covers most of the common species beginners target — bluegill, crappie, small bass, and channel catfish. A light-power rod is designed for smaller fish and finesse techniques. A heavy-power rod is built for large fish and heavy lures. Medium power hits the sweet spot because it handles a wide range of situations without favoring just one.
Action describes where along the rod blank the rod bends when pressure is applied. A “moderate” or “moderate-fast” action rod bends in the upper third to half of the blank. This matters for beginners because the bend zone gives you visible bite indication — you can actually see and feel the rod flex when a fish bites. A “fast” action rod bends only in the tip section, which is better for advanced techniques but less forgiving for beginners. A “slow” action rod bends throughout the entire blank, which is soft and pleasant but lacks the sensitivity you want.
Put together: a 6’6″ to 7′ medium-power, moderate-action spinning rod. That is the recommendation.
Spinning Reel Size and What Fits a Beginner Rod
Reels come in numbered sizes. For a 6’6″ to 7′ rod, a size 2000 to 2500 spinning reel is the ideal match. These reels hold approximately 100-125 yards of 8-10 lb monofilament, which is plenty of line for a beginner.
A spinning reel has a wire loop called a bail that opens and closes to let line out during a cast and retrieve during winding. The bail is one of the first things you will interact with on every cast, so understanding it early makes a big difference.
Spinning combos — pre-paired rods and reels sold together — are the standard recommendation for beginners. They eliminate the complexity of matching rod and reel specifications and are typically more cost-effective than buying components separately. A medium-power spinning combo covers the vast majority of beginner fishing situations.
Why Spinning Beats Baitcasting for Beginners
Baitcasting reels sit on top of the rod rather than below it. They offer more casting precision and power, but they have a steep learning curve. The biggest issue for beginners is backlash — when the line over-spools and creates a tangled mess that requires patience to sort out. Backlash is frustrating and can discourage a new angler before they even get their first bite.
Spinning reels do not produce backlash. They are mechanically simpler and have a much lower learning curve. The trade-off is slightly less casting precision and line capacity compared to a baitcasting setup, but for a beginner fishing from the bank of a pond or lake, this trade-off is well worth it. You can always move to a baitcasting setup later.
Budget Ranges for Your First Setup
How much should you expect to spend? Here is what different tiers typically look like:
- Budget spinning combos from big-box retailers or store brands typically start around $25-$50 for rod and reel together. Prices vary by retailer and model. These are functional and perfectly adequate for learning the basics.
- Value-tier spinning combos from well-known budget brands typically cost around $45-$80. These usually offer better materials and smoother reel performance than store brands while remaining affordable.
- Mid-range spinning combos from established brands generally cost around $80-$150. These provide noticeably better drag performance, corrosion resistance, and overall build quality.
You do not need to spend more than $100 to get a reliable first setup. A quality budget or value-tier spinning combo gives you everything you need to learn and enjoy your first few trips.
Picking the Right Fishing Line for Beginners
The type of fishing line you choose matters more than it might seem. Three main types are available to freshwater anglers: monofilament, braided, and fluorocarbon.
For beginners, 8 lb test monofilament is the recommended all-around choice. Here is why:
Monofilament (often called “mono”) is a single strand of nylon. It is slightly visible in the water, which actually helps beginners see when the line is moving and detect bites. It has natural stretch that acts as a shock absorber — when a fish makes a sudden run, the stretch can prevent the line from snapping or the hook from pulling free. It is more forgiving with knot tying because it is not as slippery as other line types. It is also the least expensive option.
Braided line is made of woven synthetic fibers. It is extremely strong for its diameter and has almost no stretch. These are advantages for experienced anglers but disadvantages for beginners: braided line is nearly invisible (making it harder to see bite indicators), its lack of stretch means more hook-up losses when a fish runs suddenly, and it is very slippery, making knots difficult for beginners to tie securely.
Fluorocarbon is nearly invisible in water and sinks faster than monofilament. It is more expensive and stiffer, which makes it harder to tie knots with and less forgiving for beginners. It is a good leader material but not ideal as a main line for a first-time angler.
If you are fishing around heavy cover (dense weed beds, fallen trees) or targeting slightly larger species, 10 lb test monofilament is a reasonable alternative. In very clear water with abundant fish, even 6 lb can work well where line visibility matters more.
A standard 100-200 yard spool of monofilament in 8-10 lb test typically costs around $8-$15, though premium brands may be higher. This is enough line to fill a size 2000-2500 reel with plenty to spare.
Essential Tackle for Your First Trip
Beyond your rod, reel, and line, you need a small set of tackle to actually fish. You do not need a full tackle box on day one. Here is what matters:
Hooks. Size 6 through size 10 hooks cover most beginner situations. These are medium-small hooks that work well with worms and soft plastics for species like bluegill, crappie, and small bass. You do not need treble hooks or specialty hooks at this stage.
A bobber. A bobber (also called a float) is a simple device that suspends your bait at a set depth and signals when a fish bites by dipping or going completely underwater. Slide the bobber onto your line, then attach your hook below it. Adjust the bobber position along the line to set the depth you want.
Split shot sinkers. A split shot sinker is a small, round weight with a slit that you pinch onto your line. Add one or two split shot sinkers below the bobber to keep your bait at the desired depth and help it stay in place. Add more if you need extra weight, or fewer if the water is calm and shallow.
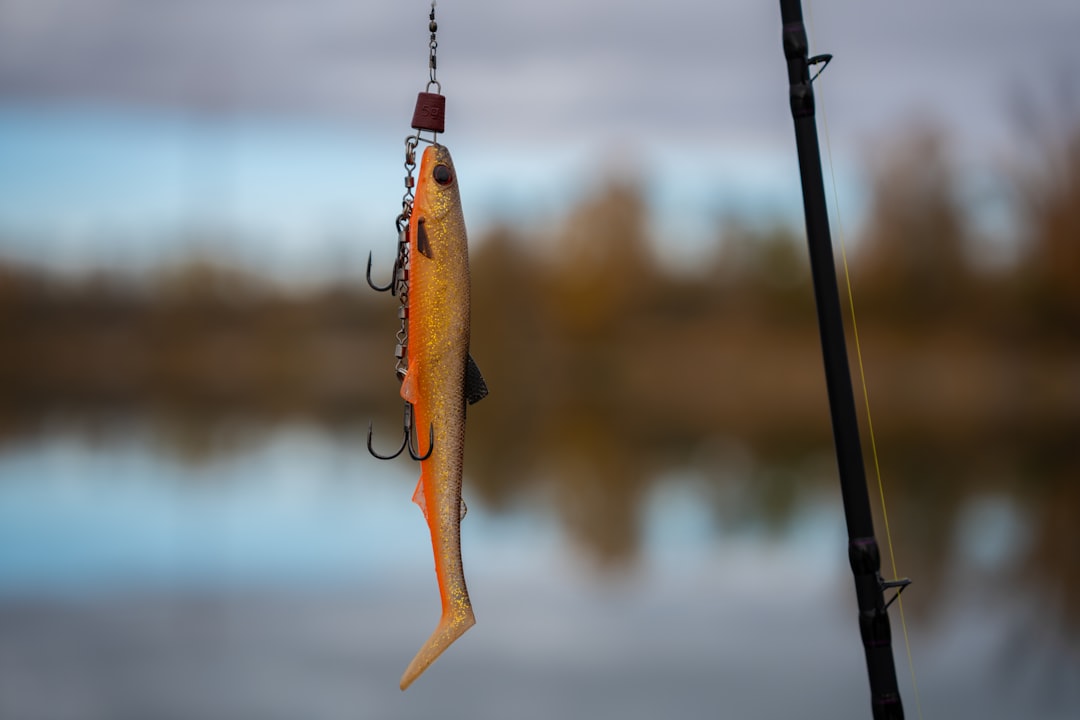
Soft plastic grubs or swimbaits. A soft plastic grub on a 1/16 oz to 1/8 oz jig head works for bluegill, crappie, bass, and even some species of catfish. It is one of the few single lures that covers this much ground. The jig head weight determines how fast the lure sinks and how well it holds position in current. Start with 1/16 oz for shallow, calm water and move up to 1/8 oz if you need more depth or are fishing in a slight current.
Live bait (nightcrawlers). Nightcrawler worms on a small hook are one of the most reliable baits across species and conditions. They are widely available at bait shops and many grocery stores.
Fishing pliers with line cutter. Pliers are essential for removing hooks safely, trimming excess line, and general tackle handling. Choose a pair that includes a built-in line cutter — you will use it more than you expect.
A small tackle box or storage container with compartments helps keep hooks, sinkers, and lures organized. You do not need a large or expensive box — a simple compartmentalized container is enough to start.
How to Tie an Improved Clinch Knot
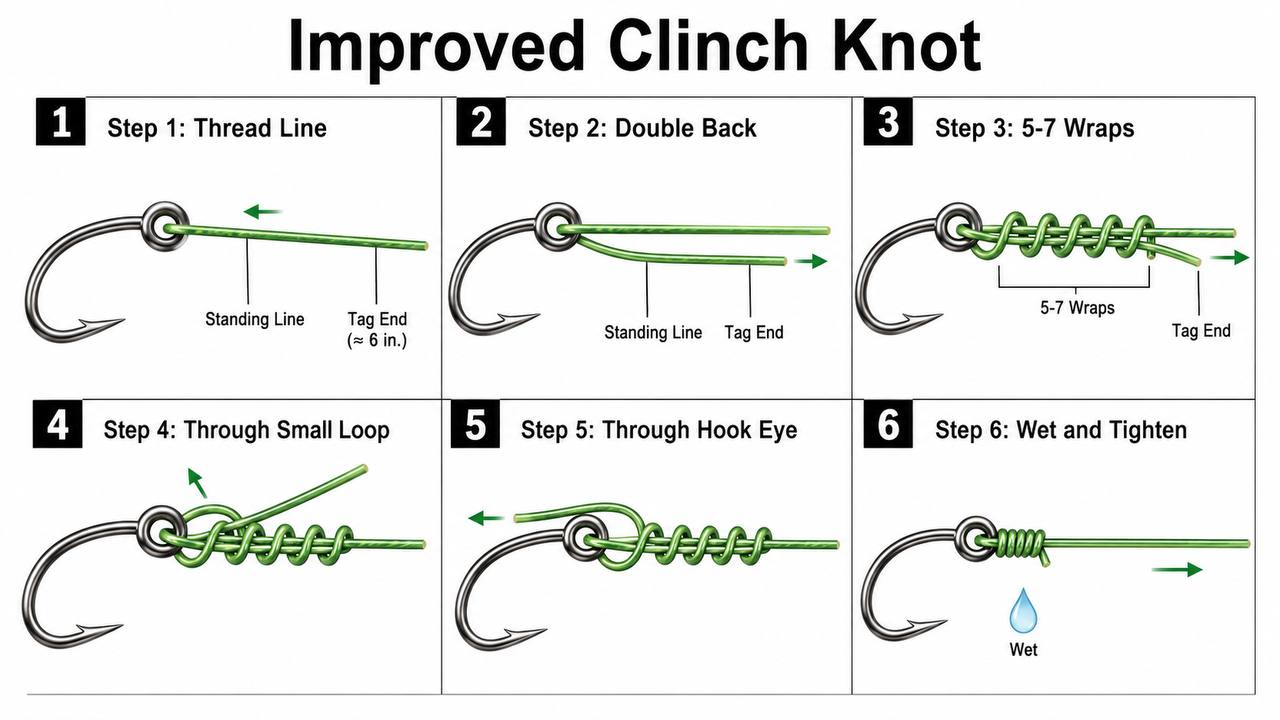
The improved clinch knot is the most universally recommended beginner knot by fishing educators, state wildlife agencies, and fishing publications. It works well on monofilament and fluorocarbon. It is less ideal on braided line, but since beginners should start with mono, this is not a concern.
When tied correctly, the improved clinch knot retains a high percentage of the line’s breaking strength — generally cited in the 70-85% range by knot testing sources, though exact strength depends on line type, diameter, and tying technique.
Here is how to tie it:
Step 1. Thread the end of your line (the tag end) through the eye of the hook, lure, or swivel. Pull about 6 inches of line through.
Step 2. Make 5 to 7 wraps of the tag end around the standing line (the main length of line going back toward the reel). Keep the wraps neat and tight next to each other.
Step 3. Form a small loop by bringing the tag end back toward the eye of the hook. The tag end should now pass back alongside the standing line, creating a loop between the wraps and the hook eye.
Step 4. Pass the tag end through the enlarged loop you just created. This is the “improved” step that distinguishes this knot from a standard clinch knot — it adds significant strength.
Step 5. Moisten the knot with your mouth or saliva. This is critical — tightening a dry knot generates friction heat that weakens the line. Pull the standing line and the tag end simultaneously to tighten the knot smoothly.
Step 6. Trim the excess tag end, leaving about 1/8 inch. A short tag end prevents the knot from unraveling without adding unnecessary bulk.
Practice this knot a few times before your first trip. A loose knot in the water costs you fish — and patience.
How to Cast with a Spinning Reel
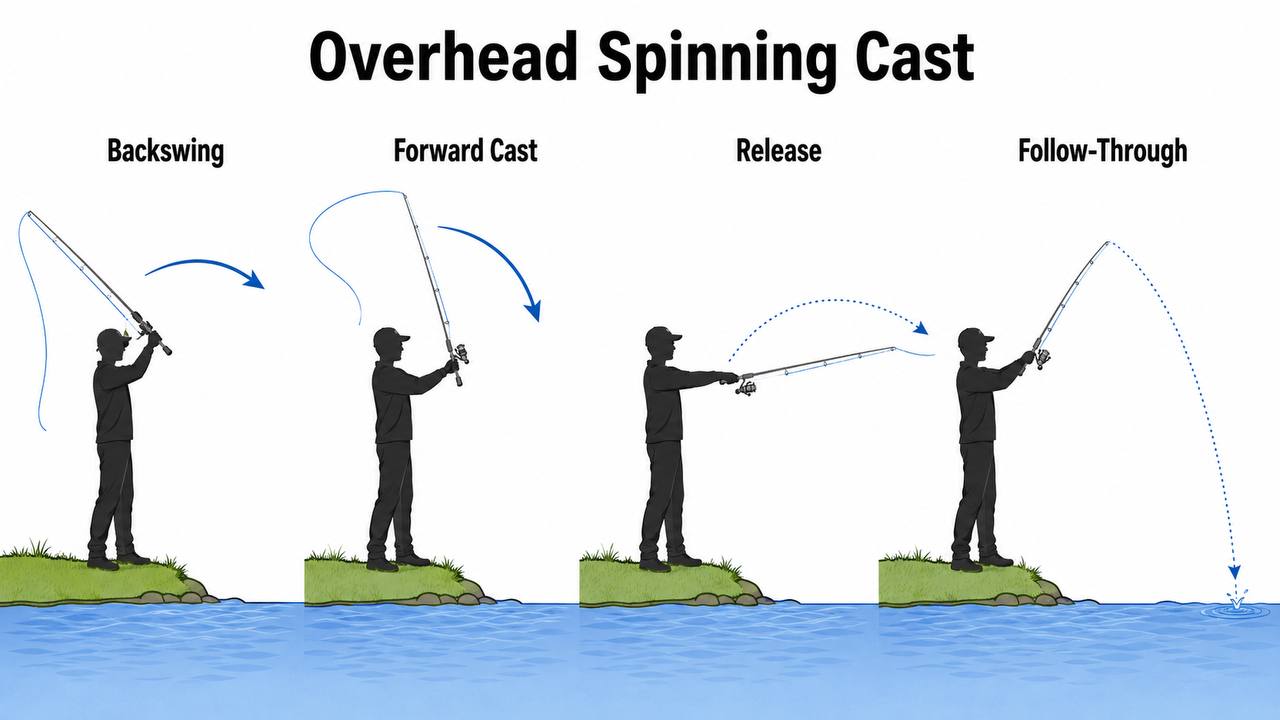
Casting is the most challenging physical skill for a first-time angler. It involves coordinating your hands, your eyes, and your timing. Here is the overhead spinning cast broken into clear steps.
Step 1: Open the bail. Flip the bail wire open on your spinning reel. This releases the spool so line can flow freely.
Step 2: Pinch the line. Use your index finger to pinch the monofilament line against the rod, just below the first guide (the small rings running along the rod). This controls how much line releases during the cast.
Step 3: Point at your target. Before you begin swinging, point the rod tip directly at where you want the lure to land. Your casting arc will be more accurate if your starting position faces your target.
Step 4: Smooth backswing. Swing the rod back behind you with a smooth, controlled motion. The rod should end up behind and to the side of you — not directly overhead, which causes the line to slap the rod blank and create noise. The backswing should feel natural and relaxed.
Step 5: Forward acceleration. Swing the rod forward toward your target. The key here is smooth acceleration, not brute force. Start slow and build speed through the motion. Think of it like swinging a pendulum — the power comes from rhythm, not muscle.
Step 6: Release the line. As the rod reaches approximately the 10 to 11 o’clock position (imagine a clock face with 12 o’clock directly in front of you), lift your index finger to release the line. The lure carries its own momentum forward from the rod’s acceleration.
Step 7: Follow through. Let the rod continue its forward motion naturally. Do not stop the rod abruptly — the follow-through helps with accuracy and prevents the line from tangling.
Step 8: Close the bail. Once the lure lands in the water, rotate the reel handle to close the bail. You are now ready to start reeling in.
A few important points for beginners:
- Wind the reel handle a couple of times before each cast to take up any slack line. Slack line creates tangles and reduces casting distance.
- Practice casting into a grassy area or empty lot before your first trip at the water. Getting a feel for the release timing without the pressure of fish watching makes a big difference.
- The amount of line you let out depends on how far you need to cast. Pinch more line for shorter casts, less for longer ones.
Casting Safety: Where NOT to Aim
Your casting safety matters to everyone around you. Never cast toward other people, vehicles, or overhead power lines. A hook or weight traveling at speed can cause real injury. Always look behind you and to your sides before making a cast to confirm the area is clear. If you are fishing in a crowded area, consider casting with a shorter, more controlled motion or switching to a different spot.
Your First Five Easy Fish to Target
Knowing which fish to target on your first trip makes a real difference. These five species are widely available across most of the continental US, relatively easy to catch, and forgiving of beginner mistakes.
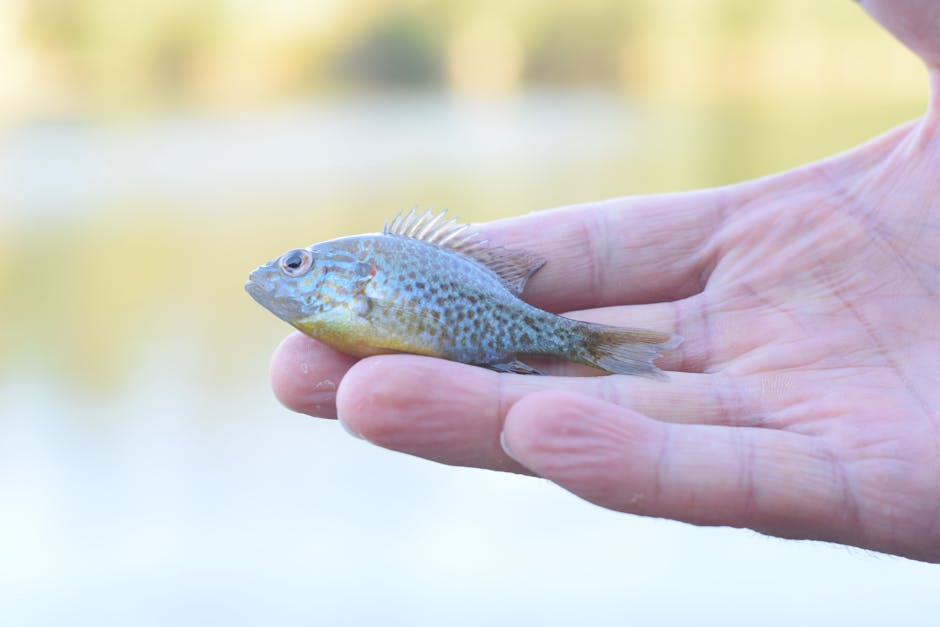
Bluegill (Sunfish): The Number One Beginner Fish
Bluegill are abundant in most US ponds, lakes, and slow-moving rivers. They bite readily on small hooks with live bait (nightcrawler pieces or small insects) or small soft plastics. They typically grow between 4 and 12 inches, though size varies by water and region. Bluegill have a distinctive appearance: a greenish-gold body with dark vertical bars and a dark vertical ear flap edged in bright blue or red.
Find them near weed beds, docks, fallen trees, and other structure in shallow to moderate-depth water. A simple bobber rig with a small hook and a piece of worm is about as reliable as it gets for catching bluegill.
Beginner tip: Bluegill will often bite almost immediately after your bait hits the water. Watch your bobber closely in the first 10-15 seconds — that is usually when you will see action.
Channel Catfish: Forgiving and Abundant
Channel catfish are bottom feeders found across most of the US. They are caught on the bottom with cut bait, stink baits, or chunks of nightcrawler. Their size ranges from 1 to 20+ pounds, though beginners typically encounter smaller ones.
Catfish are very tolerant of handling mistakes, which makes them a forgiving species for beginners. They are not picky about bait quality and will bite aggressively when hungry. Drop a weight with a hooked bait to the bottom, wait, and you will feel a catfish bite as a steady pull on the line rather than the quick taps you get from sunfish.
Safety note: Catfish have sharp barbels (whiskers) on their mouth and sharp teeth. When handling a catfish, grip it firmly behind the pectoral fin or use pliers or a lip grip. Never try to grab a catfish by its barbels — they can puncture skin.
Crappie: Consistent Biters in Lakes and Slow Rivers
Crappie are schooling fish found in lakes, reservoirs, and slow-moving rivers throughout the US. They bite consistently during spawning seasons and temperature transitions. They are typically 8-12 inches and have a silver body with dark vertical bars and black spots.
Crappie respond well to small jigs, tiny live bait on small hooks, and small soft plastics. They are often found suspended above structure or near the edges of weed beds. Because they school together, catching one crappie often means more are nearby.
Beginner tip: If you hook one crappie, stay put and cast the same spot again. Schools tend to hold in one area for hours, especially near structure.
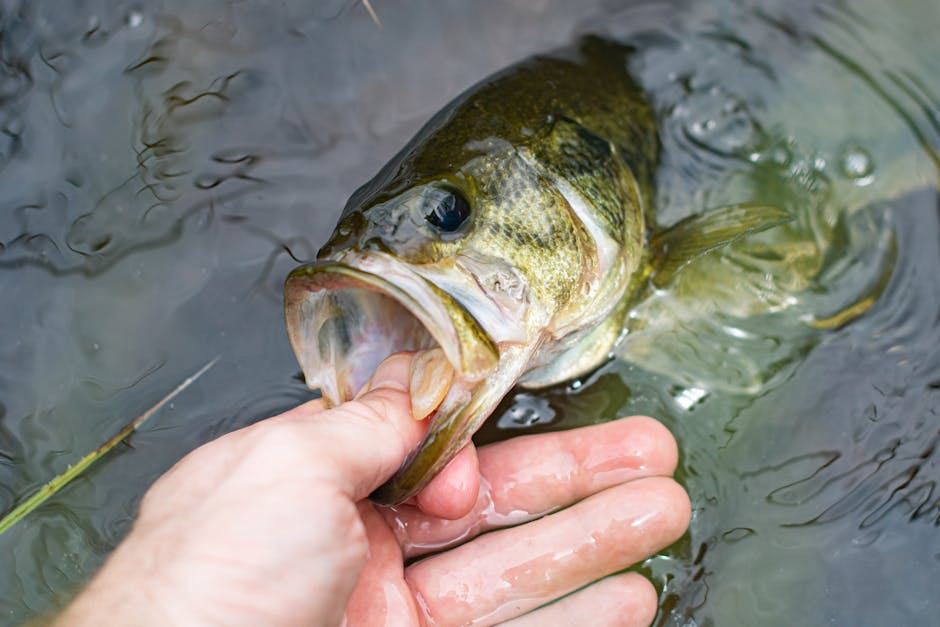
Largemouth Bass: A Slight Step Up (But Still Beginner-Friendly)
Largemouth bass are more challenging than bluegill or crappie but still reasonable for beginners. They are found near cover — weed lines, docks, fallen trees, and rocky areas. They respond to a wide variety of lures including soft plastics, inline spinners, and hard-bodied crankbaits. Bass range from 1 to 10+ pounds depending on the water.
Bass are ambush predators. They sit near structure and strike at moving prey. A simple retrieve of a soft plastic grub or spinner through shallow cover near a weed line is often enough to trigger a strike. An inline spinner (Rooster Tail style) is a particularly forgiving beginner lure for bass — the spinning blade creates flash and vibration that bass key in on even in stained water.
Beginner tip: Bass are more likely to bite near edges — where weeds meet open water, or where shallow shore transitions into deeper water. Cast along those lines rather than into the middle of open water.
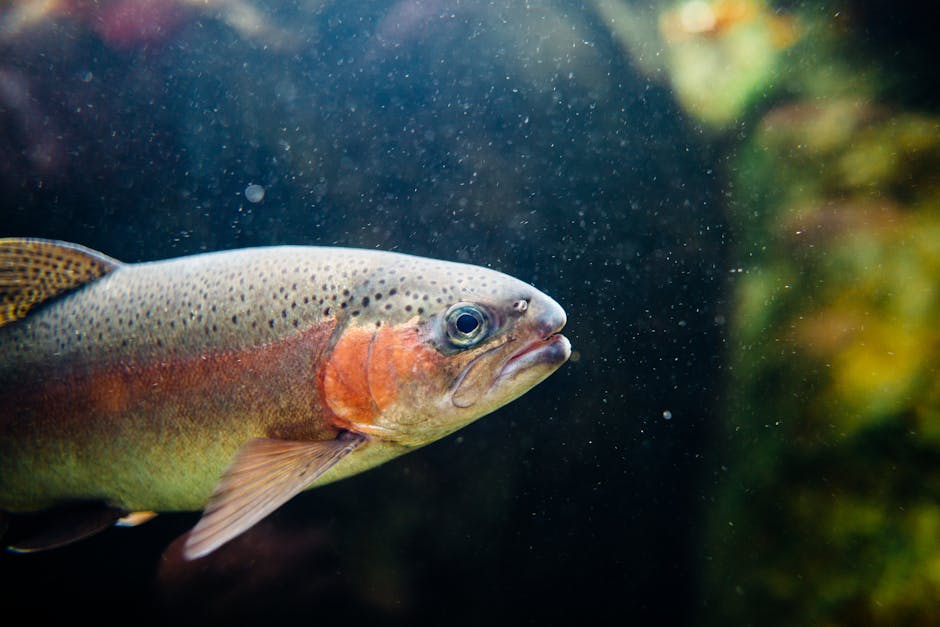
Trout: Predictable but Require Extra Care
Trout are often stocked in ponds and streams, making them predictable and accessible targets. They are caught on small hooks with live bait (red worms, nightcrawler pieces) or small flies and lures.
However, trout are very sensitive to handling stress and warm water. They are cold-water species that thrive in temperatures roughly 50-60 deg F. If you catch a trout and plan to release it, handle it with extreme care: wet your hands before touching it, keep it in the water as much as possible, minimize air exposure to a few seconds maximum, and revive it thoroughly by holding it gently in the current until it swims away on its own.
If local regulations allow it, using a barbless hook for trout fishing is strongly recommended. Barbless hooks are easier and faster to remove, cause less mouth tissue damage, and are widely recommended by fisheries researchers and the IGFA to improve post-release survival rates.
Where to Go for Your First Fishing Trip
Choosing the right location for your first trip is almost as important as choosing the right gear. You want a place that is calm, accessible, and likely to have fish.
Small ponds (stocked or natural) are the ideal beginner location. Stocked ponds have fish placed there specifically for anglers, which means you are almost guaranteed to find something to catch. Natural ponds with established fish populations are equally good.
Community fishing ponds and pay-to-fish ponds are specifically designed for beginners. They charge a small per-person fee that typically ranges from a few dollars to around $15, depending on the location and what is included. These ponds often have fish on every rod.
Accessible lake edges with calm, clear-to-moderately-clear water are excellent for learning. Look for banks that are stable, walkable, and free of steep drop-offs. Lake edges with weed beds, fallen branches, or a dock are productive because fish use these features as cover and feeding zones.
Slow-moving rivers with calm stretches work well, but avoid fast-moving sections, steep banks, or areas with strong current. Beginners should never fish alone near deep, fast-moving, or steep-banked rivers.
Always wear closed-toe shoes with good traction near water. Flip-flops and bare feet are a serious slip hazard on wet banks and rocky shorelines.
Understanding Structure: Where Fish Actually Hide
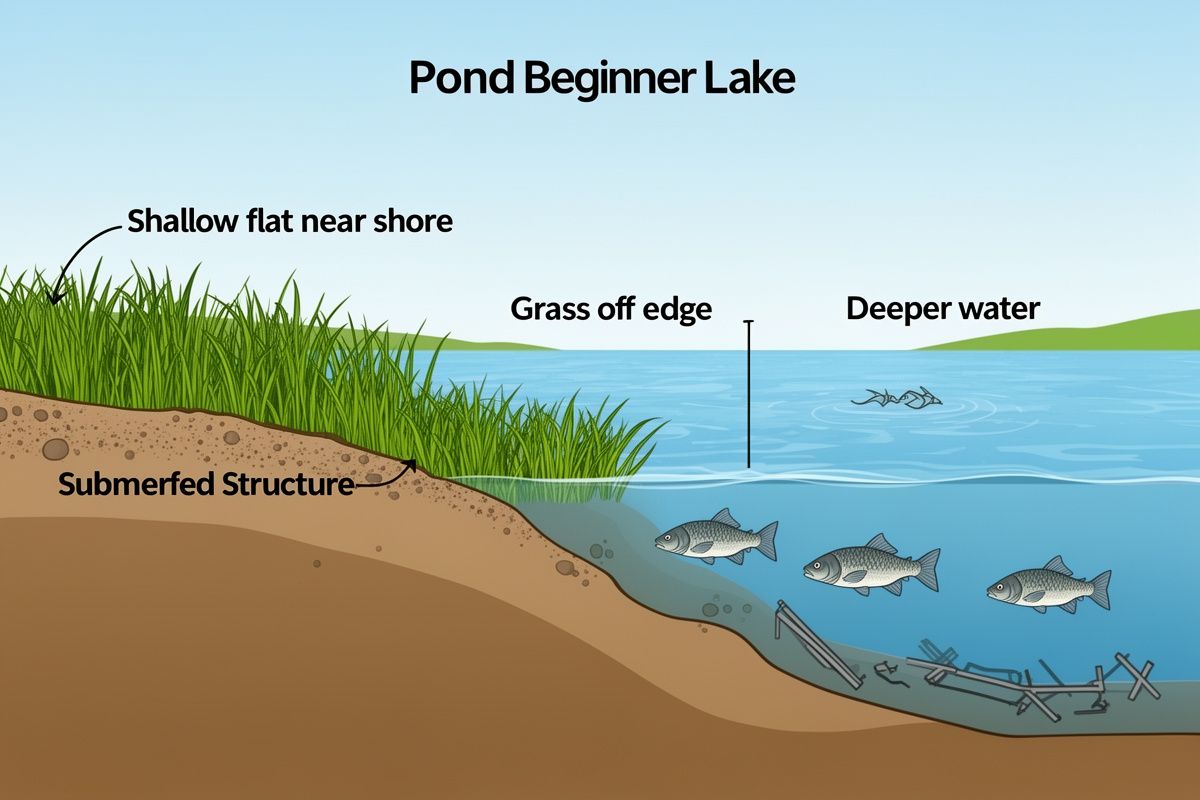
In fishing terms, “structure” refers to underwater or shoreline features that fish use for cover, food, and shelter. The most common types of structure beginners should look for are:
- Weed beds — submerged or floating vegetation where fish hide and feed
- Fallen trees and branches — provide shade and shelter
- Rocks — create edges and hiding spots
- Docks and piers — offer shade and attract baitfish
- Drop-offs — transitions from shallow to deep water where fish patrol
Fish are most actively feeding near structure. Instead of casting randomly into open water, aim your casts within a few feet of these features. A bluegill hiding near a weed edge, a bass lurking by a dock piling, or a catfish resting on the bottom near a fallen tree — all of these are classic scenarios.
The Best Seasons and Times to Fish
Once you know where to go, timing becomes the next piece of the puzzle. Fish are not equally active year-round or throughout the day.
For most of the continental US, spring (April-June) and early fall (September-October) are the most reliable seasons for beginner freshwater fishing. During these periods, water temperatures typically fall into the 55-75 deg F range, which covers the productive feeding windows for bluegill, bass, and crappie. Fish are actively feeding during spawning seasons and temperature transitions, making them easier to catch.
Note for southern and northern anglers: Seasonal patterns vary by region. In southern states like Florida or the Gulf Coast, productive fishing can extend well into fall and winter. In northern states, the fishing season is shorter and peaks more sharply in summer. The spring and fall recommendations apply best to the central and temperate zones of the continental US.
Dawn and dusk are generally the most productive times of day. Fish are more actively feeding during low-light periods. If your schedule does not allow for early morning or late evening trips, do not worry — overcast days also keep fish feeding more actively throughout the day, and midday fishing on cloudy days can be surprisingly productive.
Trout are different from the other species discussed here. They prefer cooler water, roughly 50-60 deg F, which means they are most active in early spring, late fall, or at higher elevations where water stays cold. Summer fishing for trout is typically less productive unless you are fishing deep, cold tailwaters or high-altitude streams.
How to Handle and Release Fish Safely

Now comes the moment every angler eventually reaches: a fish on the line. What you do after the hook-up matters just as much as getting the bite in the first place. Proper handling protects the fish, keeps it healthy, and is part of being a responsible angler. Whether you keep your catch or practice catch and release (catching a fish and returning it to the water alive), these principles apply.
Wet your hands before touching any fish. Fish have a protective slime coat on their skin that defends against infection and parasites. Dry hands strip away this coating, leaving the fish vulnerable. Wetting your hands with the water from the pond or lake preserves the slime coat.
Support the fish’s body properly. Use both hands to support the fish from below. Never hold a fish by its jaw alone — this damages the mouth structure and spine, especially in larger fish. Keep the fish’s body horizontal, not vertical.
Minimize air exposure. A fish out of water is stressed. Keep the fish in the water or just above it for as short a time as possible. If you want a photo, keep it to a few seconds maximum. Less time out of water is always better.
Use barbless hooks for catch and release. The barb on a hook is the small backward-pointing bar near the tip that prevents the hook from slipping out. It also means removing a barbed hook causes more tissue damage and takes more time. Barbless hooks slide out cleanly with minimal damage. You can pinch the barb flat with pliers if you want to use barbed hooks but reduce their impact.
Limit fight time. Set the drag on your reel — the adjustable resistance that lets a fish run without breaking your line — so that the fish can tire gradually rather than pulling against a locked spool. A fish that is fought to exhaustion is less likely to survive release.
Revive before release. When you are ready to release the fish, hold it gently in the water facing upstream or into the current. Wait for it to regain its strength and swim away on its own. Do not just drop it and walk away — a few seconds of revival effort significantly improves survival.
Special Handling Notes for Trout
Trout deserve extra attention because they are much more sensitive than other species discussed in this guide. Their slime coat is particularly delicate, and they are highly stressed by warm water and rough handling.
Always keep trout wet. If possible, remove the hook while the fish is still in the water. Limit handling to a few seconds. If the water is warm (above 60 deg F), consider releasing trout immediately — warm water holds less dissolved oxygen and stressed trout can quickly become lethargic and unable to recover.
Some waters have strict catch-and-release rules for trout. Check your local regulations before fishing for trout to understand what is allowed.
Handling Catfish Safely
Catfish present a different challenge: safety for the angler. Their barbels (whiskers) are surprisingly sharp and can puncture skin. Their teeth, while not designed for biting like a piranha’s, can cause scratches and small wounds.
Grip a catfish firmly behind the pectoral fin (the fin near the gills) with your thumb inside the mouth and fingers wrapped behind the fin. This is called a “gill plate grip.” Alternatively, use pliers or a lip grip tool to remove the hook without needing to handle the fish directly. Never grab a catfish by its barbels.
Do You Need a Fishing License?
Before heading to the water, check whether your state requires a fishing license. In the United States, virtually every state requires a fishing license for anglers above a certain age threshold. The age threshold commonly starts at 16, though this varies by state.
Annual freshwater fishing licenses typically cost around $15-$40 for residents in most states, with non-resident licenses generally costing more (roughly $30-$75). Exact costs and rules vary significantly by state, so check your state’s wildlife agency website for current pricing and requirements.
Key points about fishing licenses:
- Many states offer free fishing days — typically 2-4 per year — when anyone can fish without a license. These are often scheduled on the opening day of the fishing season or a designated weekend in spring.
- Age exemptions commonly exist for children under the state’s threshold age, and some states offer exemptions for seniors.
- Disabled veterans often receive free or discounted licenses in most states.
- Licenses are available online through state wildlife or fisheries department websites, at bait and tackle shops, big-box retailers, and some post offices.
- Some states require a separate stamp or endorsement for specific species (such as a trout stamp or salmon stamp) or for saltwater fishing.
- Even fishing on private property may still require a license depending on the state. Always confirm with your state’s regulations.
Make sure to check your state’s current fishing regulations for size limits, creel limits (how many fish you can keep), seasonal closures, and any protected species. Regulations vary by water body, not just by state.
Common Beginner Mistakes to Avoid
Learning what not to do is just as important as learning what to do. These are the most common mistakes that discourage new anglers:
Starting with a baitcasting reel. Baitcasting reels produce backlash — a tangled mess of line that is frustrating to fix. This is one of the fastest ways to get discouraged before catching your first fish. Stick with a spinning reel until you have built confidence.
Using braided line as your first line. Braided line is too slippery for beginners to tie secure knots, has no stretch to absorb sudden fish runs, and is too visible to fish in clear water. Monofilament is the better choice.
Skipping practice casts. Casting is a physical skill that takes repetition to develop. Practice in your yard, a parking lot, or any safe open area before you get to the water. Getting the timing of line release right on the water while fish are watching adds unnecessary pressure.
Fishing at the wrong time of day. Midday in bright sun during the summer is typically when fish are least active. Try early morning or late evening instead, or choose an overcast day for midday fishing.
Staying in one spot too long. If you have been fishing the same spot for 30 to 45 minutes without a bite, move to a different area. Fish are not always distributed evenly, and a better spot may be just a few yards away. In very large bodies of water or waters with concentrated structure, productive fishing can sometimes happen sooner.
Not respecting local regulations. Ignoring size limits, creel limits, or seasonal closures can result in fines and harms fish populations. Always check your state’s current fishing regulations before heading out.
Your First Trip Checklist
Use this checklist to make sure you have everything you need before heading out:
- Spinning rod and reel combo (6’6″-7′, medium power, moderate action)
- Monofilament line (8 lb test)
- Hooks (sizes 6-10) and bait (nightcrawler worms or soft plastic grubs on jig heads)
- Bobber and split shot sinkers
- Fishing pliers with line cutter
- Fishing license (check your state’s requirements)
- Closed-toe shoes with good traction
- Water bottle
- Sun protection (hat, sunscreen)
- Trash bag for packing out used line and waste
Pack your tackle in a small container with compartments. Label hooks and lures if possible — small hooks all look the same when dumped out of a box.
If you plan to fish from a boat or kayak rather than the bank, a shorter rod (6′ to 6’6″) may be more practical for confined spaces. The power and action recommendations remain the same.
Frequently Asked Questions
What is the best rod for a complete beginner to start fishing with?
A 6’6″ to 7′ medium-power, moderate-action spinning rod paired with a size 2000-2500 spinning reel. This combination handles the fish sizes you will typically encounter and works from ponds, lakes, and slow rivers.
Can I fish without a license?
In most states, you need a license if you are above the state’s age threshold, which is commonly 16. Many states offer 2-4 free fishing days per year. Always check your state’s wildlife agency website for current requirements, exemptions, and free fishing day dates.
What is the easiest fish for a beginner to catch?
Bluegill (sunfish). They are abundant, bite readily on small hooks with simple bait, and are found in most ponds and lakes across the US. Channel catfish and crappie are also very beginner-friendly.
Do I need different gear for freshwater vs saltwater fishing?
Yes. Saltwater fishing requires gear rated for corrosion resistance (saltwater damages metal components faster), heavier line, and different tackle designed for saltwater species. This guide covers freshwater fishing only. Saltwater fishing involves different species, techniques, and environmental considerations.
How much does it cost to start fishing?
Plan on approximately $50-$100 for a complete first setup including a spinning rod and reel combo, monofilament line, a couple of lures or bait, basic tackle (hooks, bobber, sinkers), and fishing pliers. Actual costs depend on the retailer and specific products you choose.
What should I do if I do not catch anything on my first trip?
It happens to everyone. Focus on building your skills: practice your casts, tie knots correctly, learn to read the water, and figure out what a bite feels like. On your next trip, try a different location, a different time of day, or a different bait. Every trip teaches you something.
Is monofilament line better than braided line for beginners?
Yes. Monofilament is more visible, which helps you detect bites. It has natural stretch that acts as a shock absorber, and it is more forgiving with knot tying. Braided line offers advantages for experienced anglers but creates more challenges for beginners.
How do I know what fishing knot to use?
Learn the improved clinch knot first. It works on monofilament and fluorocarbon, it is easy to pick up, and it retains a high percentage of line strength. Once you know this knot, you can attach hooks, lures, and swivels reliably in most situations.
Can I fish on private property without a license?
It depends on the state. Some states require a license even on private property, while others exempt private land fishing. Always confirm with your state’s fishing regulations. Also make sure you have permission from the property owner before fishing on private land.
What size hooks should beginners use?
Size 6 through size 10 hooks work well for most beginner freshwater situations. These medium-small hooks are a good match with worms and soft plastics for species like bluegill, crappie, and small bass. You do not need a wide variety of hook sizes to start.
Before heading out, remember three things: pack everything on the checklist, check your state’s fishing regulations, and have patience with yourself. Fishing rewards practice, and every trip — even the ones where you do not catch anything — teaches you something that makes the next trip better.