
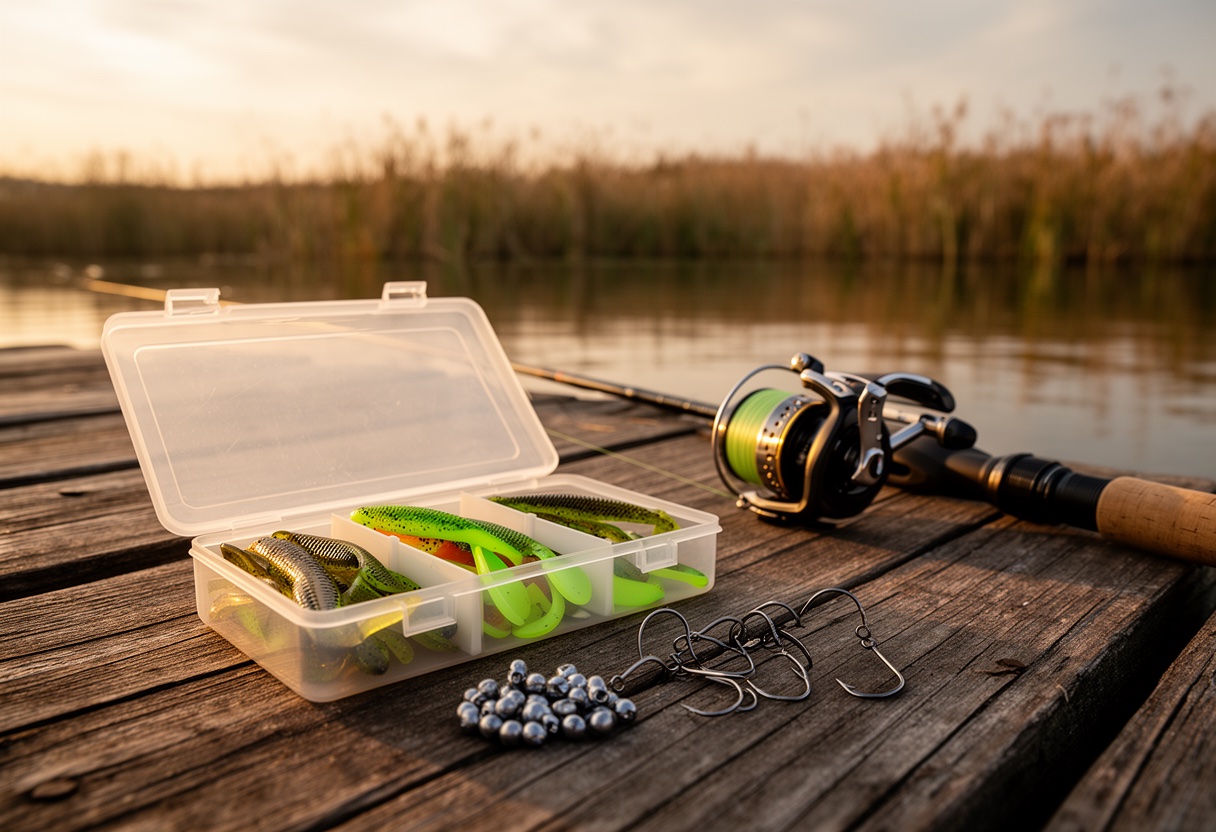
You have a rod, a reel, and a tackle box full of squishy plastic things. Now what?
If you’ve just gotten into fishing — or if you’re the type of angler who watches a lot of YouTube but hasn’t figured out how to actually get bait on a hook yet — you’re in the right place. The good news: two rigging setups cover the vast majority of soft-plastic fishing situations. Learn the Texas rig and the drop shot, and you’ll be ready for whatever throws your way.
Rigging just means putting bait on a hook in a specific way. The same plastic worm can act completely different depending on how you rig it. Get it right, and you’ll catch fish. Get it wrong, and the fish will taste the bait and immediately lose interest.
This guide walks you through both rigs step by step — what you need, how to tie them, common mistakes to avoid, and when to use each one.
What Is Rigging, and Why Should You Care?
Rigging is the combination of hook, weight, bait, and how they’re all assembled together. Think of it like choosing the right tool for a job — you wouldn’t use a wrench to drive a screw, and you wouldn’t use a drop shot to fish through thick weeds.
Here’s why rigging matters:
- The same bait behaves differently on different rigs. A 4-inch plastic worm on a Texas rig crawls along the bottom. That same worm on a drop shot hangs in the water column where finicky fish can see it from below.
- Some rigs are weedless. The Texas rig lets you fish through cover without constantly snagging. Other rigs — like the drop shot — are more delicate and work best in open water.
- Rigging affects how fish see and feel your bait. A heavy weight dragged through mud kicks up silt. A light weight sitting quietly on the bottom looks more natural. Fish notice the difference.
If you’re new to soft plastics — baits like worms, grubs, and creature baits made of flexible vinyl — start with our soft plastic baits guide to understand what you’re working with.
The Texas Rig — Your Go-To Soft Plastic Setup
The Texas rig is the most versatile rig a beginner can learn. It’s weedless, works at any depth, handles any type of cover, and catches everything from bass to catfish to panfish. If you learn only one soft-plastic rig, make it the Texas rig.
It got its name from Texas bass anglers in the 1970s who used it to fish through heavy cover that other rigs couldn’t handle. It’s been a staple ever since.
When to reach for the Texas rig:
- Fishing through weeds, grass, or aquatic vegetation
- Working around structure like logs, rocks, or brush piles
- Murky or stained water where visibility is low
- Any general fishing situation where you’re not sure what to use
What You Need for a Texas Rig
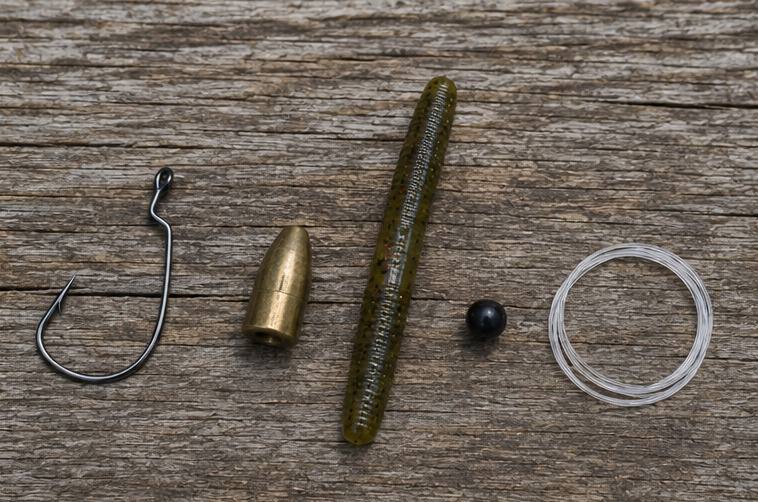
You’ll need four basic components plus one optional item:
1. EWG Offset Hook (sizes 1/0 to 3/0)
“EWG” stands for Extra Wide Gap. It means the hook has extra space between the point and the shank so thick plastic baits can sit properly. “Offset” means the hook point is bent at an angle relative to the shank — this is what makes the Texas rig weedless. Match the hook size to your bait: smaller baits (2–4 inches) need 1/0 or 2/0 hooks; larger baits (5–7 inches) need 3/0 or 4/0.
2. Bullet Weight (1/16 to 3/4 oz)
A bullet weight is a teardrop-shaped sinker that slides freely on your line. Most beginners will spend most of their time with 1/8 to 1/4 ounce weights. Heavier weights sink faster and hold bottom in current, but they feel more obvious to fish in clear or shallow water.
3. Soft Plastic Bait
Almost any soft plastic works on a Texas rig: straight worms, creature baits, craw imitations, paddle-tail swimbaits, and ribbon-tail grubs. Green pumpkin and watermelon red are solid starting colors.
4. Fishing Line (8–14 lb fluorocarbon)
Fluorocarbon is nearly invisible underwater and has enough stretch to help prevent fish from throwing the hook. See our guide on choosing the right fishing line for a deeper comparison.
5. Bead (optional)
A small rubber bead between the weight and the knot does two things: it makes a soft “clink” sound when the weight slides that can trigger strikes, and it protects your knot from getting crushed by the weight.
How to Texas Rig — Step by Step
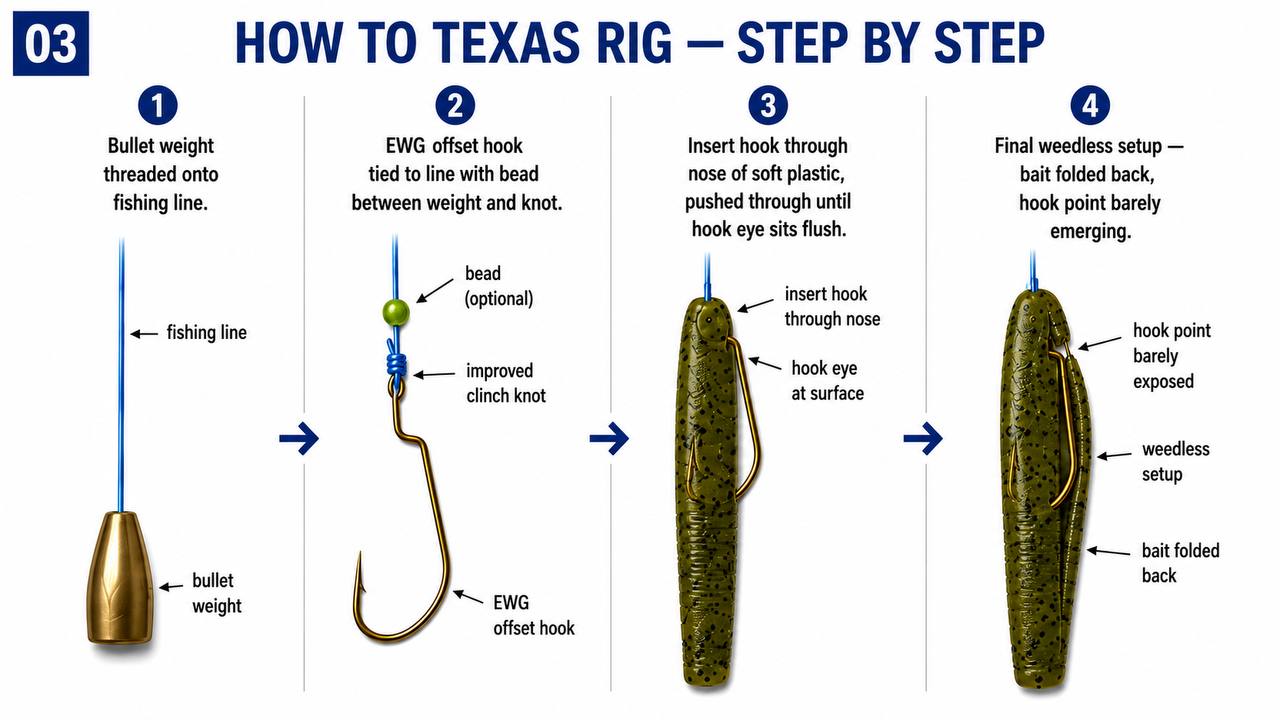
Step 1: Thread the bullet weight onto your line. The bullet weight goes on first because once you tie the hook, the weight won’t fit through the knot. Pull it all the way to the end of your line.
Step 2: Add the bead (optional). Slide a small rubber bead onto the line after the weight. It should sit between the weight and where you’ll tie the knot.
Step 3: Tie the hook to your line. Use an improved clinch knot or Palomar knot — both are reliable and easy to learn. Check out our guide on essential fishing knots if you haven’t tied one yet. Tie the hook about 18 inches from the end of your line (or wherever you want your bait to sit relative to the weight).
Step 4: Insert the hook point into the nose of the bait. Push the hook point straight into the rounded end of your soft plastic. Feed it through until the hook eye sits flush with the surface of the bait. The bait should be threaded onto the shank of the hook, with the hook eye sitting right at the nose.
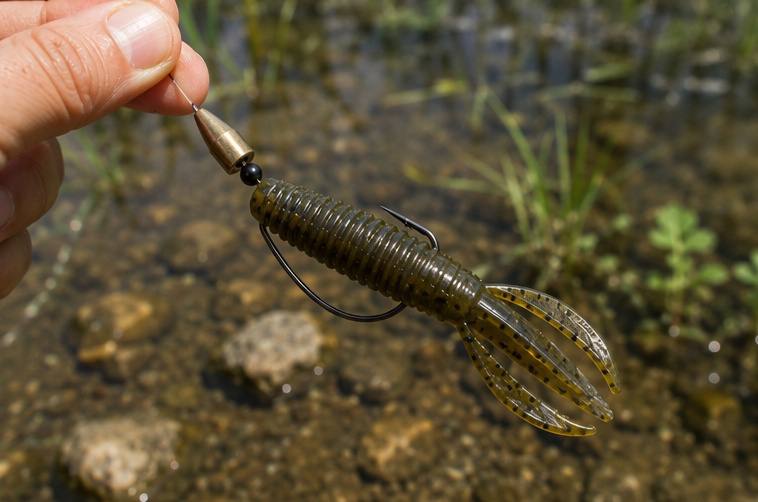
Step 5: Set the hook point (this is the critical step). Pull the hook out so the point emerges from the bait body, then fold the bait back over the shank of the hook. The hook point should be barely exposed — just enough to penetrate when you set the hook, but not so much that it snags vegetation. This “barely weedless” setup is what makes the Texas rig work in cover.
Step 6: Check your rig. The bait should look natural when sitting on the bottom. The hook point should be tucked into the body of the bait — you should barely be able to feel it if you run your thumb along the bait. The bullet weight should slide freely on the line above the hook.
Common Texas Rig Mistakes (and How to Avoid Them)
Hook too large for the bait. If your bait is 3 inches long and you’re using a 3/0 hook, the bait won’t fit properly on the shank, the rig won’t sit weedless, and the bait will look wrong to fish. Match hook size to bait length — the hook should be about one-third the length of the bait.
Hook point too exposed. If the point sticks out too far, you’ll snag every weed blade and root. The Texas rig loses its main advantage. Pull the point back so it barely emerges from the bait body.
Hook point too buried. If you’ve tucked the point completely inside the bait, you won’t be able to set the hook when a fish bites. The point needs to be exposed just enough to penetrate. Think “barely visible” — not “completely hidden.”
Weight too heavy for the conditions. A 3/4 ounce bullet weight in two feet of clear water looks and feels like a rock to bass. Use lighter weights (1/16 to 1/8 oz) in shallow or clear water, and heavier weights (1/4 to 3/4 oz) in deeper or murkier water.
Not practicing at home first. There’s no pressure to get it right on the dock. Practice at your kitchen table with a cup of water to test the weedless setup. Once it becomes muscle memory, you’ll rig new baits in under 30 seconds.
The Drop Shot — When You Need Something Different
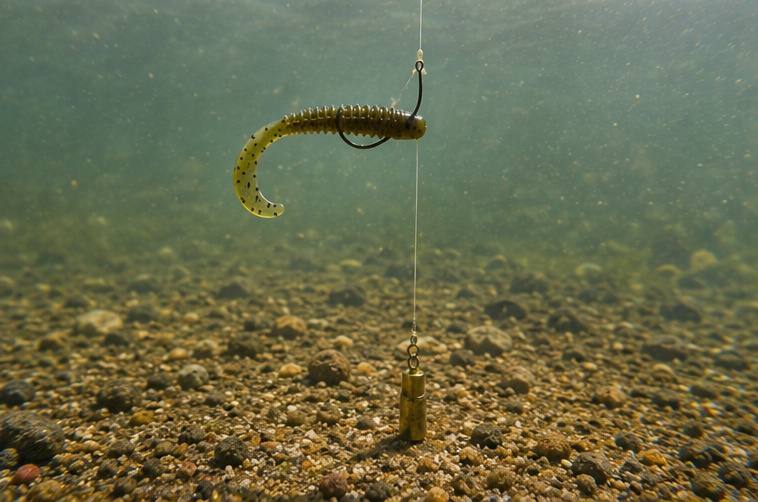
The drop shot is a finesse rig designed for situations where the Texas rig is too aggressive. Instead of dragging the bait along the bottom, the drop shot suspends it above the weight at a set depth. This gives the bait a more natural, free-floating appearance that finicky fish find harder to resist.
When to reach for the drop shot:
- Shallow water (2–8 feet deep)
- Cold water conditions (late fall, winter, early spring)
- Finicky or pressured fish that won’t eat a heavier presentation
- Open water without heavy cover
- Flat or muddy bottoms where the bait can hover naturally
When NOT to use the drop shot:
- Thick weeds or heavy cover (the weight snags constantly)
- Fast-moving current (the weight won’t hold)
- Deep water over 15 feet (the line is too long and unwieldy)
What You Need for a Drop Shot
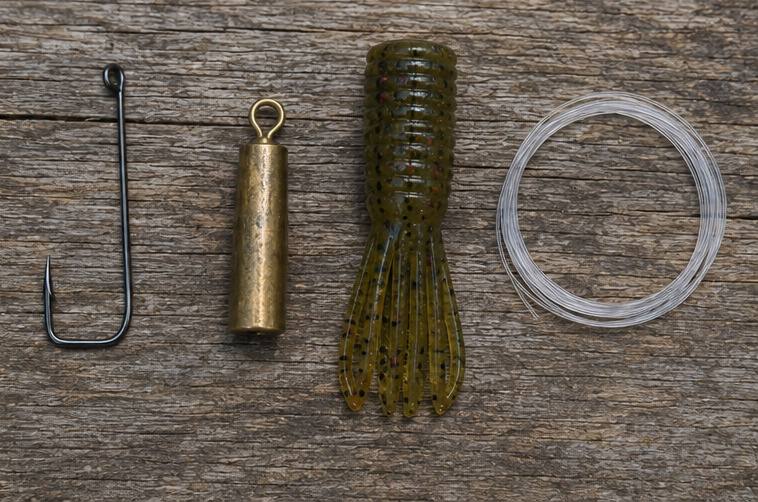
1. Drop Shot Hook (sizes #1 to #4)
A drop shot hook looks different from an offset hook. It has a straight shank with a 90-degree bend where the point starts. This shape lets the bait hang straight out from the line instead of curling. Size #2 is the most common starting point.
2. Drop Shot Weight (1/8 to 3/8 oz)
Unlike the bullet weight on a Texas rig, a drop shot weight is egg-shaped with an open eye. It ties directly to the end of your line and sits on the bottom while the bait hangs above it. A 1/4 ounce weight works for most shallow-water situations.
3. Soft Plastic Bait (2–5 inches)
Drop shots work best with smaller baits: tube baits, ribbon-tail grubs, small swimbaits, and straight worms. The bait should be small enough to look natural when suspended in the water column.
4. Fishing Line (4–8 lb fluorocarbon or 10–20 lb braid)
Light fluorocarbon is nearly invisible and gives a natural presentation. Braid is more sensitive — you’ll feel lighter bites — but it’s visible underwater. Many anglers use a braid main line with a fluorocarbon leader.
How to Drop Shot Rig — Step by Step
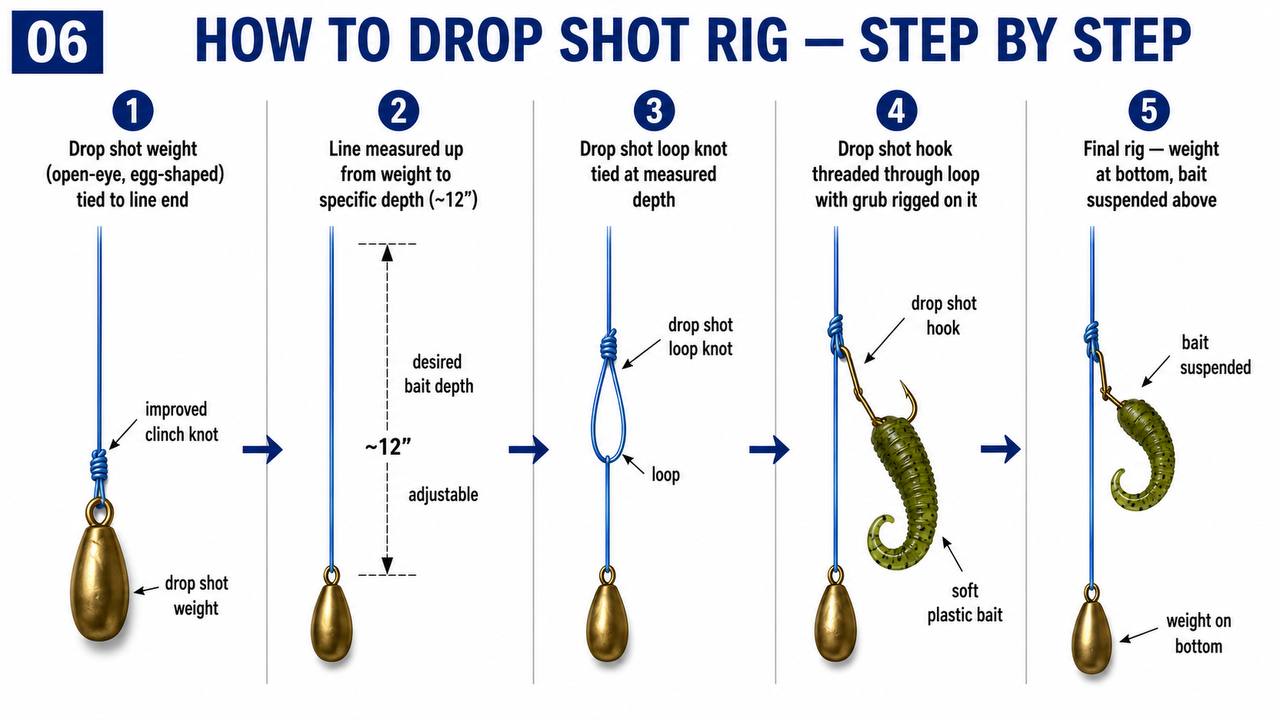
Step 1: Tie the drop shot weight to the end of your line. Use an improved clinch knot or Palomar knot. The weight goes at the very end of your line.
Step 2: Measure up the line to your desired bait depth. A good starting point is 12 inches above the weight, but you can adjust based on the depth you’re fishing. In four feet of water, you might want the bait 18 inches above the weight so it’s in the strike zone. In two feet of water, 6–8 inches might be better.
Step 3: Create the drop shot loop knot. At your measured depth, double the line back on itself and wrap it around the standing line 3–4 times. Pull the hook end through the loop and tighten. This creates a small loop in the line that the hook will thread through.
Step 4: Thread the drop shot hook through the loop. Pass the hook eye through the loop you just created. The hook should be able to slide slightly in the loop but not pull free.
Step 5: Rig your soft plastic on the hook. For grubs and worms, thread the hook point into the nose of the bait and push through until the hook eye sits at the surface. For tube baits, push the hook through the body of the tube and exit through the side near the front.
Step 6: Check the presentation. When you hold the line at the top, the weight should hang at the bottom, and the bait should be suspended freely above it. The bait should not be touching the weight. Give the bait a gentle twist — it should rotate naturally in the water.
Texas Rig vs. Drop Shot — Which One Should You Use?
Here’s the simple version:
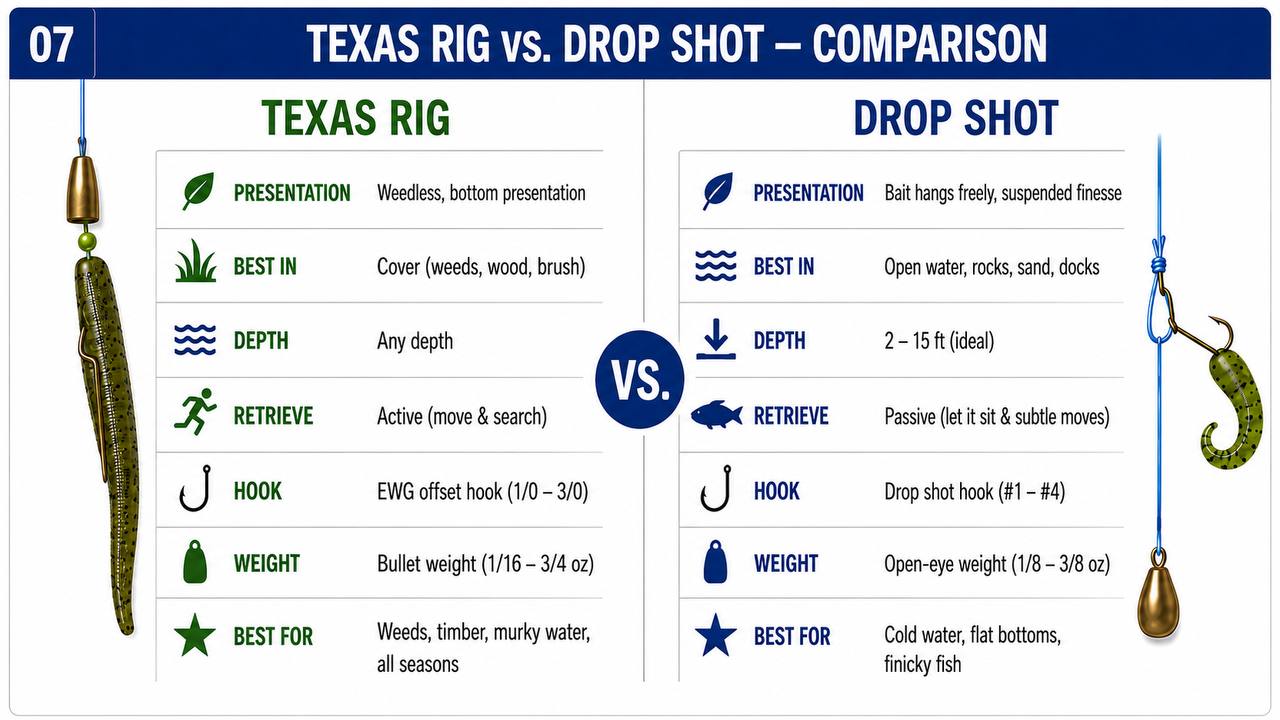
Use the Texas rig when you’re fishing cover, structure, or when you’re not sure what to use. It’s your daily driver. It handles weeds, timber, rocks, murk, and current. It works in any season and at any depth. If you’re casting to a laydown log in eight feet of water, the Texas rig is your go-to.
Use the drop shot when conditions call for finesse. Shallow water, cold water, flat bottoms, and finicky fish — these are the drop shot’s strengths. If you’re fishing a shallow creek bank on a cold January afternoon and the bass are holding tight to the bottom, the drop shot will outfish the Texas rig most of the time.
Many anglers keep both rigs ready on the boat or in their tackle bag and swap between them based on what they’re seeing. There’s no shame in trying the Texas rig first and switching to the drop shot if nothing’s biting.
Practice Before You Fish — Tips for Getting Comfortable
The best anglers aren’t the ones with the most expensive gear. They’re the ones who can rig a new bait in 30 seconds without taking their eyes off the water. Here’s how to build that skill:
Practice at home on a table. No pressure, no wasted time on the water. Lay out your hooks, weights, and baits and rig them until it feels automatic. The Texas rig is simpler and more forgiving — start there.
Use inexpensive hooks and baits for practice. You don’t need premium gear to learn. Once you’ve got the technique down, the expensive stuff will feel like a nice bonus, not a necessity.
Check your weedless setup. For the Texas rig, the hook point should barely emerge from the bait body. Run your thumb along the bait — you should feel a slight bump, not a sharp point.
Film yourself and compare with tutorials. If you can watch yourself rig from a slightly different angle, you’ll spot mistakes you wouldn’t notice otherwise.
Test the weight slide on the Texas rig. The bullet weight should move freely up and down the line. If it’s stuck against the knot, your bead might be pinching it, or you may need a slightly larger bead.
Start with these specific setups:
- Texas rig: 4/0 EWG hook, 1/4 oz bullet weight, 5-inch green pumpkin worm
- Drop shot: #2 drop shot hook, 1/4 oz weight, 3-inch green pumpkin grub
These are the workhorse combinations. Once you’ve mastered them, experimenting with other hook sizes, weights, and baits becomes a lot easier.
The Texas rig and drop shot together give you a complete toolkit for soft-plastic fishing. One handles the rough-and-tumble situations, and the other handles the finesse moments. Learn both, practice them until they’re second nature, and you’ll be ready for whatever you encounter on the water.