
You’ve just bought a fishing rod, spooled on some line, and picked out a few hooks. Then you sit down to tie your first knot and realize something: tying it correctly matters a lot more than you expected. A poorly tied knot is the number-one reason beginners lose fish, and it has nothing to do with how good of an angler you are. The problem is that a quick search can show you dozens of different knots, and it’s hard to tell which ones are actually worth your time.
The good news is you don’t need to master thirty knots to be comfortable on the water. There are six that cover essentially every situation a beginner will face, from tying on a hook to joining two lines together. This guide walks through each one, explains why it matters, and includes step-by-step diagrams so you can follow along while you practice.
Which Fishing Knots Should Beginners Learn First
Fishing knots fall into two categories: line-to-hook or lure connections (tying your line to a hook, swivel, or lure) and line-to-line connections (joining two pieces of line together). For beginners, the priority is learning one or two solid hook knots first, then picking up a line-to-line knot as your setups get more involved.
The three line-to-hook knots to learn are the Palomar, the Improved Clinch, and the Uni Knot. The three line-to-line knots are the Surgeon’s, the Blood, and the Albright. Together, these six cover everything from basic hook attachment to connecting braided line to a fluorocarbon leader.
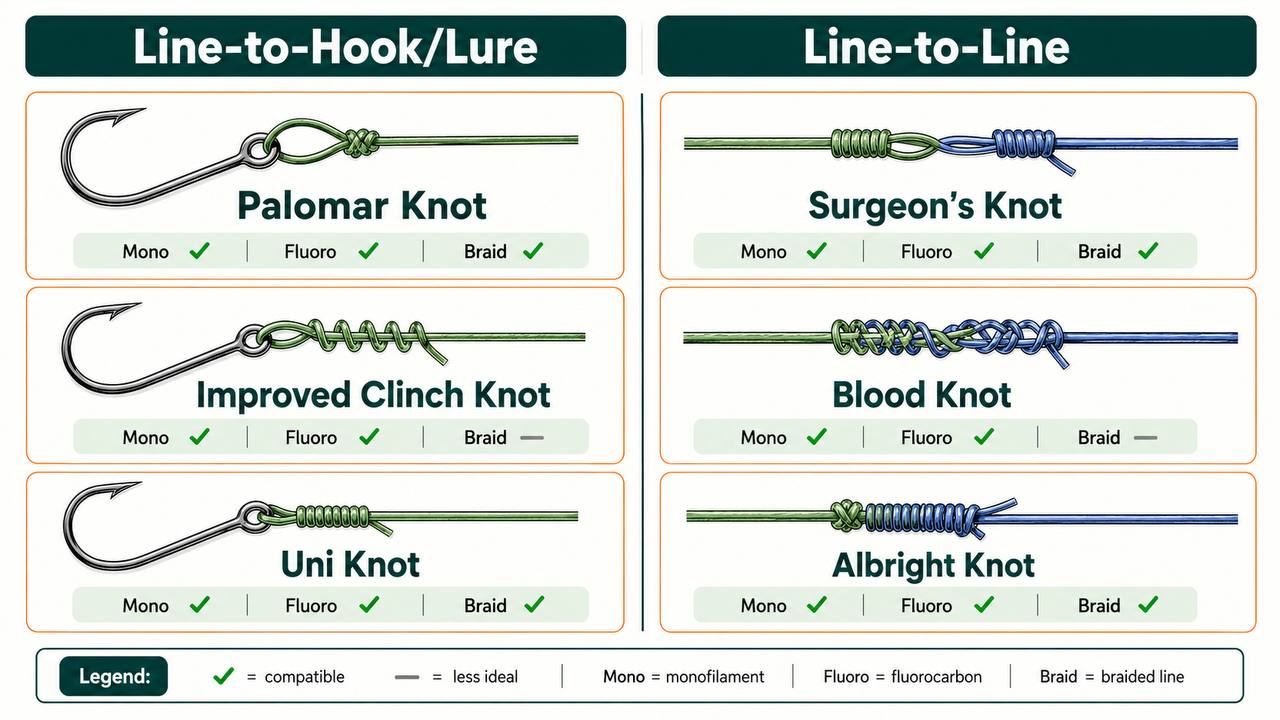
Your line type matters here. Monofilament, fluorocarbon, and braided line all behave differently with knots. Braid, for example, is slick and tends to slip in knots that work perfectly fine with mono. If you’re unsure which line type you’re using or how they compare, check out the line type guide.
There’s also a practical detail worth understanding upfront: every knot reduces the effective strength of your line. Even the best fishing knots retain somewhere between 80–95% of rated line strength — nothing retains 100%. Published strength percentages come from lab tests under ideal conditions, so in the field you should expect 5–10% less. A knot rated at 90% on the test chart might hold around 80–85% in real use.
How to Tie the Palomar Knot
The Palomar knot is the most widely recommended knot for beginners, and the reasons are straightforward. It works on every line type — monofilament, fluorocarbon, and braid — and it’s consistently the strongest all-around hook and lure knot. On mono and fluorocarbon, it retains approximately 90–95% of line strength. On braid, it can reach 95% or higher, making it the obvious choice when fishing with braided line.
The reason the Palomar performs so well comes down to mechanics: the line is doubled through the hook eye before the knot is tied, so the knot wraps around a double line instead of a single one. That doubled loop gives the knot maximum grip, which is why strength retention stays high across every type of line.
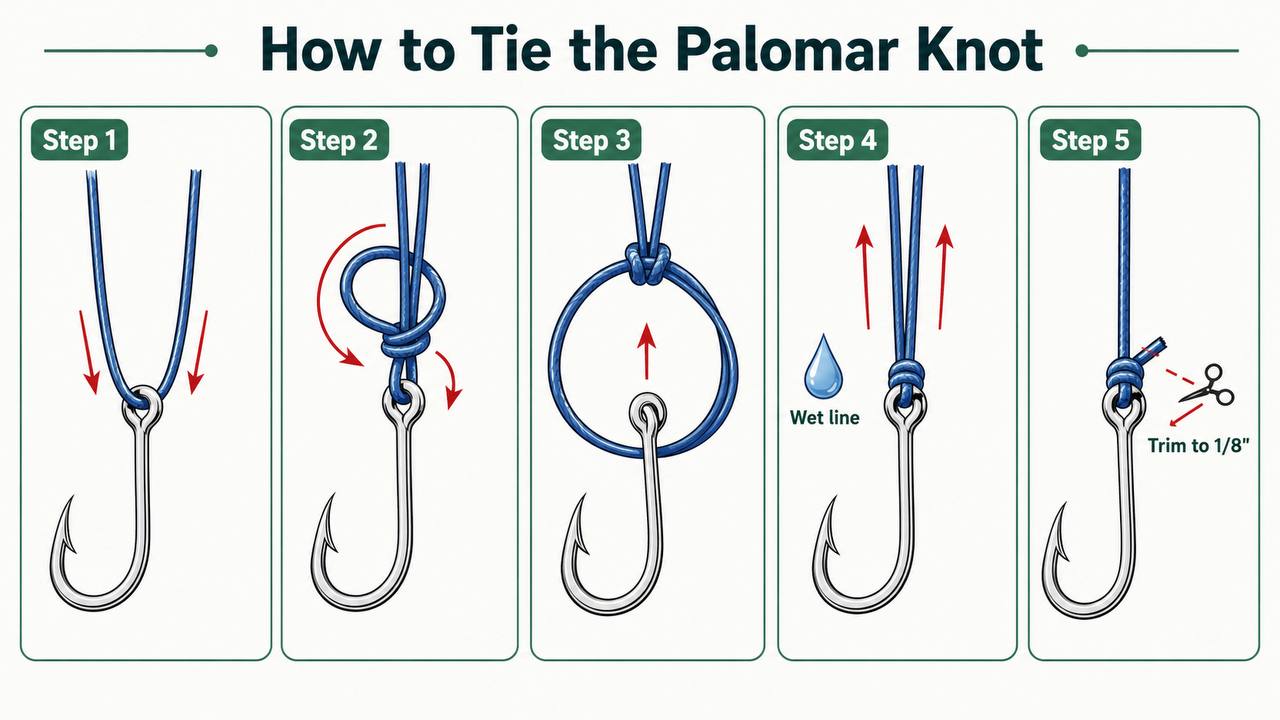
- Double the line and pass both strands through the eye of the hook or lure. Leave about 8–10 inches of tag end.
- Tie a simple overhand knot using both strands, leaving a large open loop. Make sure the line doesn’t cross and form an “X.”
- Pass the hook up through the open loop of the doubled line.
- Wet the knot with saliva or water, then pull the standing line to tighten. Both strands should slide together smoothly.
- Trim the tag end to 1/8–1/4 inch. Leave it slightly longer if using braid, since braid can slip.
The most common Palomar mistake happens in step one: crossing the two strands as they pass through the hook eye, creating an “X” instead of a clean parallel loop. Those crossed strands create a pinch point that increases abrasion and weakens the knot, especially with fluorocarbon.
How to Tie the Improved Clinch Knot
The Improved Clinch Knot is the knot most anglers reach for first. It’s easy to learn, works well with mono and fluorocarbon, and it handles hooks, swivels, and lures with equal ease. It retains 85–95% of line strength on mono and fluorocarbon, making it nearly comparable to the Palomar on those lines.
There is one important caveat: the Improved Clinch Knot is not recommended for braided line. On braid, strength drops to 70–80% due to the slick surface of braid fibers, which don’t hold the wraps as securely. If you’re fishing braid, switch to the Palomar — you’ll retain roughly 20% more strength.
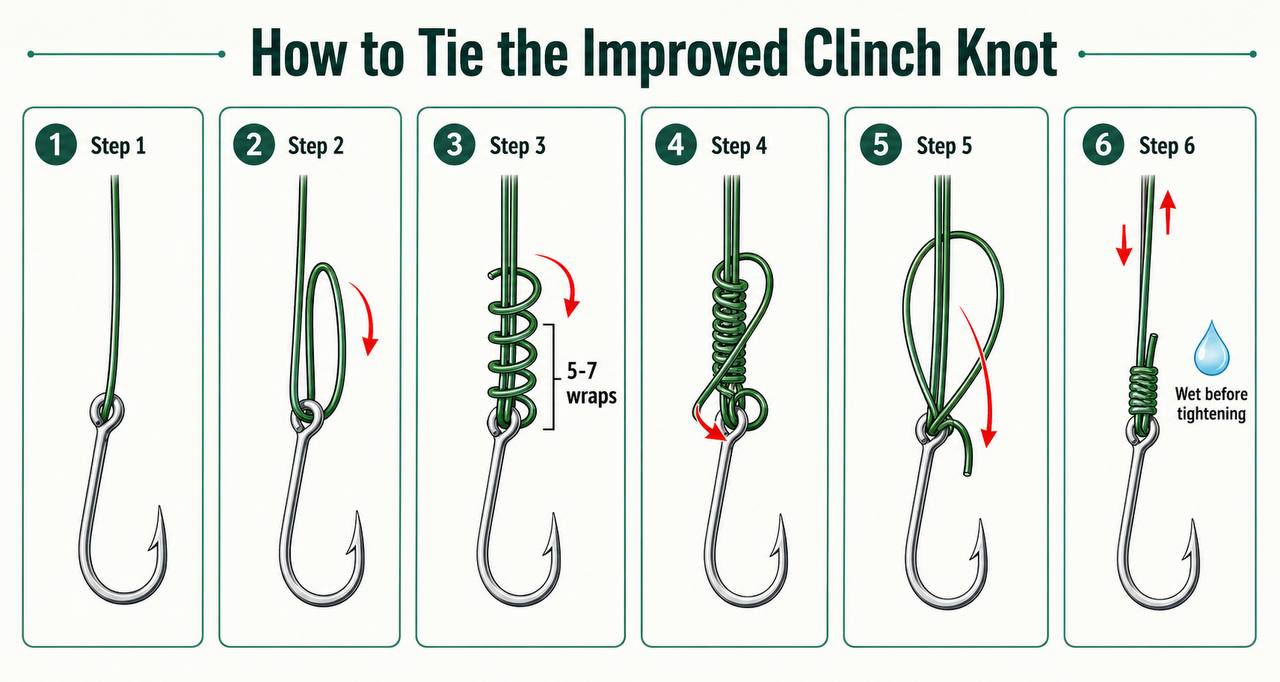
- Thread the line through the eye of the hook. Leave about 8–10 inches of tag end.
- Double the tag end back alongside the standing line.
- Wrap the tag end around the standing line 5–7 times. Thin lines may need a few more wraps to prevent slippage.
- Pass the tag end through the small loop near the hook eye (the loop created by the initial double-back).
- Pass the tag end through the larger loop formed at the hook.
- Wet the knot before pulling it tight. Draw it in slowly and steadily until it seats.
Like all knots, the Improved Clinch needs to be wet before tightening. Dry tightening generates friction heat that weakens mono and fluorocarbon significantly — and it’s the single most common reason beginners lose strength at the knot.
How to Tie the Uni Knot
The Uni Knot (also called the Grapevine Knot) is the most versatile knot on this list. It attaches hooks and lures just like the Palomar or Clinch, but it also works as a line-to-line connection when you tie it on each of two lines and slide them together — a configuration known as the Double Uni or uni-to-uni. The Double Uni is the standard method for connecting braided line to a fluorocarbon leader.
The Uni retains approximately 85–90% of line strength across all line types, which puts it slightly below the Palomar but still solidly within the strong range. It’s also a good alternative when hook eyes are too small to pass a doubled line through.
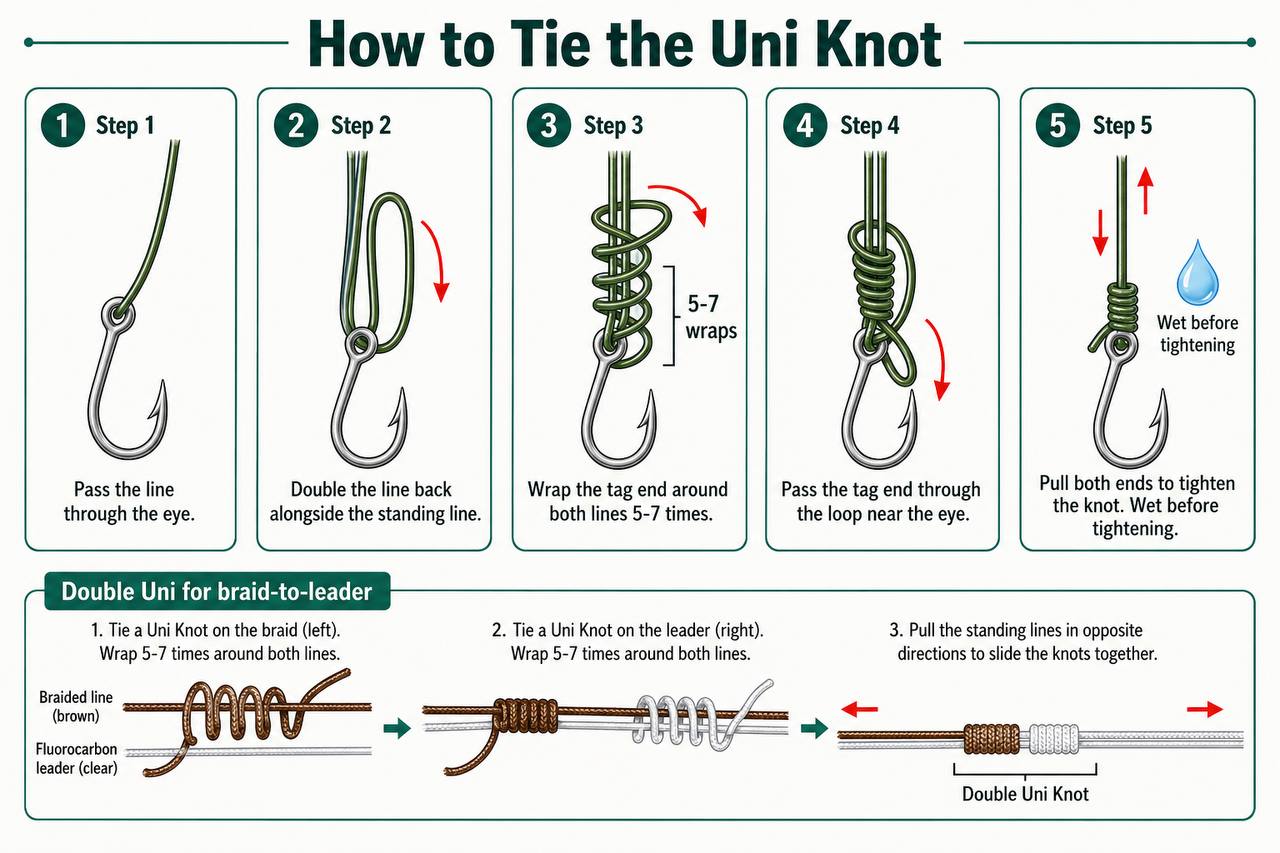
- Pass the line through the hook eye and double it back alongside the standing line.
- Wrap the tag end around both strands 5–7 times.
- Wet the wraps before tightening.
- Pass the tag end through the loop at the hook eye.
- Pull the standing line to tighten the knot evenly.
For line-to-line connections, tie a Uni Knot on each of the two lines, leaving a tag end loop. Moisten both knots, then pull the standing lines in opposite directions so the knots slide together. This is the Double Uni, and it’s the go-to method for joining braid to fluorocarbon leader.
Line-to-Line Knots: Surgeon’s, Blood, and Albright
Line-to-line knots solve a different problem than hook knots. You’ll need one when adding leader material to your setup, repairing a damaged section of line, or joining two spools of the same line. The three knots below cover every line-to-line scenario a beginner will encounter.
Surgeon’s Knot: The best general-purpose line-to-line connection. It works with both similar and different line diameters and retains approximately 85–90% of strength. On braid, use the triple-wrap version (three passes through the loop instead of two) because braid’s low friction means the standard version can unwind.
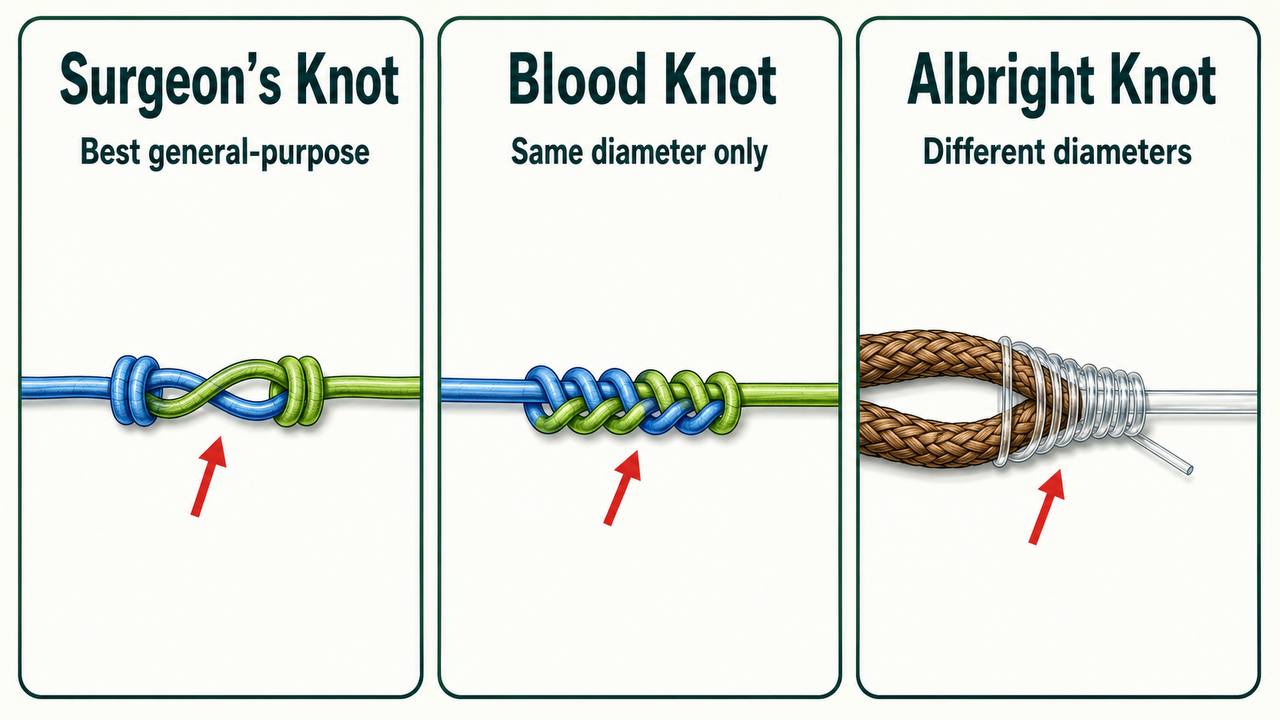
Blood Knot: The traditional method for joining two lines of similar diameter. It retains 80–90% of line strength and works best when the two lines are within two sizes of each other. It’s less practical with braided line.
Albright Knot: Designed for joining lines of very different diameters — for example, thick braided line to a thin fluorocarbon leader. It retains 75–90% of strength and is the knot to reach for when the lines you’re joining are noticeably different in thickness. If you’re stocking leader material for your setup, the starter tackle box guide covers what to buy.
To tie a Surgeon’s Knot (the most useful of the three), pass both line ends through each other, then tie a double overhand knot using both strands together. Wet it and pull evenly. For braid, make it a triple knot by passing the strands through a third time before tightening.
Common Mistakes That Weaken Your Knots
Knowing which knot to use is only half the equation. How you tie it matters just as much. The most common knot-tying mistakes typically cost 20–30% of a knot’s rated strength, turning a strong knot into a weak one.
The number-one mistake is not wetting the knot before tightening. Pulling a dry knot tight creates friction that generates heat, and that heat damages mono and fluorocarbon fibers. Saliva works fine, or keep a small water bottle in your tackle bag. Getting into this one habit alone makes the biggest difference in real-world knot performance.
Other common mistakes include:
- Not tightening enough — Under-tightened knots look tied but can slip under load, holding at only 50–70% of rated strength before fully seating. Pull steadily and firmly until the knot draws in tight.
- Uneven or crossed coils — Wraps that overlap or cross each other reduce both security and strength. Keep every wrap neat and parallel.
- Too few wraps for thin lines — The thinner the line, the more wraps you need. A 6-lb line may need 7–8 wraps instead of the standard 5.
- Crossing lines in a Palomar — Creating an “X” with the doubled line when passing through the hook eye increases abrasion risk, especially with fluorocarbon.
- Getting the tag end wrong — Trim to 1/8–1/4 inch after tightening. Leave it slightly longer with braid, since braid fibers can work loose over time.
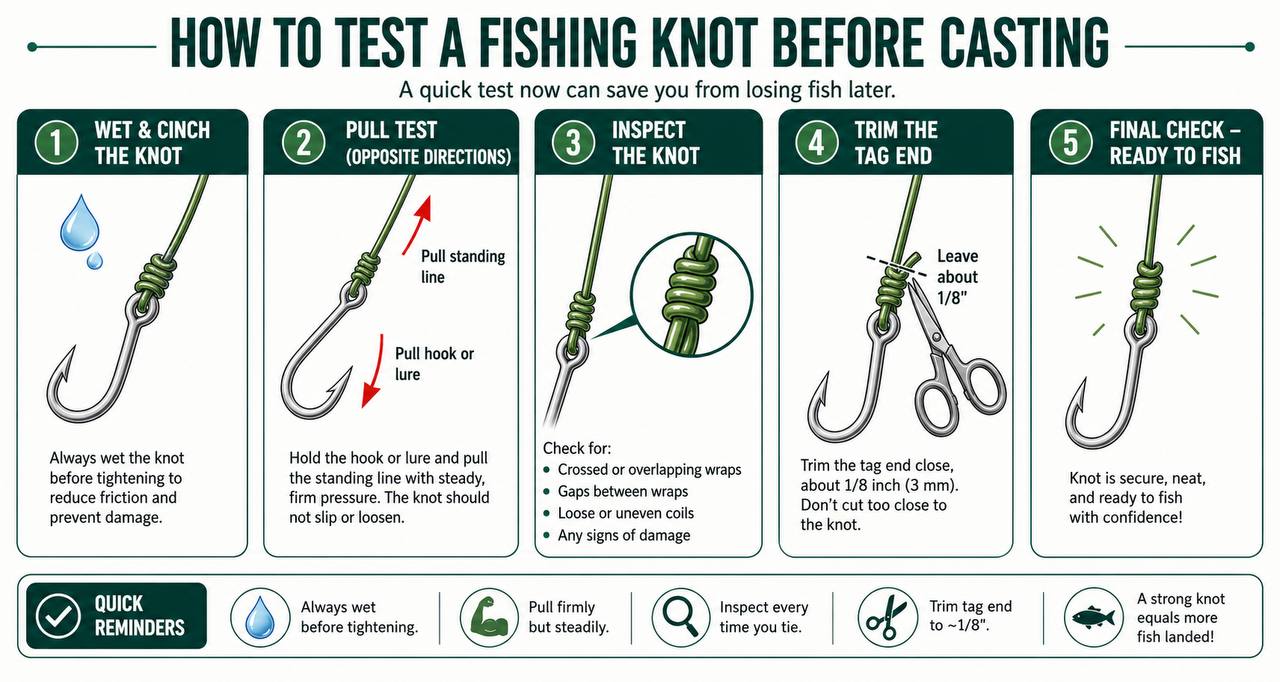
- Not testing the knot — Always give a firm tug after tying, harder than feels comfortable. It takes two seconds and prevents the most embarrassing moment on the water.
For general best practices on getting started with fishing, the beginner fishing guide covers additional fundamentals worth reviewing.
Most lines should hold at least 80% of their rated strength at the knot. If a knot consistently breaks well below that, it typically points to a technique problem rather than a problem with the knot itself.
How to Test Your Knots Before You Fish
The best way to build confidence in your knot-tying is to test your knots before you head to the water. You don’t need special equipment — just some spare line and something to anchor to.
Start with the firm pull test: after tying any knot, give it a steady, firm pull in the direction the line would be loaded while fighting a fish. Pull harder than feels comfortable. If the knot slips or loosens, retie it.
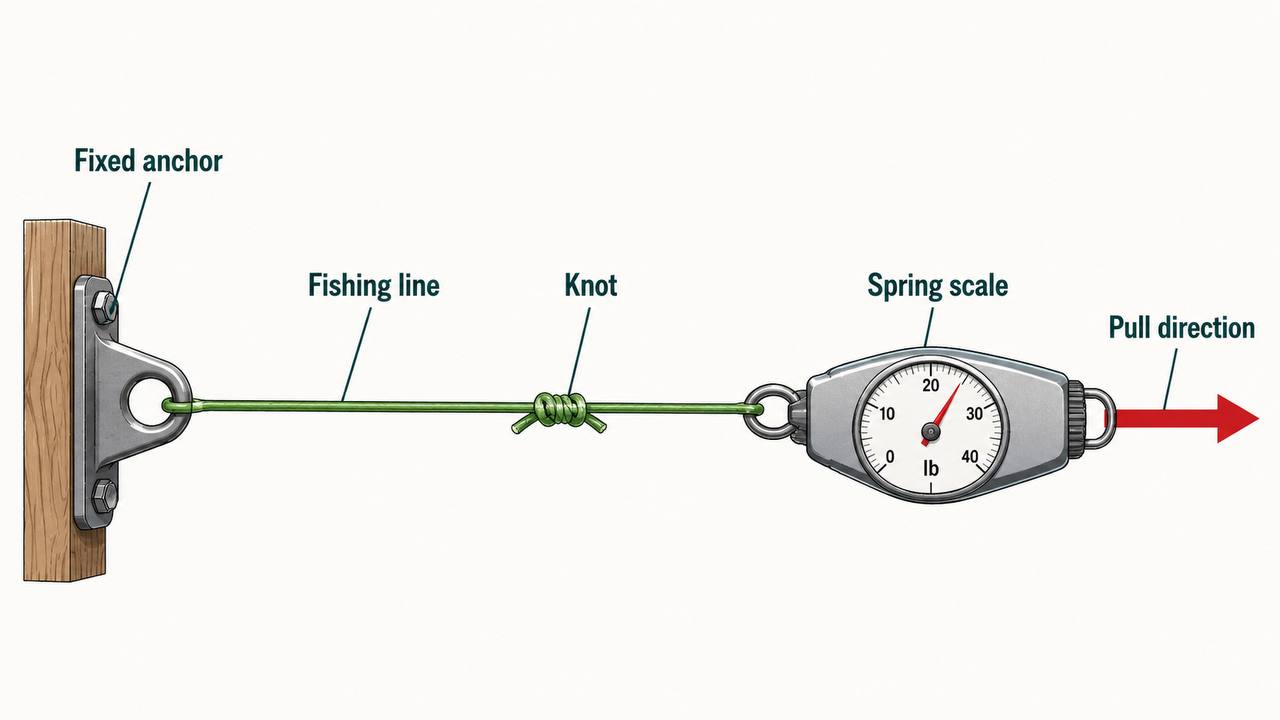
For a more thorough test at home, cut equal lengths of the same line, tie the knot in one length and leave the other bare, then attach both to a fixed anchor point. Pull each one until it breaks and compare the break points. Alternatively, attach the knotted line to a spring scale and pull gradually to see the exact break point.
Keep in mind that line-test labels on spools typically overstate actual line strength. A 10-lb test mono might actually break at a higher weight dry, so the percentages you see in knot strength charts are relative to labeled strength, not necessarily actual strength. The practical takeaway is that you can still use this test to compare one knot against another and see which performs better in your hands.
If you eventually want to explore more advanced knot options, the FG Knot is the gold standard for braid-to-leader connections, retaining 95–99% of strength. It’s complex to learn and not recommended for beginners, but it’s worth knowing about for when you’re ready to move on to more advanced rigs.
Conclusion
You don’t need to know every fishing knot to be a capable angler. Learn the Palomar for all-around hook attachment, the Improved Clinch for mono and fluorocarbon, and the Uni Knot for versatility. Add the Surgeon’s, Blood, and Albright for line-to-line work. Practice tying each one while looking at the diagrams in this guide, test them before you fish, and you’ll spend less time worrying about knots and more time actually fishing.