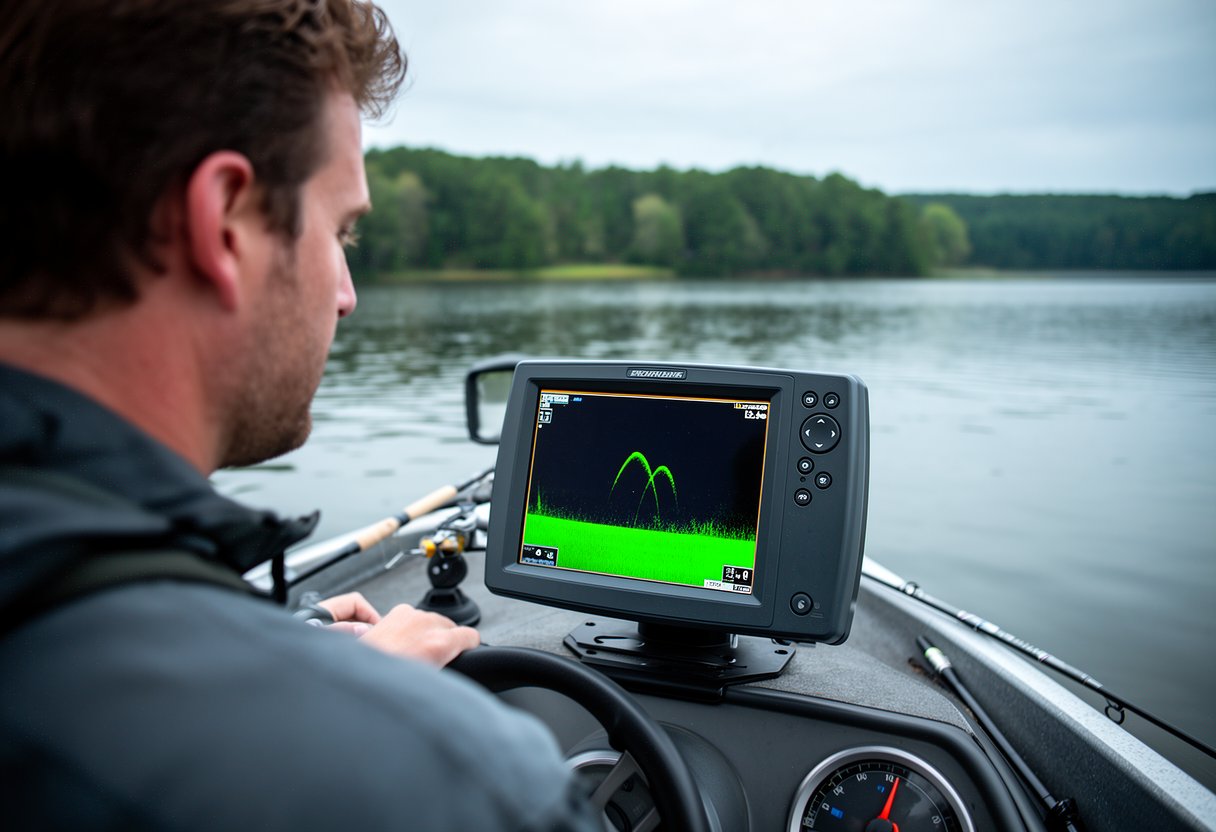
You flip on your fish finder and the screen looks like static crossed with a heart monitor. Squiggly lines, bright dots, random arches — nothing that tells you where the fish actually are. Half of beginner anglers just shut the thing off and pretend they don’t have one. The other half starts throwing lures at weeds, thinking every blip on the screen is dinner. This article breaks down every element on a standard 2D sonar screen so you can tell the difference between fish, structure, and noise.
What Is a Fish Finder and How Does Sonar Work?
A fish finder sends sound waves into the water through a transducer. That’s the box mounted below your boat’s hull — though some clip onto kayaks, stick to trolling motors, or even float in the water on their own. The transducer takes electrical signals, turns them into sound, pings downward, then listens for the echoes that bounce back.
It works the same way a flashlight works in the dark. The beam hits something and light bounces back. Here, sonar pings hit something underwater and sound bounces back instead. The transducer does all of this dozens of times per minute without you noticing.
The sound travels in a cone shape. A wider cone covers more area but gives less detail. A narrower cone gives sharper readings but misses things outside the beam. The unit measures how long it takes for the echo to come back, which tells it the distance. Rocks return strong signals. Mud comes back weak. Fish show up clearly because of their swim bladders — those gas-filled organs inside fish reflect sound a lot better than water does.
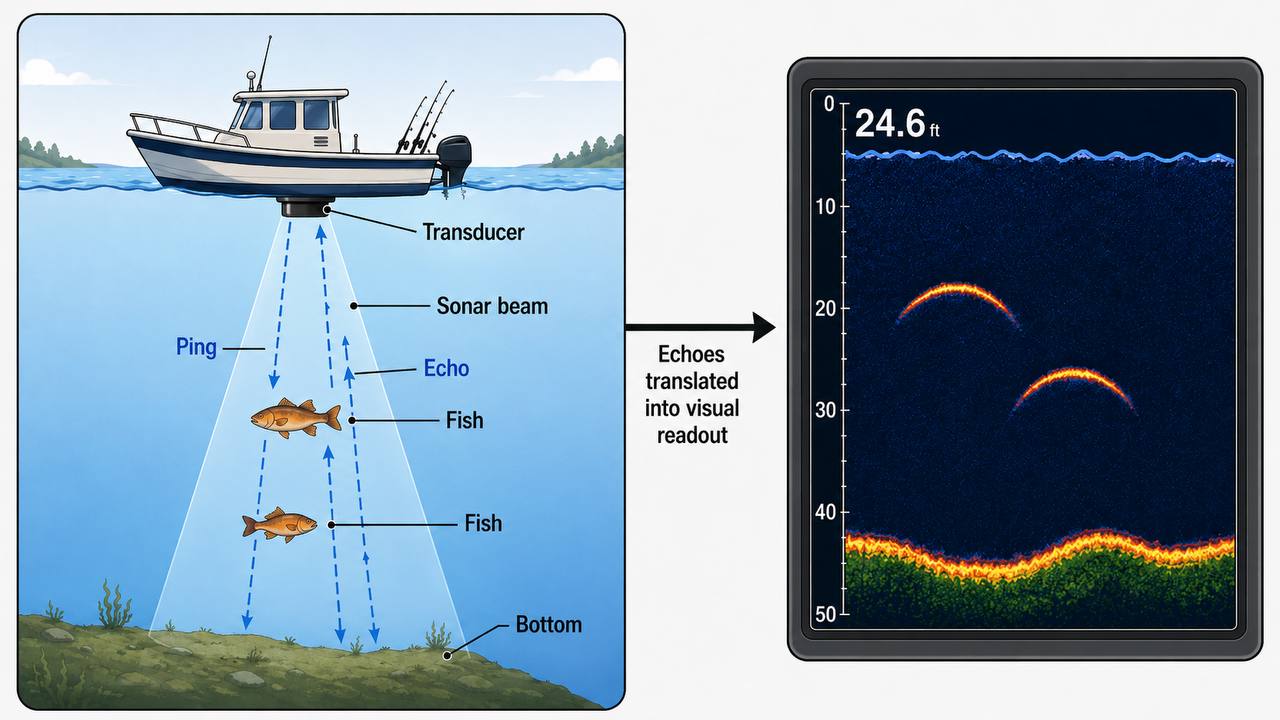
That basic cycle — ping, bounce, listen — is everything. Every line, arch, and dot on your screen came from a real object underwater. Once that clicks, the display stops looking like random noise.
For more foundational fishing knowledge, check out our beginner fishing 101 guide.
Reading the Fish Finder Screen: What Each Element Means
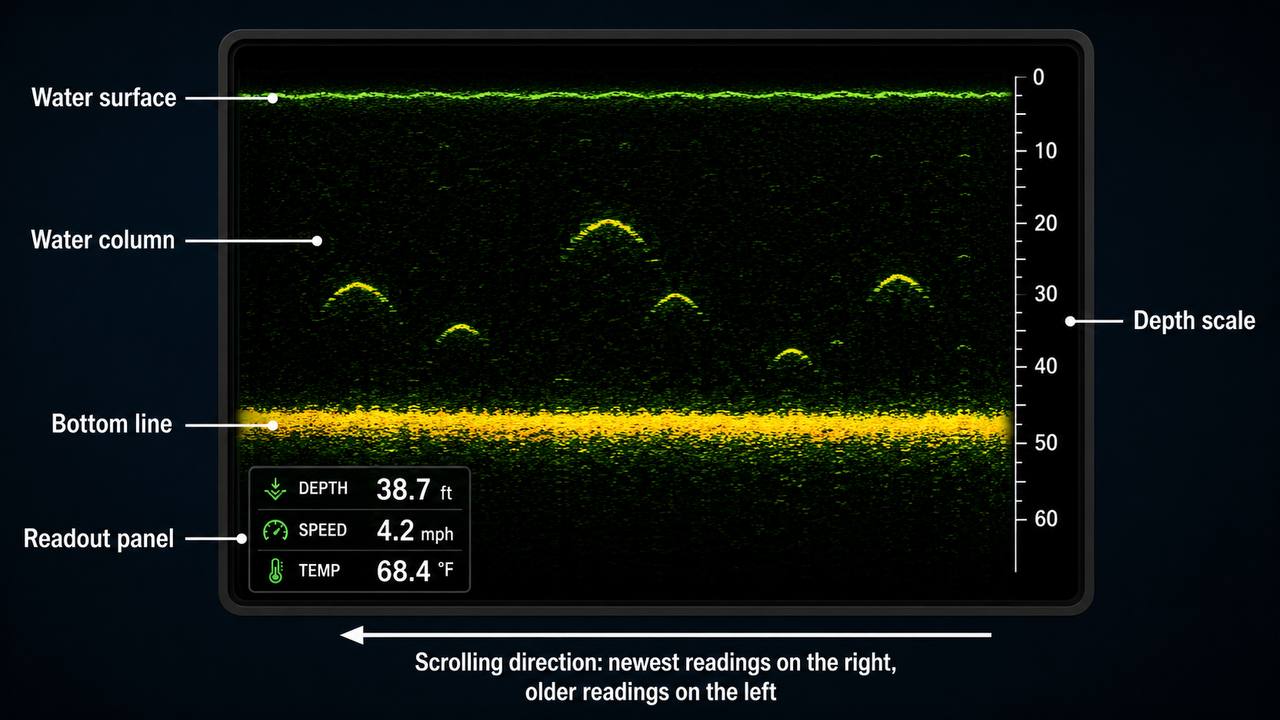
Fish finder screens follow the same layout no matter which brand you have. The top of the screen is the water surface. The bottom is the lake or river floor. A depth scale runs along the right side so you can see how deep everything is.
The display scrolls right to left. The right side is what’s happening right now. The left side is what you passed over earlier. Think of it like looking out the window of a moving car — things behind you are already in the rearview mirror, and things ahead are what you’re approaching next.
Usually there’s a readout panel in the bottom-left corner showing water depth, boat speed, and water temperature. Helpful info for orienting yourself, especially on unfamiliar water.
Pay attention to the bottom line itself. It tells you about what’s under the water without you even seeing a fish. Hard bottoms like rock or gravel show up as thick, bright, solid lines. Soft bottoms like mud or sand look thinner and fuzzier. Just from that one line, you can already get a sense of the underwater terrain.
Once you can spot the surface, the bottom line, and the depth numbers, the rest starts making sense. The screen becomes a vertical slice of whatever is underwater, recorded as you move across the water. Learning to read water from the surface helps, too — our guide to reading water for fishing covers how surface clues connect to what’s happening below.
How to Tell Fish from Structure on Sonar
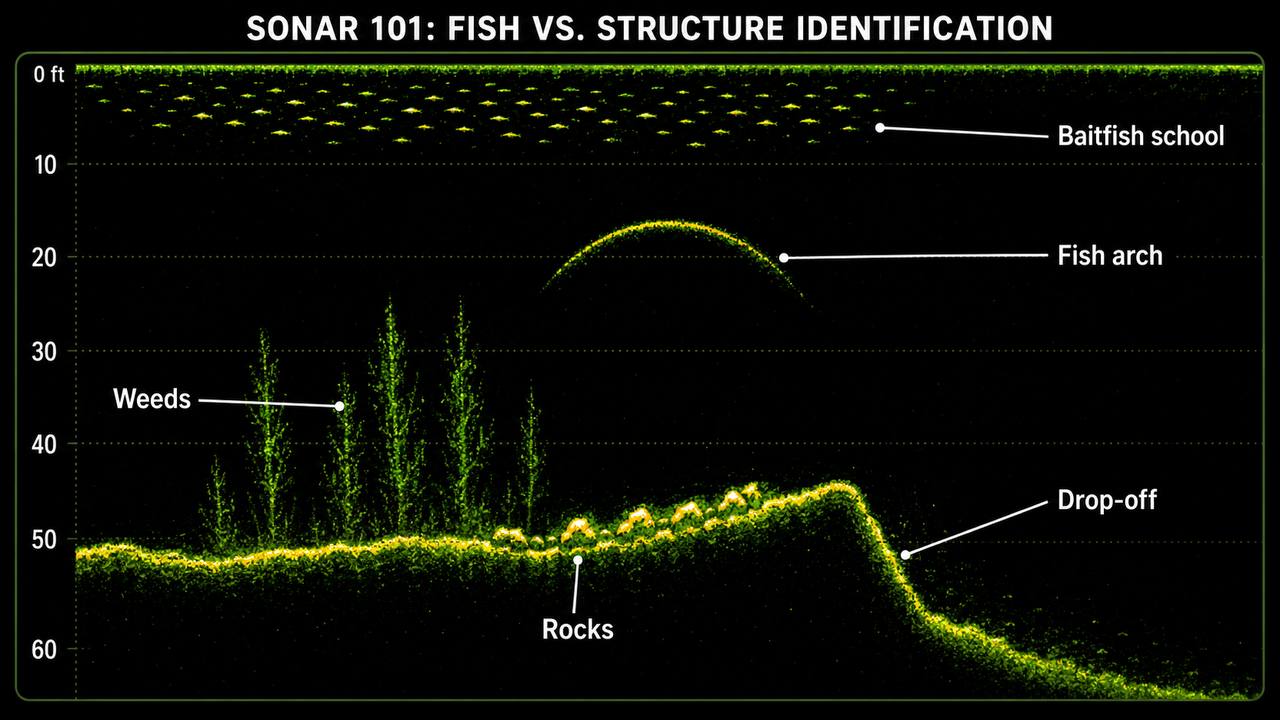
On traditional 2D sonar, fish show up as arches. This is the concept that matters most, and it’s also where most beginners get confused.
The arch shape comes from the cone-shaped sonar beam. As you drive past a fish, it passes through the edge of the beam, then the center, then the other edge. Each position gives a slightly different signal, and the unit draws those signals as a curved arc.
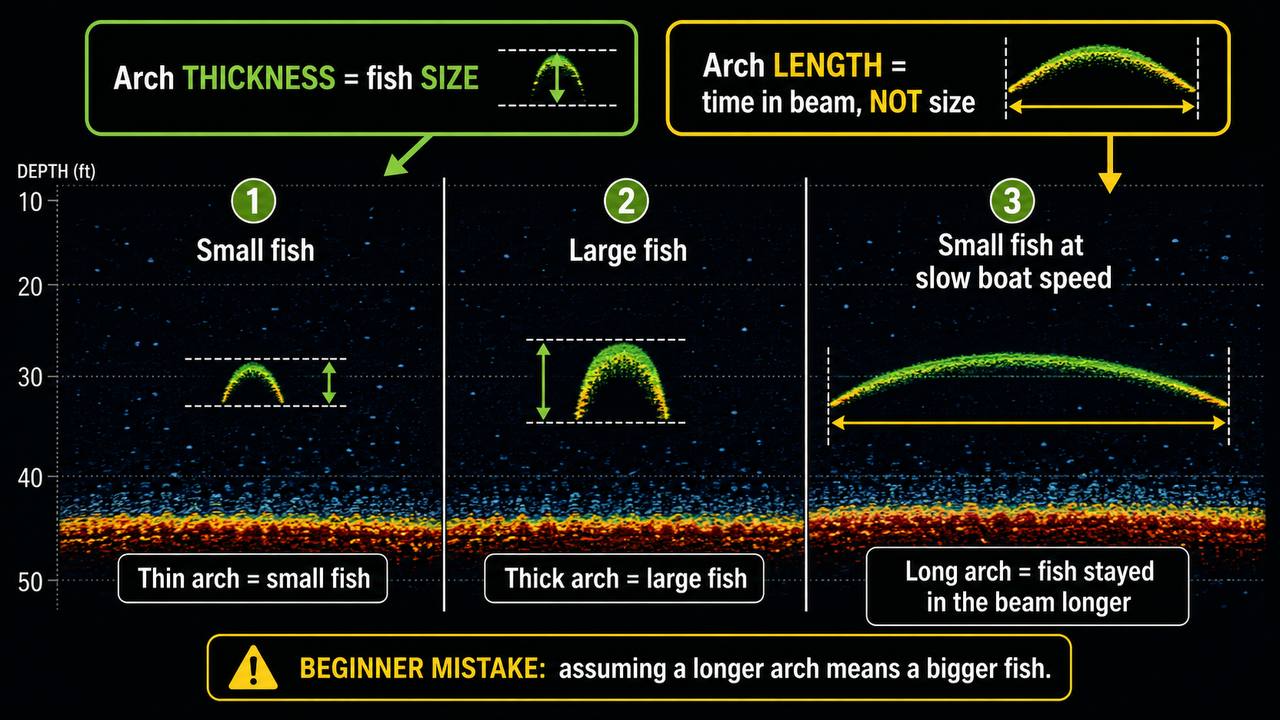
Important distinction: arch thickness tells you about fish size. Arch length tells you how long the fish stayed in the beam. A thick arch means a bigger fish. A long arch just means your boat was going slow. Don’t confuse the two.
Arches are thickest right in the center — that’s where the fish passed closest to the middle of the beam — and they thin out toward the edges. Schools of fish look like multiple arches stacked on top of each other, or dense clusters in a small area. Baitfish — small forage fish that predators eat — show up as thin, short arches, usually bunched together near the surface or hanging in the middle of the water column.
Weeds look completely different. They show up as fuzzy vertical patterns sticking up from the bottom line. Less defined than fish arches, more spread out and chaotic. Rocks give the strongest returns of all — bright, thick lines that can look like fat arches. The giveaway is intensity and position: rocks sit on or near the bottom and their signal is noticeably brighter than anything else.
Submerged logs and stumps appear as irregular shapes, often horizontal, with strong returns similar to rocks. Drop-offs show up as sudden angles in the bottom line — sharp transitions from shallow to deep. Fish tend to hang out near those edges.
The real targets are where fish arches line up with structure. If you see arches hovering near a weed line, or sitting above a rocky bottom, that structure is holding fish. Look for those combinations instead of chasing one arch after another across the screen.
Essential Fish Finder Settings for Beginners
The settings on your fish finder control what you actually see on the screen. Getting these right matters just as much as learning to read the display. Names vary by brand, but the concepts are universal.
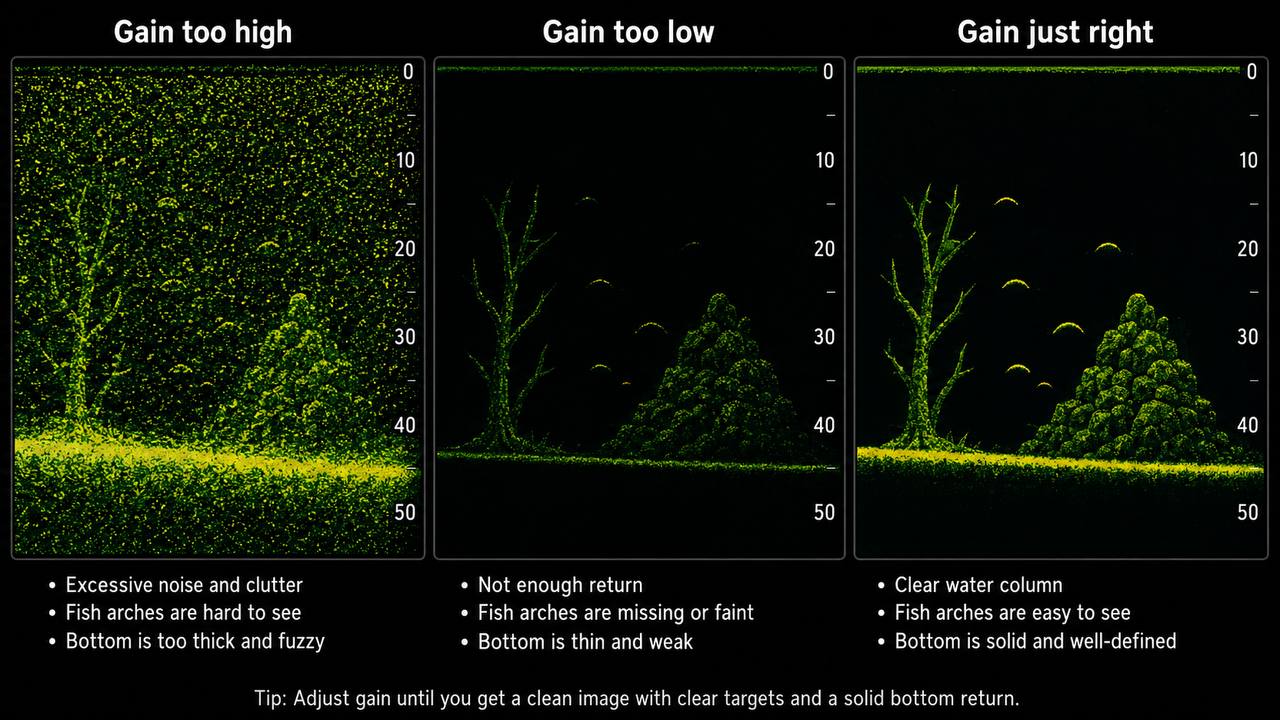
Gain (sometimes called sensitivity) is the most important one to understand. Crank it too high and the screen fills with static and false targets. Dial it too low and you’ll miss small fish and subtle structure entirely. Here’s the trick: start with gain at maximum, then turn it down gradually until the screen looks clean but the targets are still there.
Depth range controls the vertical scale. Set it to at least twice the actual water depth. Fishing in 20 feet? Set your range to 40 feet or more. That extra space above the bottom lets you see fish hanging in the water column, track depth changes, and spot bait schools near the surface.
Frequency affects how deep the sonar reaches and how much detail it picks up. Lower frequencies (50–83 kHz) penetrate deeper but with less clarity. Higher frequencies (200 kHz and up) give more detail but don’t reach as far. Most beginner units use a single all-purpose frequency, and some dual-frequency models let you switch between the two.
Ping speed determines how often the transducer sends out a ping. Faster ping rates mean more frequent screen updates — helpful when you’re cruising at speed. Slower ping rates reduce clutter when you’re sitting still.
Clutter mode filters out surface noise and interference. It can clean up a noisy display but also removes weak, real targets like small baitfish. Use it sparingly. Target separation helps the unit distinguish between two objects sitting close together — like baitfish just above a bass near the bottom. Higher settings improve clarity in these stacked situations.
Cone angle is the width of the sonar beam itself. Wider covers more area but with less precision. Narrower gives detail but a smaller footprint. Most beginner units lock this setting, so you probably won’t need to touch it.
Start with the factory defaults. Adjust one setting at a time — gain first, then depth range, then whatever else you need to tweak. Changing multiple things at once makes it impossible to tell which adjustment actually helped.
Common Beginner Mistakes (and How to Avoid Them)
A long arch doesn’t mean a big fish. That’s the most common mistake, hands down. Length equals time in the beam. A small fish drifting slowly produces a long, thin arch. A large fish moving fast produces a short, thick one. Thickness is what tells you about size.
Fish ID mode sounds convenient but it’s more trouble than it’s worth. It replaces the raw sonar arches with little fish icons. The problem is those icons are wrong a lot — the system regularly mistakes weeds and rocks for fish. Reading actual sonar arches gives you more information than a cartoon fish symbol ever will.
Leaving gain too low is sneaky because you won’t realize what you’re missing. Small fish, bait schools, faint structure — all gone from the screen. If your display looks completely empty in the water column, your gain is probably set too low.
Setting depth range too narrow cuts off everything above the bottom. Fish often hold several feet off the bottom, and baitfish school near the surface. Without vertical headroom, you only see what’s on the lake floor. Leave room above the bottom line.
Chasing individual arches gets you nowhere. Look for patterns instead. “Arches clustering two feet off the bottom on this breakline.” “Baitfish schools near the surface above a drop-off.” Patterns tell you where fish are holding consistently. Single arches just tell you one fish happened to be in the beam.
Not adjusting your settings for different conditions costs time. Clear water reads differently than murky water. Shallow coves need different depth ranges than deep channels. Switching from a clear lake to a stained river? Retune your settings. Water clarity and fish depth also shift through the seasons — our seasonal fishing guide covers how fish behavior changes throughout the year.
Over-relying on down imaging is worth mentioning if your unit has it. Down imaging gives great detail in shallow water, but traditional 2D sonar works better in depth and is more forgiving to learn. Get comfortable with 2D first.
Types of Sonar: What’s the Difference?
Not all fish finders use the same sonar. Knowing the differences helps you understand what your unit can do — and whether an upgrade makes sense later on.
Traditional 2D sonar is what most beginner units use, and that’s fine. It sends sound waves at one frequency and displays a scrolling chart with depth on the right and time moving left. Works well as a general-purpose tool, especially in deeper water. It’s the foundation every angler should learn.
CHIRP sonar (Compressed High-Intensity Radar Pulse) sends a range of frequencies at once instead of just one. More frequencies mean more data from each ping, which translates to better target separation and cleaner readings at different boat speeds. Think of it as traditional 2D sonar with better optics.
Down imaging looks straight down under the boat using a narrow, pencil-thin beam. It captures picture-like detail of the bottom and whatever’s sitting on it. Great for distinguishing between brush piles, rock piles, and bare bottom. Works best in shallow to moderate depths and loses effectiveness in very deep water.
Side scanning sends beams to both sides of the boat instead of straight down. It maps fish and structure out to a certain distance, giving you a wider underwater view. Good for pre-fishing a lake and finding new spots before you drop anchor. Shows things that neither down imaging nor 2D sonar can see from directly overhead.
You don’t need fancy sonar to catch fish. 2D sonar is the foundation. Learning to read it well matters more than having the most expensive unit on the dock. Advanced sonar adds detail and versatility, sure — but it all runs on the same principles: sound waves, echoes, and learning to interpret what you see.
Quick Tips for Better Sonar Reading
Check your settings before each trip. Water clarity, depth, and temperature change from day to day. Settings that worked last Saturday might not work today. Take two minutes when you launch to verify your gain, depth range, and clutter mode.
Practice on structure you already know. Spotted a weed line from shore? Run the boat over it slowly and watch what the screen shows. Matching what you see on the display to what you know is underwater builds your skills faster than guessing.
Boat speed changes how arches look. Going slow means fish spend more time in the beam, which produces longer arches. Going faster produces shorter ones. The fish is the same size either way. Just something to keep in mind when your arches look different from last time.
Look for patterns. Clusters of arches. Repeated formations near the same type of structure. Baitfish schools hanging above bigger arches. All of it tells a story. Where are the arches grouping? What depth? What structure is nearby? Those questions matter more than whether one particular arch looks like a keeper.
Fish hold near structure longer than they do in open water. Use your sonar to find weed lines, drop-offs, rock beds, submerged timber, then fish those spots. Structure concentrates bait, and bait concentrates predators. It’s that simple.
Start with the defaults, adjust one thing at a time, observe what changed, then repeat. Reading sonar takes practice, even for experienced anglers. You will mistake weeds for fish and noise for bait on your first few trips. That’s completely normal. The patterns get clearer with each outing, and the screen stops looking like static. Pretty soon you’ll know exactly what to look for — and where to cast.